Walker bulldog my first build

Up to the end of WWII.
Post Reply
Marty
Recruit
Posts: 16
Joined: Sun Jan 03, 2016 12:24 pm

Walker bulldog my first build

Post by Marty »

Ok so I've started and this for another forum group build so I'll keep this updated at the same time, any suggestions just jump in, I'll be listening carefully.

Now reading up on the bulldog, there were various incantions of the tank with lots of different color schemes, of which i still hav'nt decided on, but plenty of scope for something different.Onwards, i started with sanding and general tiding up of the turret, lots of edges and flashy bits but nothing major.Now on the sprus are the grab handels and bits and bobs which you would find on a tank, plastic. So i decided to replace the handles with metal ones.Image
Yes they are supposed to be bent out of shape, hopefully like the real thing.I then started to add some weld seams around the various cubbins on the turret, using green stuff i rolled it out into a thin worm and then pushed around the join i wanted to "weld".
Image
Then using a cocktail stick made the impression of the weld .Image
Hopefully it will look effective when painted and weathered.Rest of the turret
Image
Image
Barrel.
Image
I also detailled the jerry cans for the sides.
Image
TIP FOR THE DAY:If your using green stuff, keep it wet it is easier to work with and stops it hardening to quick i just drop what im not using into some water. also wet the tool your using to apply so it wont stick to the tool.
Well i've made a start.
see you next time.
Martin.
Marty
Recruit
Posts: 16
Joined: Sun Jan 03, 2016 12:24 pm

Re: Walker bulldog my first build

Post by Marty »

Update: 2 ok big update here as i did'nt get a chance through the week, ive been working on the bits and bobs that can be painted of the Tank.First thing i tackled was the big toothed sprocket for the turret, this has a bit where there is no teeth, to stop the turret going 360, but it makes a nasty noise when it gets to this point so i filed in 2 extra teeth, just have to be careful not to twist it too much and snap the cable.
Image
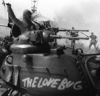
Next the machine gun 50 cal. clean up and drill out the holes down the side and the barrel.Image
Image
Also attached the ammo box in the right position as the instructions would have you place it way back on the gun nowhere near the part the bullets would enter the gun.
Added a handle to the side, some wire and the end of a cocktail stick. (Cheers Ian).Image
Image
Then i turned my attention to the exhaust covers which get the bulk of the heavy weathering.
Because of the heat the paint flakes of really quickly and rust and the such set in, but the plastic is way thick here so out came the dremel,
Image
Image
Did some damage to the sides aswell just for fun, i dont get to use this to often as its a bit harsh for the small scales i do.
Image
Image
Slapped on some vallejeo texture paint and sanded it back just to give me some texture.The car exhaust was a addon to the tank in real life not sure what its for but i used some old PE to cover the joins and left one sticking up.
Image
Primed up.
Image
While that was drying i painted the fuel cans for the sides and the actual exhaust pipes, first primer then some dark rust and a coat of gloss, ill be using the hair spary technic on this so on with some aquired hairsray and finally some us dark green.
Image
The fuel cans had a lighter green as the primer as these i believe were aluminium so no rust.Then straight on to the rusting.
Image
pealing paint
Image
Image
Now i think everyone has there way of doing rust and the hard part is not too take it to far, with this scale i think it is easier to not go too far as the details are big anyway.Using various browns, reds and washes i got it to a place i was happy with.
Image
One done and just too compare.
Image
Some black pigment to the exhaust and back on too the tank for a quick check.Image
Colors seem really bright in the pics but they should dull back with a coat of matt varnish.So back too the machine gun. After primer i sprayed it with some dark iron buffable.
then guess what, i buffed it, i love this effect easy and is much better than dry brushing, quick once over with the lead pencil to really bring out the detail and were done.Image
Image
Image
Thats all folks, sorry for the long post but hey its better than a long stand!
martin.
ALPHA
Major-General
Posts: 10960
Joined: Thu Oct 03, 2013 1:06 am

Re: Walker bulldog my first build

Post by ALPHA »

Those Exhausts look .................Exhausted :thumbup: .....Nice Job so far....will keep watching for more :D


ALPHA
User avatar
HERMAN BIX
Major-General
Posts: 11280
Joined: Sun Jan 12, 2014 12:15 am
Location: Gold Coast,Australia

Re: Walker bulldog my first build

Post by HERMAN BIX »

Great effect on the '50 mate.
Can you please post a pic of the paint you used
HL JAGDPANTHER,HL TIGER 1,HL PzIII MUNITIONSCHLEPPER, HL KT OCTOPUS,HL PANTHER ZU-FUSS,HL STuG III,HL T34/85 BEDSPRING,
HL PZIV MALTA,MATORRO JAGDTIGER,HL F05 TIGER,TAMIYA KT,HL PANTHERDOZER,HL EARLY PANTHER G,TAIGEN/RAMINATOR T34/76,
HL AN-BRI-RAM SU-85
User avatar
palepainter
Sergeant
Posts: 564
Joined: Sun Nov 03, 2013 4:04 am
Location: Lafayette, CO

Re: Walker bulldog my first build

Post by palepainter »

The rust effect on the exhausts look great.
Marty
Recruit
Posts: 16
Joined: Sun Jan 03, 2016 12:24 pm

Re: Walker bulldog my first build

Post by Marty »

update 3:

love sundays, bench time and all quiet.

Started with the drivers periscopes on the left are how they come out of the box, on the real version they sit nearly parellel with the drivers hatch infact tilted foreward, this requires some modification.

Image

All glued and sanded, fiddley but a vast improvement.

Image

The led lamp on the front Protrudes alot from the light housing, i think alot of RC tankers (yes im a tanker now, steady on), take these out and just fill it. I've decided i like the bright light for those night time excursions when im hunting wabbit. So i sanded the lamp flat, apparently as long as you dont go to far down and hit the actual diodes your good.

Image

Polished it up with a sponge and then tested it all good and it seems alot brighter, bonus.

Still working on the front of the tank i cleaned up and installed the light gaurd's and other gubbins at the front, this all needs the welds palced around it so ill see how i go today.

Image

the other lights need some grystal clear in and some silver for the reflection.

Added some cable at the back of the lights for power cables.

At the back of the tank i have 2 red led's but these also stick out of the housing so "off with there heads".

Image

You can see how much you can take off here.

Image
Image

Thats better.

A nerf antenna, so you dont have to have a piece of wire sticking up on the tank, im actually going to put the antenna back on put im going to cut it down and use it as a scale aerial.

Image

Thanks Ian.

Someday me and Ian will have to get together we live about 10 miles from each other im sure he has a cave of epic proportions, and maybe some swapping.

Then some painting as i feel nothing has been achived in the day without some paint been splashed on something, usually me.

Pre shaded the barrel and give it some US dark green. Now i hav'nt decided how far im going to take the weathering yet but post and pre shading is a must as the thing will look like a brick otherwise.

Image

Welds have came up really well.

Image

TA TA for now hope your enjoying the build.

Martin (tanker).
Marty
Recruit
Posts: 16
Joined: Sun Jan 03, 2016 12:24 pm

Re: Walker bulldog my first build

Post by Marty »

HERMAN BIX wrote:Great effect on the '50 mate.
Can you please post a pic of the paint you used
How you doing herman, what i use is this,
Image

you can brush it on or spray it, careful when you spray it is strong stuff. It will go on very matt and when it dries, takes about 2mins you can then buff the hell out of it untill if you want you get a mirror finish.
advice use a nice smooth primer the effect is excellent.

martin.
Marty
Recruit
Posts: 16
Joined: Sun Jan 03, 2016 12:24 pm

Re: Walker bulldog my first build

Post by Marty »

Update 4:
Working on the tank over the last couple of days, so i have finished the clean up of the upper hull and turret. with some filler here and there and also taking some of the moulded suff the back of the turret.First up the mouldings, some pretty naff moulding of a spade and i think a stand of some sort, did'nt take a pic of this as it got attacked with the dremel.Image
a small patch as the moulding was hollow inside but best thing about armor you can stick a patch over it and its battle damage.Filler on the side just to smooth things out.
Image
Now i wanted to try and give the turret some texture using Ian Prices method of using the not so sticky vallejeo primer, so on with some grey stuff and was hoping to just rub it away where i wanted some old paint under some new.
Now i must be the only person who got some good stuff as after 10 mins i had to really go to town to get it to come off and even resorted too using some very strong masking tape to lift the primer.Image
I'll try to inhance the effect later on through oils and some wash.
The lower hull got primed as well, and the wheels. I made myself a card board mask as my circle thingy did'nt go up to the right size so i have a circle cutter and made one.Image
Horrible brown color now a nice greeny color.
Image
Image
Then i preshaded the turret and slapped some green on that. Good thing about this scale you will get plenty of spray booth time.
Image
Some texture there.
Image
Now if i wanted a smooth surface you could pretty much guarantee it wouldnt look like this.Image
Then on to some postshading for all the nucks and crannies. Just added some olive green to the origonal color and went over the shadows.
Image
Then some panel lighting for the faded paint, the picture dos'nt show it very well but after some varnish hopefully it well come back a little more.
For the more warn parts im going to be using some liquid mask and then over spray a slightly darker golor which should give me the lighter scratches and marks.
Started on the kits tools clean up and primed, lots of seams and things on these so lots of prep.Image
Last job for today was to fill the headlights with some crystal klear and hang it upside down to get the glue to set with a bulge. Hopefully it works.
Image
cheers lads.
martin.
jtracks
Warrant Officer 2nd Class
Posts: 1209
Joined: Wed Sep 17, 2014 4:00 pm
Location: Roseville, CA.

Re: Walker bulldog my first build

Post by jtracks »

I don't have a Viet Nam era tank as of yet and I'm a Viet Nam vet. I'll use your build as an excellent reference when I pick one up.
Joe
Post Reply

Return to “Other”