M1A1HA, 9/18/23 update. Delay of Game, two week penalty!
Re: HL M1A1 HA, New info MAJOR change to Belly Armor 4/08
Barry you are welcome...But the the credit needs to go to you. I'm getting ideas from you like nobody's business...Mine will use alot of your techniques for the stiffening of the lower hull. Keep going!

Re: HL M1A1 HA, New info MAJOR change to Belly Armor 4/08
Cody,CODY614 wrote:Barry you are welcome...But the the credit needs to go to you. I'm getting ideas from you like nobody's business...Mine will use alot of your techniques for the stiffening of the lower hull. Keep going!
Looking at the photos you posted; on the Tamiya kit does the armor span the full width of the main hull; it looks like it does. As you can see in the shots I posted of the RFM kit their rendering does not except where it attaches at the front. I have tried to determine from your prototype photo looking underneath and forward but I can not tell if it does or not.
I have my framing structured to allow for a finish piece to run the length front to back that will bring it flush with the hull sides but not sure now; any thoughts?
Thanks,
Barry
"Details make perfection, and perfection is not a detail."
Leonardo Da Vinci
Leonardo Da Vinci
Re: HL M1A1 HA, New info MAJOR change to Belly Armor 4/08
Barry...
I think this will help?
1/35th scale...
I think this will help?
1/35th scale...


Re: HL M1A1 HA, New info MAJOR change to Belly Armor 4/08
Finally something that is starting to look like the Belly Armor. Had a little trouble in I forgot my geometry when laying out and cutting the two forward pieces. The cuts needed to follow the "red" line not the "black" as noted on the photo.
Here are couple of shots showing the progress today.


The plan is to get the right side trimmed in tomorrow.
Thanks for looking,
Barry
Here are couple of shots showing the progress today.
The plan is to get the right side trimmed in tomorrow.
Thanks for looking,
Barry
Last edited by BarryC on Sun Jul 16, 2017 2:06 pm, edited 1 time in total.
"Details make perfection, and perfection is not a detail."
Leonardo Da Vinci
Leonardo Da Vinci
Re: HL M1A1 HA, New info MAJOR change to Belly Armor 4/08
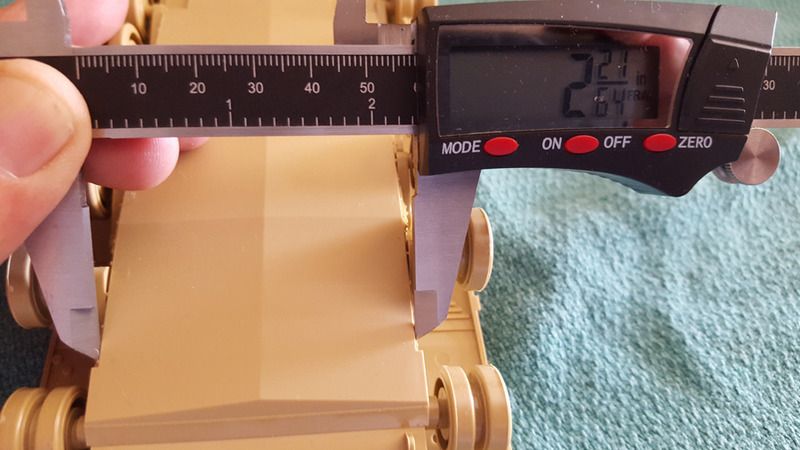
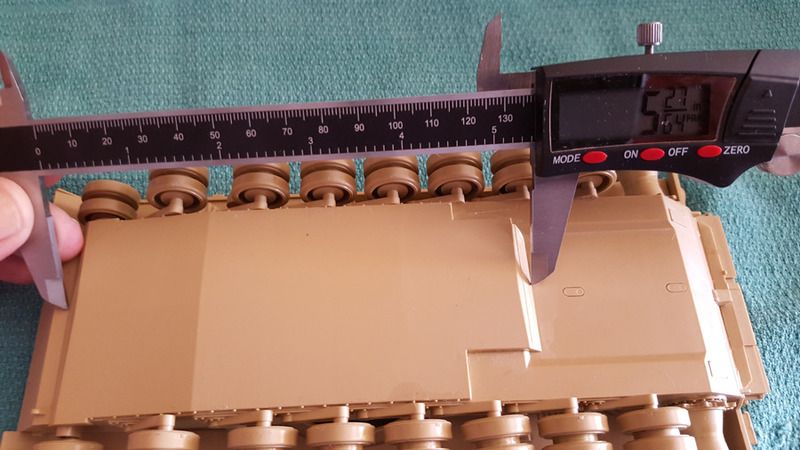
Belly Armor, update 4-10-16
As planned….for a change, I did get the main section of the Belly Armor trimmer and shaped. I also drilled the new mount screw locations through the lead weight stack-up and the false floor. With the addition of the lock washer the .5” screw length worked out great without having to shorten the length.
I began work on the forward sloped piece getting as far as the center and outboard sloped pieces and the forward end cap. Next comes the interior longitudinal and lateral/horizontal blocking. I plan at least two additional longitudinal pieces per side, either side of center and an upper and lower lateral/horizontal pieces then the decking. There will be two mounting screws through the lower lateral/horizontal one either side.

I cut the forward pieces of the main decking short by .020” to allow for the decking on the forward piece to overlap onto the main section at the forward most “rafter”.

TAFN,
Barry
As planned….for a change, I did get the main section of the Belly Armor trimmer and shaped. I also drilled the new mount screw locations through the lead weight stack-up and the false floor. With the addition of the lock washer the .5” screw length worked out great without having to shorten the length.
I began work on the forward sloped piece getting as far as the center and outboard sloped pieces and the forward end cap. Next comes the interior longitudinal and lateral/horizontal blocking. I plan at least two additional longitudinal pieces per side, either side of center and an upper and lower lateral/horizontal pieces then the decking. There will be two mounting screws through the lower lateral/horizontal one either side.
I cut the forward pieces of the main decking short by .020” to allow for the decking on the forward piece to overlap onto the main section at the forward most “rafter”.
TAFN,
Barry
Last edited by BarryC on Sun Jul 16, 2017 2:20 pm, edited 1 time in total.
"Details make perfection, and perfection is not a detail."
Leonardo Da Vinci
Leonardo Da Vinci
Re: HL M1A1 HA, New info MAJOR change to Belly Armor 4/08
Cody, here is the data on the RFM kit.CODY614 wrote:Barry...
I think this will help?
1/35th scale...
Barry


Last edited by BarryC on Sun Jul 16, 2017 2:23 pm, edited 1 time in total.
"Details make perfection, and perfection is not a detail."
Leonardo Da Vinci
Leonardo Da Vinci
Re: HL M1A1 HA, Belly Armor update 4/10
Barry...
I went digging into some other pic's I had found. Here are a couple more that kind of show it coming out to the very edge of the hull.
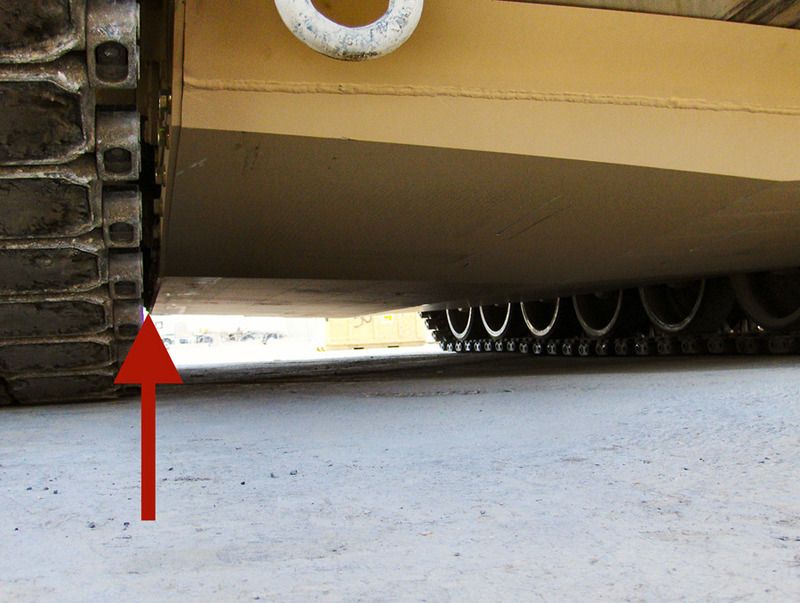
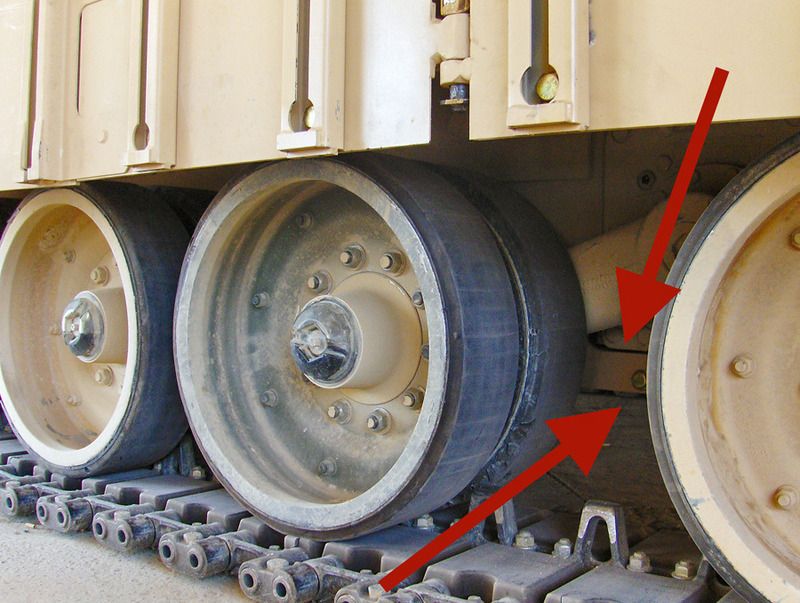
I went digging into some other pic's I had found. Here are a couple more that kind of show it coming out to the very edge of the hull.


Re: HL M1A1 HA, Belly Armor update 4/10
Great pics Cody!CODY614 wrote:Barry...
I went digging into some other pic's I had found. Here are a couple more that kind of show it coming out to the very edge of the hull.
Looks like the RFM kit is inaccurate with respect to the Belly Armor width, now I know how to proceed. In the second photo it appears that there is an outer "rail" that attaches to the armor then "lugs" on the rail attach to the hull side.
I have to ask; where are you getting these photos, are they from an available publication?
Thanks!
Barry
"Details make perfection, and perfection is not a detail."
Leonardo Da Vinci
Leonardo Da Vinci
Re: HL M1A1 HA, Belly Armor update 4/10
[quote="CODY614"]http://www.primeportal.net/tanks/jeff_d ... hp?Page=22
Last edited by BarryC on Mon Apr 11, 2016 11:23 pm, edited 1 time in total.
"Details make perfection, and perfection is not a detail."
Leonardo Da Vinci
Leonardo Da Vinci
