King Tiger AFter a wash of the wheels, and some drybrushing with sandgelb mixed with brown. Also installing metal arms and strong springs on the Tiger 1.
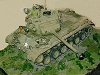
Here is the King Tiger after some light weathering.


I sent away for some tamiya "buff" paint, probably could have bought some at the local hobby shops but it was cheap and I'm lazy. Incidentally, I was talking to the lady who owns the local hobby shop, Rob's RC in Huntington beach, and asked her why they don't carry the tanks. She said, "they just don't sell..we tried a few and they sat for too long-I do have to stock what people want to buy..." Probably wasting my breath, but I suggested she try a lot of HL tigers and sell them for $60-70 (they did indeed carry tanks, I saw them there before, but these were the $200 taigen M41's-no wonder they gathered dust on the shelf!) and that she'd make a mint on selling parts and paints and so forth. Either she doesn't get the concept of a "loss leader" product or she knows the hobby market better then I do...Oh well! The HL Tanks just aren't big here in the USA.
Anyway I want to try and airbrush some over the KT and see how that works. As for the drybrushing, I did try it on my Panzer III first and like the result so I went ahead on the King. Not too pleased with the decals at all-those will need to be redone. On a flat surface like my Panzer III you can make em work-just cut close to the numbers and they are good enough, for me anyway. On the zimmerit surface, not so much. Also the KT is much bigger and shows the least flaw. I have stencils I bought earlier just for this, I plan to install my metal gearboxes into the KT, redo the rear screens i mangled and perhaps beef up the hull the same way I did the tiger-I still have the L shape alumin bar and plan to glue that inside the hull too. Worked pretty well for the tiger.
Speaking of which, I added metal suspension arms to the tiger today. I thought this tank was getting pretty heavy so I thought might benefit performance from the stronger springs, and metal arms. The arms I got from Artistic hobbies, in Texas, they were here in 4 days. The springs from good old Mato mart, Ali express, i was very surprised they were here in only one week.
Here's the metal arms. For me, being in the US, Artistic hobbies was the cheapest so that's who I bought from. A bit less then $20 shipped is what they cost. These susp arms are very beefy just to hold up a 5 lb tank so at first I thought they might be polished steel. But they must be aluminum as a magnet does not stick,

The springs were cheapest from Ali Express/Mato mart, $10 shipped. Notice as the photo shows, springs are different from left side to right side.

So now to actually installing the springs and susp arms. In the photo, the old spring and arm is on the left. The pivot bolt is in the center, and the new parts on the right. The old arm and spring is of course not reused. The suspension arm bolt you will reuse and also the washer, over the threaded hole in the hull, per second picture.


The wheels and susp. arms come apart with the same size hex wrench that removes the front sprockets-I just don't remember the size. They include axles that are smooth threaded, I don't know which tank these are for because they tell you in the ad copy "NOT FOR THE TAIGEN TIGER 1 you need a different part number for taigen". If you have the Heng long/airsoft you will be reusing your factory axles. The axles they sent you with it do not work for Heng long, the ends are not threaded they are smooth. You just use the old axles on these new metal arms. Please note also, when you final install the wheels, the axle threads need to stick out the bottom of the susp. arm, it acts as the suspension arm stop in that curved slot in the plastic hull.
Anyway I'll try to describe how you install these arms with the springs. Remove all the wheels on one side only, then you have the wheels on the other side to use as a guide if need be. First time around I installed the wrong wheels in the wrong holes and had to unscrew and redo them all...argg!

Now grab the plastic arm and remove that hex screw. Discard into a container the old susp arm and spring, make sure the washer is not sticking to it and is still in the hole, since you will need that. I kept a plastic can to toss in the old parts as i worked, because there's a lot of them and they pile up fast.
Now to install the new springs-you can tell by the photo, they're strong! I used extra care not to lose small parts because there are many of them and you need every one of them too. I laid out the new parts to my right and dropped the old parts in a bucket to my left. And I used a bit of silicone grease of the 100% type, called "Diver's grease" that I have around for my airguns and Hill pump. (I'm pretty sure you could just use regular grease here since you'd be using a tiny bit, but since I had the silicone grease around anyway, and will certainly not react with the plastic in any way. So i just used this grease as it was the best choice.) Really though I don't think there's much need to lube the parts much if at all, but it helped the spring and washer stick in place anyway during assembly.
So, the way I quickly learned to do it. Double check the tiny washer is in place in the hole. Now Insert the spring end into the hole in the hull. It's best not to try to fight the spring, with all wheels and arms removed you have working room to just place the arm over t he spring then insert the pivot bolt into the threaded hole. Place the suspension arm over the spring and press down until the arm captures the spring. Now insert the susp. arm bolt and push until you feel it enter the hole. Start turning the hex wrench, feel the bolt start itself in the threaded hole in the hull, and tighten it. If the spring pops out just start again. The suspension arm hole is just going to point wrong until you install the wheels anyway so I just left them like that and did the other 7 wheels. After a few times installing the susp arms, you get the hang of it and they go fast.
Installing the wheel, you probably want to start at one end or the other. The only trick here is, the end of the axle sticks out, which you want it to do, because it is the "stop" for the travel of the suspension arm in its proper installed position. So get the axle threaded and started in the susp arm hole til it engages the threads. Now pivot against the spring force, turn the susp arm to where it is over the "slot" in the hull. Now finish tightening the axle=the end of the axle will stick out, and act as a stop, in the slot next to the suspension arm. Repeat 15 more times!
Really it's not so bad once you get the hang of it. Once you have the
fingerspitzengefuehl of how the arms go on, they will go on fairly easy. Please do, beware of dropped or flying parts at first though you don't want to lose any of the parts!!! I put some plastic underneath my tiny, tiny work table (a wooden tv tray yet) for that purpose but I used care and thank goodness, did not lose any of the parts (except one washer, I had a spare in my spares drawers anyways).
If your tank has the metal tracks, metal wheels, or otherwise added lots of weight to it, you might like this upgrade. It was a bit of a chore to install and if you plan on adding weight to the tank, say anything more then the metal gearbox, I'd install these before painting if possible. As if you use any grease at all can make a bit of a mess that needs cleaning off the tank with alcohol or windex or something else that won't damage plastic.