ALPHA
Heng Long Pershing Rebuild
Re: Heng Long Pershing Rebuild
Hey Painless... sorry some family things came up... so won't be till next week that I can get to the Post office 
ALPHA
ALPHA
-
PainlessWolf

- Colonel
- Posts: 7864
- Joined: Sun Feb 26, 2012 9:09 pm
- Location: Southern Colorado Rocky Mountains
Re: Heng Long Pershing Rebuild
Alpha,
No problem, thank you again! ;o) There is plenty of work to do while I wait.
regards,
Painless
No problem, thank you again! ;o) There is plenty of work to do while I wait.
regards,
Painless
...Money!? What's that!?...
Re: Heng Long Pershing Rebuild
Sorry for the delayPainlessWolf wrote:Alpha,
No problem, thank you again! ;o) There is plenty of work to do while I wait.
regards,
Painless
ALPHA
-
PainlessWolf
- Colonel
- Posts: 7864
- Joined: Sun Feb 26, 2012 9:09 pm
- Location: Southern Colorado Rocky Mountains
Re: Heng Long Pershing Rebuild
No worries, Alpha ;o) and speaking of some of that work. Nothing in the post today so I took up scribing knife and did one of the least looked forward to bits of detailing that I had in mind. After I removed the sand shields, I sanded the edge of the fenders smooth and using the shields as a template, marked and drilled the bolt holes that removal of those pieces would have left. With a few minutes left over in the evening, I pulled the old HL antenna stub and cut the plastic flat in anticipation of the arrival of Woz's 3D printed tank and radiator caps. Pics:
- Attachments
-
- Removed the HL antenna stub and wiring. These come in handy if you need a good ground wire at times so I try to save them.
-
- Left over sand shields for a future Sherman build
-
- Closeup of the drilled attachment holes for the shields.
-
- Extra care is needed to avoid slicing up the ammo cans if they are meant to be used as detail bits.
-
- A close up of the tool and sharpener used to keep the blade edged.
-
- Sore fingers but no cuts just a lot of repetitive motion to cleanly remove the track shields
...Money!? What's that!?...
-
Jake79
- Warrant Officer 2nd Class
- Posts: 1062
- Joined: Mon Aug 11, 2014 9:10 pm
- Location: Essex,Colchester, UK
Re: Heng Long Pershing Rebuild
Enjoying following your build,you explain things well, good for us novices to learn a thing or two. 
Tamiya: 2 King Tigers
H/L,Taigen :Initial Tiger 1, Panzer III, Kv 2, Panther G, Bulldog, Leo 2A6
H/L,Taigen :Initial Tiger 1, Panzer III, Kv 2, Panther G, Bulldog, Leo 2A6
Re: Heng Long Pershing Rebuild
I can tell you love the challenge Painless.... if I were cutting those skirts...the last tool I would grab is a knife  ....Dremel or xacto saw
Have to admit...that's some Eye boggling work ....the bolt holes are a nice touch
ALPHA
Have to admit...that's some Eye boggling work
ALPHA
-
PainlessWolf
- Colonel
- Posts: 7864
- Joined: Sun Feb 26, 2012 9:09 pm
- Location: Southern Colorado Rocky Mountains
Re: Heng Long Pershing Rebuild
Good Morning, Jake,
Thank you for following along! I learned by watching other guys do the work and show how to make it fun. ;o)
regards,
Painless
Thank you for following along! I learned by watching other guys do the work and show how to make it fun. ;o)
regards,
Painless
...Money!? What's that!?...
-
PainlessWolf
- Colonel
- Posts: 7864
- Joined: Sun Feb 26, 2012 9:09 pm
- Location: Southern Colorado Rocky Mountains
Re: Heng Long Pershing Rebuild
Alpha,
Thank you for the compliments, my friend. ;o) There were a couple of minutes in the middle of scribing out the last one when I asked myself why I had not fetched the Dremel and put a router bit or blade on it. My fingers were getting pretty sore by that time. It turned out Ok tho'. At least, there was minimal sanding required to clean up the edges plus I now have a workable pair of sand shields for the parts box. The bolt holes were just an afterthought. I'm trying to use my mini Yankee drill more to add easy detailing.
regards,
Painless
...Money!? What's that!?...
Re: Heng Long Pershing Rebuild
The final result is great Painless.... I just couldn't help but thing the first tool I would reach for is my xacto sawPainlessWolf wrote:Alpha,
Thank you for the compliments, my friend. ;o) There were a couple of minutes in the middle of scribing out the last one when I asked myself why I had not fetched the Dremel and put a router bit or blade on it. My fingers were getting pretty sore by that time. It turned out Ok tho'. At least, there was minimal sanding required to clean up the edges plus I now have a workable pair of sand shields for the parts box. The bolt holes were just an afterthought. I'm trying to use my mini Yankee drill more to add easy detailing.
regards,
Painless
ALPHA
-
PainlessWolf
- Colonel
- Posts: 7864
- Joined: Sun Feb 26, 2012 9:09 pm
- Location: Southern Colorado Rocky Mountains
Re: Heng Long Pershing Rebuild
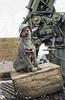
Alpha, *grinz* I like my scribing tool set. I used it to get those plastic grills off of Maxine's rear deck and still leave the posts to screw into there. There are plenty of times that I do fire up the Dremel or electric Drill as well. ;o) Nothing Post wise today so I was about to start making the little exterior Fire Extinguisher handle then remembered, "Hey, I think I bought some parts for this tank" Sure enough, that piece and most of the rest of the deck detail that I was about to move from the old tank to the new were on the Tamiya sprues. I contented myself with removing some unneeded HL deck detail and adding the four Mato periscope guards for the front hatches and surrounds by the Blower housing. Plenty of time to have fun this weekend with the rest. Pics:
- Attachments
-
- Mato periscope guards
-
- Glued on helmets and gas cans removed via drilling out the mounting posts with the Yankee drill.
-
- Enough Tamiya parts to build a hybrid Pershing
...Money!? What's that!?...
