Another HMAF conversion.

Post all your larger scale RC Tanks, Half Tracks and Military Vehicles, build threads here. From 1/12 all the way up to 1/4! all here! Your Larger Scale figures are also welcome here.
Post Reply
User avatar
Storky
Private
Posts: 98
Joined: Wed Nov 10, 2010 2:58 pm
Location: Plymouth

Another HMAF conversion.

Post by Storky »

It all started back in the summer when my 7 year old son kept asking if he could have a go with either of my 1/16th HL or my 1/8th M26 Pershing RC tanks.

I decided that I would build him an RC tank for Christmas.

I chose an HM Armed Forces tank as a donor vehicle due to it's size and the large amount of room inside for all the required equipment etc.


I duly aquired a tank from that well known auction web site. When it arrived, I quickly took out all the screws that hold the 2 halves together and removed the toy rubber tracks. I noticed that the road wheels were all fixed to thier respective axle that goes all the way through the hull of the tank. They would not rotate independantly as was required. So I had to pull them all off the axles. They are a very tight push fit onto serations on the end of each axle.
The road wheels come apart by removing 2 screws in the back of each one. (The idlers had to be junior hacksawed apart). The plastic spigot inside each wheel has to be removed to allow the fitting of the retaining 4mm star washers.
DSCF0161.JPG (42.86 KiB) Viewed 1438 times
After modding each wheel, I filed down the serations on the ends of each axle to allow the wheels to rotate freely. I then fitted 4mm washers between the hull and the wheel, and the wheel and the star washer.

The idlers were star washered the same, except they had to be glued back together with plastic weld glue.
4mm star washer
4mm star washer
m1T9eCUbDkHlmz4vvnc4fug.jpg (6.38 KiB) Viewed 1438 times
Wheel with star washer fitted.
DSCF0157.JPG (40.12 KiB) Viewed 1438 times
After sorting out all the road and idler wheels, I turned my attention to the fitting of the gearboxes etc. I decided to fit the gearboxes in the back for ease rather than scale appearance. I chose 'long shaft' HL gearboxes aquired from Dave 'Forgebear' Allerton. These are mounted on a piece of 9mm WBP plywood. I was originally going to fit a smoke unit in between them, but decided to put the speaker there instead.
Chassis with gearboxes and speaker mounted on a piece of 9mm WBP plywood in the back with the speaker fitted between them.
DSCF0154.JPG (49.21 KiB) Viewed 1438 times
I bought the RX18, receiver board, speaker and transmitter from Eddyk.

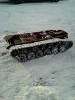
Then I fitted some HL M26 Pershing tracks that I had left over after fitting metal ones on my 1/16th tank.
HL M26 Pershing tracks and sprockets fited. Luckily the HMAF road wheels fitted over the guide teeth very nicely.
DSCF0159.JPG (48.17 KiB) Viewed 1438 times
Next I decided to fit a track tensioning system, having had some bad experience with tracks coming off when turning on grass etc.
Track tensioning system using 3mm threaded rod and suspension parts from an RC car.
DSCF0189.JPG (44.66 KiB) Viewed 1438 times
I wired in the speaker, RX18 and receiver board to test the motors etc. That all worked fine. So it was time to look at the turret rotation.

I bought an HL rotaion unit and 2 HL turret rings from that auction site.

The turret rings were cut out to leave just the toothed rings, then they were split to allow them to be warmed up with a heat gun and expanded to fit the turret ring of the HMAF tank.
HL turret rings expanded to fit HMAF turret ring. An HL rotation unit is fitted by cutting out the inside of the rear storage bin.
DSCF0152.JPG (50.51 KiB) Viewed 1438 times
Close up view of the turret ring and rotation unit.
DSCF0185.JPG (52.38 KiB) Viewed 1438 times
Next I wanted to fit both front and rear lights. Using brass tube and flat bar, I made some brackets for the rear lights. I then fitted 5mm red LED's.
5mm red LED's used for the rear lights.
DSCF0173.JPG (41.94 KiB) Viewed 1438 times
and 10mm white LED's for the front lights
10mm Phenoptix LED's fitted in place of the painted on ones. These are wired via a switch staright of the 7.2 volt battery, as they require a higher voltage than the RX18 gives out to the lighting circuit.
DSCF0150.JPG (53.98 KiB) Viewed 1438 times
The battery was mounted inside the hull under the engine deck using a piece of plastic with brass tubing fitted in channels to hold the cable ties. This was super glued under the engine deck.
Last edited by Storky on Mon Dec 30, 2013 12:50 am, edited 1 time in total.
If you are not living on the edge, then you are taking up too much room.
User avatar
Storky
Private
Posts: 98
Joined: Wed Nov 10, 2010 2:58 pm
Location: Plymouth

Re: Another HMAF conversion.

Post by Storky »

Battery secured to underside of engine deck using a piece of plastic with brass tubes imbedded to take small cable ties.
DSCF0186.JPG (51.9 KiB) Viewed 1433 times
I wanted to fit a remote battery charging facility, so I decided to wire the RX18 through a double pole double throw toggle switch so that in the on position, the battery was connected to the RX18 and the charging port wass isolated, and in the off position the battery was connected to the charging port and the RX18 was isolated.

The remote charging port was fitted inside the left hand front storage bin along with the volume switch and the switch for the headlights.
Remote charging port with volume switch and the switch for the front lights
DSCF0177.JPG (52.05 KiB) Viewed 1433 times
All of the wiring to the upper hull is able to be disconnected in much the same way as on all the HL tanks, by the use of plugs and sockets.
All the internal wiring showing the plugs and sockets to connect between the upper and lower hulls.
DSCF0188.JPG (59.17 KiB) Viewed 1433 times
Internal wiring showing the back of the DP/DT switch and the HL 8 pin connector etc
DSCF0187.JPG (53.86 KiB) Viewed 1433 times
The aerial is from an RC boat. This is connected to the RX18 via it's own single plug and socket. My 1/8th Pershing is in the background. (up on blocks to allow testing of motors and drive trains etc). I will do a build log of this also if anyone asks. (Dietrich)!

The RX18 and the receiver boards are mounted on the side of the hull.
RC boat aerial fitted into a hole drilled into the top of the turret. There is a screw terminal on the inside to connect the aerial wire from the RX18 via a single connector.
DSCF0181.JPG (50.15 KiB) Viewed 1433 times
RX 18 unit mounted on the side of the hull.
DSCF0183.JPG (56.11 KiB) Viewed 1433 times
A priority of mine was to always allow the HMAF figures to be able to fit into the turret and drivers hatches. So I had to allow room inside the tank to facilitate this.
Therfore I was not able to fit a main gun raise/lower or BB shooting units.

I have managed to fit a flashing LED for the co-axial machine gun.
Co-axial machine gun flash LED fittted into the mantlet in (hopefully) the correct location.
DSCF0191.JPG (44.47 KiB) Viewed 1433 times
The final job was to attempt to paint the tank. I sprayed the end of the main gun, exhaust pipe and the silver sprockets with 'Desert sand' spray paint. Then added some camoflage brown striping with a brush.
Painted drive sprockets. Bettter than leaving them silver.
DSCF0179.JPG (51.64 KiB) Viewed 1433 times
Project Scorpion (as it became known) complete with crew.
DSCF0200.JPG (55.88 KiB) Viewed 1433 times
Say 'cheese' lads!
Say 'cheese' lads!
DSCF0198.JPG (51.07 KiB) Viewed 1433 times
So, there it is. My son was VERY pleased to get this for Christmas. All I can say is " I'm glad there is a volume switch"!

Any questions just ask.

Next project is an RC helicopter for myself!

Regards

Phil (Storky)
If you are not living on the edge, then you are taking up too much room.
sassgrunt
Sergeant
Posts: 747
Joined: Wed Oct 29, 2008 9:08 am
Location: Hawaii, USA

Re: Another HMAF conversion.

Post by sassgrunt »

Phil, this was a very cool build log - thank you for posting pictures of how you went about it all. It was also a neat thing to do for your son. Last summer, my 8-year-old grandson wanted a tank, so we built him up a Sherman out of a Mato upper hull and Tamiya lower hull. He did all the painting, and we added decals to personalize it for him. It's a great way to interest the next generation, and give them memories of the project that they'll carry for the rest of their lives. -Mike
User avatar
Dietrich
Staff Sergeant
Posts: 973
Joined: Thu Aug 13, 2009 10:29 am
Location: England and Aquitaine,France

Re: Another HMAF conversion.

Post by Dietrich »

Very nice build Storky.. :thumbup:
Standing next to the tank, the scale of the 'Correct' figures makes the tank look very small indeed.. probably about 4'08'' to 5' 00'' tall.... IF they were available to 'Buy' in a 1 to 1 scale...That would make a lovely little 'sports car' to keep in the garage for the weekend :haha: .... How the wife would laugh as I drove it in home through the gate and into the garage .. 8O >:<
Never Forget......
   The Propaganda of the Victors....... becomes the History of the Vanquished
User avatar
Storky
Private
Posts: 98
Joined: Wed Nov 10, 2010 2:58 pm
Location: Plymouth

Re: Another HMAF conversion.

Post by Storky »

Scale comparison. It looks to be quite a small tank, and the gun makes a handy washing line!
Here is a picture of a real Scorpion tank with crew. Just for scale comparison!
1460175_652726911446131_455546346_n.jpg (55.56 KiB) Viewed 1408 times
Phil
If you are not living on the edge, then you are taking up too much room.
User avatar
Dietrich
Staff Sergeant
Posts: 973
Joined: Thu Aug 13, 2009 10:29 am
Location: England and Aquitaine,France

Re: Another HMAF conversion.

Post by Dietrich »

Hi Phil,
It is quite a small tank..
Weight 17,800 lb (8.074 tonnes)
Length 5.288 m (17 ft 4.2 in)
Width 2.134 m (7 ft 0 in)
Height 2.102 m (6 ft 10.8 in)
Crew 3
Armour 12.7 mm welded aluminium
Main
armament
ROF 76mm L23A1 gun
90 mm in Scorpion 90
Secondary
armament
Coaxial 7.62 mm L43A1 machine gun
Engine Cummins BTA 5.9-litre (diesel) Much better Than the Petrol Jaguar from a fuel economy point of view !!
190 hp (140 kW)
Power/weight 22.92 hp/tonne
Transmission David Brown TN15
Suspension Torsion-bar
Operational
range
756 km (470 mi)
Speed 7
.....
I cannot find a PRICE for a second hand one though !!!!!
:(
Never Forget......
   The Propaganda of the Victors....... becomes the History of the Vanquished
User avatar
PainlessWolf
Lieutenant-Colonel
Posts: 7564
Joined: Sun Feb 26, 2012 9:09 pm
Location: Southern Colorado Rocky Mountains

Re: Another HMAF conversion.

Post by PainlessWolf »

Good Morning,
I've always wanted a White's Half Track to drive around. All that rubber on the road and at only 10 tons, a bargain to fill up at the gas station *chuckles* Thanks for the pictures of the 1/1 scale Scorpion, there!
warm regards,
Painless
...Here for the Dawn...
Post Reply

Return to “Larger Scale Military”