1 Kompanie PzAbt 101 Tiger 131 Walter Hahn Project Diary

User avatar
Wildboar44
Corporal
Posts: 392
Joined: Sun Jan 13, 2013 10:28 pm
Location: Kent England UK.

Re: 1 Kompanie PzAbt 101 Tiger 131 Walther Hahn Project Dia

Post by Wildboar44 »

Red Devils wrote:Hey Gordo,

Since your interested in the 101, check out this site. It's Russian but you can cut and paste into Google translate. Interesting stuff...

http://www.retrospicere.narod.ru/2-libe ... 001-01.htm

Derek

Hey Red , thanks for the link , what a great set of photo's and vehicle history , you sure a great help Bud.


Thanks Again

Gordo
Yesterday is our history, Tomorrow is an eternal mistery, Today is a gift, its why its called "The Present".
User avatar
Wildboar44
Corporal
Posts: 392
Joined: Sun Jan 13, 2013 10:28 pm
Location: Kent England UK.

Re: 1 Kompanie PzAbt 101 Tiger 131 Walther Hahn Project Dia

Post by Wildboar44 »

Updated 04-11-2019
Ok, got some time to do a few more reliabilty modifications over last few days . First on the agenda was building the Firewall and gearbox covers ...................

A strip of 2.5x2.5mm brass channel was resin bonded to the inside of the Hull sides .................
Brass channel bonded either side of hull to hold fire wall behind gearboxes.
Then a sheet of 2mm Ally was formed to make the Firewall , this will serve two functions , First although I use the super tacky/sticky motorcycle chain lube on the gearbox drive, its enevitable that some will fling off so this plate will limitwhere the lube can go. Second reason is it will act as a brace to further strengthen the hull up front.
Gearbox fire wall
Gearbox fire wall
Then 2 Ally brackets were made to support the gearbox top plate, its bolted for now but will be resin bonded prior to painting
Picture of right hand gearbox cover support bracket
Now the tricky bit..... The top cover plate required 6 bends to make it follow the contour of the gearbox and as indicated by the Green Arrow, the plate needs to be lower than the Hull here in order allow the Upper Hull / Front glacia drop correctly onto the lower Hull. The cut out indicated by the red arrow is for the on/off switch mounting plate bracket.
Gearbox top cover. Carefully formed to foul upper hull.
With the gearboxes re-installed..... everything is a snug fit. Before these are painted, the inside of the gearbox cover, firewall and hull sides will be lined with thin sound deadening foam.
Gearboxes re fitted. cover and firewall are bolted together.


More to follow ...........
Last edited by Wildboar44 on Sun Dec 01, 2019 1:28 pm, edited 2 times in total.
Yesterday is our history, Tomorrow is an eternal mistery, Today is a gift, its why its called "The Present".
User avatar
Wildboar44
Corporal
Posts: 392
Joined: Sun Jan 13, 2013 10:28 pm
Location: Kent England UK.

Re: 1 Kompanie PzAbt 101 Tiger 131 Walther Hahn Project Dia

Post by Wildboar44 »

Updated 06-11-2019
Next on the list was moving the speaker. As mounting the aerial post directly under the correct position, this meant that the speaker mounting now clashed with the aerial base plate .. :S
Green arrows show speaker mounting points, speaker can no longer fit forward of the red line
The simple answer is to dremmel off the mounting posts and relocate the speaker 15mm rearward and 10mm closer inside the Hull. If using the original speaker, moving it any further back will make it clash with one of the rear Hull mounting posts .For now the original drill holes were covered with thin Styrene sheet , then re-drilled and the redundent holes filled with Milleput
New holes for speaker further rearward and original holes covered and filled
One day i hope to invest in an Elmod sound system, would be nice.............
I have always liked these Armoured gearbox covers , chunky stuff and look the part. UNTIL...?
Armoured Gearbox covers from Asiatam
I realised ... Looking at a photo Red posted on my build, and the checking it with other photo's . Tiger 1 Armoured Gearbox cover bolts do not protrude anywhere near the extent of Asiatam covers. In fact they are quite flush, so some excess was Dremelled off.
Bolts extent to far out
Armoured cover bolts rduced in height.
Last thing on the list today was to add the "rod" that supports the spare track links on the front of the hull. Early Tiger 1's have a flat plate bar spanning the width of the lower hull to hold the spare track, Mid production period photo's seem to showa rod and Later model Tiger's are often shown with no spare track on the lower hull at all, although I have seen some clearly carrying track there. My solution was judging by photo's that the wire from a coat hanger seemed to be the right size diametre.
coat hanger wire almost correct scale to original

Thanks for viewing ........


.
Last edited by Wildboar44 on Sun Dec 01, 2019 1:34 pm, edited 4 times in total.
Yesterday is our history, Tomorrow is an eternal mistery, Today is a gift, its why its called "The Present".
User avatar
Red Devils
Staff Sergeant
Posts: 872
Joined: Sun May 06, 2012 2:38 pm
Location: Edmonton, Alberta, Canada
Contact:

Re: 1 Kompanie PzAbt 101 Tiger 131 Walther Hahn Project Dia

Post by Red Devils »

Looking sweet Gordo, nice and clean inside. If I ever get my mounting plate for my Walterson gearboxes, I'm going to attempt the same. May come looking for some tips brother, so stay frosty...

Derek
Last edited by Red Devils on Sun Mar 10, 2013 2:11 am, edited 1 time in total.
The Princess Patricia's Canadian Light Infantry
First in the Field - Since 1914.
User avatar
Wildboar44
Corporal
Posts: 392
Joined: Sun Jan 13, 2013 10:28 pm
Location: Kent England UK.

Re: 1 Kompanie PzAbt 101 Tiger 131 Walther Hahn Project Dia

Post by Wildboar44 »

Red Devils wrote:Looking sweet Gordo, nice and clean inside. If I ever get my mounting plate for my Walterson gearboxes, I'm going to attemt the same. May come looking for some tips brother, so stay frosty...

Derek
Anything i can do to help you in return Brother , just call on me 8)
Yesterday is our history, Tomorrow is an eternal mistery, Today is a gift, its why its called "The Present".
User avatar
Wildboar44
Corporal
Posts: 392
Joined: Sun Jan 13, 2013 10:28 pm
Location: Kent England UK.

Re: 1 Kompanie PzAbt 101 Tiger 131 Walther Hahn Project Dia

Post by Wildboar44 »

Updated 07-11-2019
This part took me out my comfort zone, the original version of my Tiger 1 has the Taigen rubber stick on type Zimmerit applied, this time I wanted to have the finer look of Milliput moulded into Zimmerit. The plan is to use Milliput on the front, rear and sides of the hull, the turret Zimmerit from the photo's I have seen is a larger broader pattern slightly wider and deeper. I plan to use Atak Zimmerit for the turret as this will marry up to edges and hatches cleaner than milliput and as I plan to hang spare track from the turret sides Atak zimmerit will ensure it is nice and thin so as not to pack out the turret sides.

Probably took too much time, but here is my first bash,I little bit of battle damage, not too much
,just on the front plate only for this project. (Battle damage that is)
Zimmerit applied to front hull.
Last edited by Wildboar44 on Sun Dec 01, 2019 1:37 pm, edited 6 times in total.
Yesterday is our history, Tomorrow is an eternal mistery, Today is a gift, its why its called "The Present".
User avatar
Wildboar44
Corporal
Posts: 392
Joined: Sun Jan 13, 2013 10:28 pm
Location: Kent England UK.

Re: 1 Kompanie PzAbt 101 Tiger 131 Walther Hahn Project Dia

Post by Wildboar44 »

Updated 08-11-2019.
The first part of this re-build has been to lift the electronic components off from the bottom of the hull and to add sound deadening covers around the gearboxes and stiffen up the front of the hull.The following pages will deal with the conversion from this early period Tiger 1 to the Mid-production version shown in the photograph of Tiger 131 in Morgny 1944.

The next few articles are dedicated to "correcting" the many details on a HL Tiger 1 (especially the early ones) that are incorrect on purpose for what I believe is to not have a copy right challange from that well known Japanese company beginning with T? There are many items that are incorrect, mine when purchased did not have all the "faults" as the evolution process had begun and changes had been made by HL as later units were produced. As a guage as to what needs correcting here are some of what I can remember popped up on many a build list within the community for the Early model Tiger1

1-Gun barrel mantlet was upside down (not on my purchase model)
2-Barrel is shown in the "recoil" position
3-Pistol port left turret side wrong orientation, shown horizontal not vertical (I think !) (Removed on mid Production)
4-Main commander cupola wrong orientation, hatch opening at wrong angle
5-Turret storage bin wrong shape and too narrow.
6-Undercut on lower rear turret inaccurate, there never was a cut out here in real life.
7-Hull turret opening is too far forward.
8-Turret ring opening is to far forward.

The above 7 & 8 look correct when the turret and barrel face forward, only when turned 90 degree to left or right the turret bin is shown overhaning the hull sides. When rearward facing the turret is shown too far forward, I guess this can only be a copy right thing as it can be correct as demonstrated later so that the turret has the correct alignment with the turret bin flush with the sides and in a central location pointed rearward.

9-Two convoy light mouldings on rear, one above each mudflap ( One on the left only is accurate )
10-The square loaders hatch on the top of the turret is too big.
11-Towing pintle missing from bottom cente of rear hull (towing hitch plates)
12-Turret lifting lugs either side of mantle wrong shape.
13-Turret lifting lug on rear of turret missing.
14-The antenna storage tube is shown along both side of hull , this only ran along the right side (looking from rear)
15- The Mantlet on the HL early version is shown with the gun barrel central. It should be in fact slightly off centre to the left as viewed from the front.


First job was to remove the "rubber zimmerit from the rear hull, then dremmel off the right hand side dummy convoy light I may fit a working left hand side convoy light in the furture, not sure if historically they were blue or green ? Anyone know the right answer ?

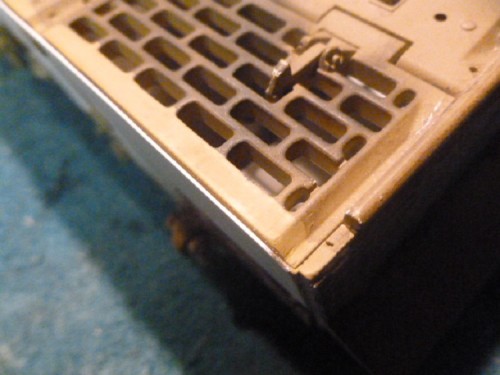
Next one was a bit of a head scratcher. As indicated on many of the Master Class Tiger 1 builds past and present , The Rear Panel on a HL Tiger should not stop under the engine rear decking. It should in fact extend all the way to the top and its the engine decking panel that should butt up against this. The solution following the inspiration of these Master builders is to scratch build an extention on top of the rear panel or cut the back edge from the engine deck and glue this onto the top of the rear panel and in so doing will restore the original detail.
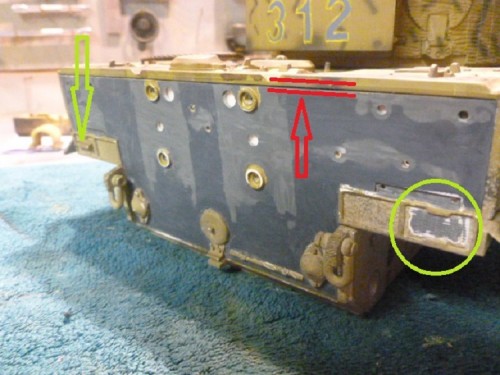
Green arrow is correct location convoy light, circled light has been removed . Red lines show incorrect gap on hull/engine deck
My dilema was this, the rear engine panel on the original HL top hull is around 4.5mm thick. I plan to mount a travel lock onto the rear of my Mid Production Tiger. In order to do this I will need this width as my plan is to make the travel lock from 3 layers of 1.5mm brass strip. Cutting off the back of the Hull and gluing it to the rear hull panel top edge will mean I only have 2-3mm to balance any travel lock onto.
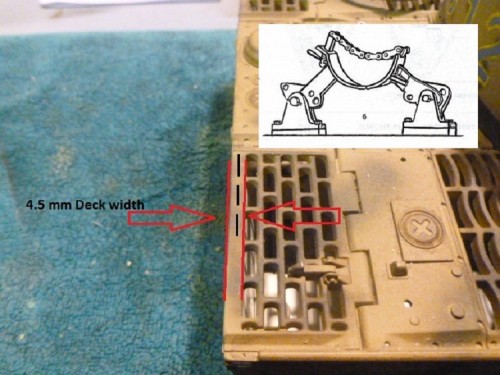
Location for travel lock placement.
I prefer brass as it will be more durable and if I try to follow the Master example of a travel lock built by Red Devilsbuilt by Red Devils (His travel lock by its own right should be in a display case?) out of styrene I am concerned that it will be destroyed in a short space of time.The trouble is I also wanted to correct the rear panel height issue, as now its been pointed out

So after a lot of head scratching and staring at the rear panel for hours at a time, the answer to fix both issues came to me. My solution was this. I selected a sheet of 0.75mm styrene and cut a covering template to cover most of the rear panel.The top was left 2-3mm over the height of the rear panel, the rear engine decking was then filed back 0.5mm so the styrene panel sat flush against the back of the hull, after the two part epoxy resin glue had dried, I filed down the styrene sheet to the exact width and height contours of the corrected rear panel using the height of the engine decking as a guide. Historically the Mid-production Tiger's had the Feifel air filter cannisters and tool box removed from the rear hull, the styrene saved me the job of filling in the holes with milliput.The two holes on the right lower side are to mount the jack.
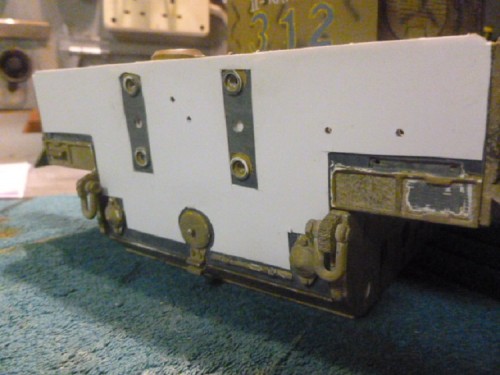
Corrected height of rear panel
Engine deck now butts up to rear panel
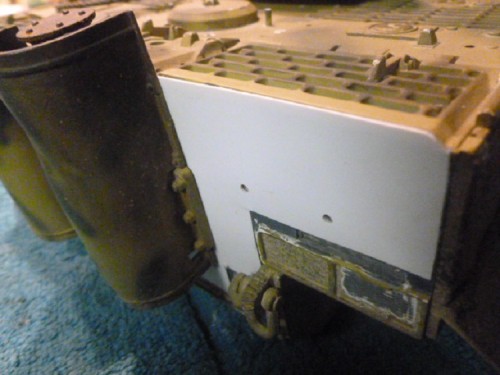
Styrene sheet profiled to contours of engine deck


Until next time............
Last edited by Wildboar44 on Sun Dec 01, 2019 1:49 pm, edited 4 times in total.
Yesterday is our history, Tomorrow is an eternal mistery, Today is a gift, its why its called "The Present".
User avatar
Wildboar44
Corporal
Posts: 392
Joined: Sun Jan 13, 2013 10:28 pm
Location: Kent England UK.

Re: 1 Kompanie PzAbt 101 Tiger 131 Walther Hahn Project Dia

Post by Wildboar44 »

updated 08-11-2019
A Qurstion ?

One last reliability fix is the rear idlers , currently these Asiatam early pattern units are mounted to Tank Modellbau track adjusters, the bore of the internal hole of the idler is "close" to the diameter of the shaft, I am planning on fixing these helicopter rotorunit bearings inside the Asiatam idler wheels. At present there is a degree of "float" from the rear idlers , my concern is that I have never had problems with this set up , perhaps when small stones get between the idler and tracks the float gives a degree of tolerance?

If by fitting these bearing , will this make the drivetrain too "taught" and I will start having problems ? Whats your view Guys ?
Bearings for rear idlers Float or no float ?
Last edited by Wildboar44 on Sun Dec 01, 2019 1:51 pm, edited 3 times in total.
Yesterday is our history, Tomorrow is an eternal mistery, Today is a gift, its why its called "The Present".
User avatar
Wildboar44
Corporal
Posts: 392
Joined: Sun Jan 13, 2013 10:28 pm
Location: Kent England UK.

Re: 1 Kompanie PzAbt 101 Tiger 131 Walther Hahn Project Dia

Post by Wildboar44 »

Update 09-11-209
Little bit more work done tonight , I as going to prime the Lower Hull & gearbox covers / components ready for painting but the garage was too cold for spraying, we in the Uk are in the grip of an artic freeze

Mid Production Engine Starter Plate
So I turned my attention to the rear Hull plate while I was awaiting some parts. One small job I have is to produce the correct style of rear engine starting plate. Introduced some time near May 1943 this starter plate was the result of fitting a different Maybach Engine.
Aug 1942 original starter plate and May 1943 version as drawing
There is a version produced by Henntec I have seen but the detail is so small I was afraid It would get lost after painting. So searching around for a suitable item to replicate the raised second aperture, I came across this, as I am also a keen mountain biker, it’s used to crimp the end of brakes cable ends to stop them fraying after they are cut
Crimp barrel used from a cycle brake cable kit to replicate second raised aperture
After a pilot hole was drilled, I used a 3.5mm drill bit to open up the hole to allow the crimp barrel to drop in. I then filed down the head of the nipple to around the same height as the original.
Crimp barrel in place,
The "Rod" was produced by taking an everyday sowing pin , cutting it to length , then to replicated the small holder on the lower end of the rod, I cut a very thin section of masking tape (1.5mm wide ) and wrapped it around the pin, finally securing it by dropping a few drops of styrene glue to seal the tape.
Sowing pin used as bar. Super thin masking tape used to made collar.
This is what it looked like when it was put together, its dry fixed for now as it will be removed prior to the zimmerit being placed on the rear panel. Ok I will never win any prizes for super detailing, but its a fair representation after painting I hope it will look better .
Starter plate with Mid-production modification

Until the next post..........


.
Last edited by Wildboar44 on Sun Dec 01, 2019 2:06 pm, edited 3 times in total.
Yesterday is our history, Tomorrow is an eternal mistery, Today is a gift, its why its called "The Present".
User avatar
Wildboar44
Corporal
Posts: 392
Joined: Sun Jan 13, 2013 10:28 pm
Location: Kent England UK.

Re: 1 Kompanie PzAbt 101 Tiger 131 Walther Hahn Project Dia

Post by Wildboar44 »

Updated 09-11-2019
I managed to get a bit more done over the weekend, first on the job list was to apply Zimmerit to the "dummy " rear panel.

I have 3 options to create this effect,
1. Milliput/sculpture application with effect pressed/rolled in.
2. Hot screwdriver method.
3. Pre formed cut sheet (ATAK).

I’m going for milliput zimmerit for the Hull and Atak pre formed sheet zimmerit for the Turret. My original Tiger project vehicle had the rubber stick on Zimmerit, I decided for this build to remove this and apply milliput Zimmerit using some Trumpetier Zimmerit tools.

Please accept my apologies if this is teaching experienced modellers to suck eggs , but for someone like me new to Milliput Zimmerit ,here is how I got on. The process can be daunting for those like me who are doing this for the first time but with some practice and patience it can be easier than first thought.

First after needing the Milliput for 5 mins, i rolled up a ball the size of a pea, the black tape is to give me a line to work up too so after the Milliput is rolled out i can pull it off and reveal a sharp line for the next application.
Milliput the size of a pea ready to roll !
This is the hard bit, your thumb is the best tool to spread the Milliput, it needs to be "damp", too wet and your thumb slides, too dry and you tear the Milliput. You need to "kneed" the Milliput pulling, pushing to get it as thin as you can .
Spread the milliput with your thumb as even as possible.
Once you have spread the Milliput pea over your target area (about 1.5 sq inches) I used an old scrap styrene card (all edges sanded smooth) to smooth the Milliput, but you need the Magic ingredient to help you out !
When scraping the milliput with the wet soution it will remove thin layers and even it out
Good old fairy liquid
I made sure I used plenty of the soapy solution to smooth out the Milliput, every time I scrapped I would dip the styrene card back into the solution.These are the Zimmerit tools I picked up, one is a "stamp" , the other is a roller, they are really for 1/35 scale but they seem to be ok for the lower Hull, the Turret Zimmerit seems to be thicker and broader in photo's, so this will be applied in the form of sheet Atak Zimmerit when the time comes.
Zimmerit tools and thinned out Milliput.
When the Milliput is thinned out , it seems to dry quicker, so this is where you have to get your skates on !, dipping the Roller tool into the solution after each application, the pattern was rolled on, it seemed rough at first, but when dry, you can sand off the hard edges. The black tape is re-applied to give you the next hard edge.
Fresh rolled Zimmerit
Where the Milliput meets detailed features such as this access plate, I used a 1.5mm drill bit dipped into the solution to restore the hard edges. Again I did not worry too much on the rough texture as this can be cleaned up once hard.
Drill bit used to clean edges
By this time I had worked my way across the rear panel, each time applying a line of black tape to work up too. Inside the exhaust shrouds were masked off as the Zimmerit was not applied inside these. As you work applying the Zimmerit , when the paste is firm, its a good time to press in any details such as tow cables or mouting lugs. These Feifel air cleaner mounts are strickly incorrect for this build, Tiger 131 was built December 1943 - January 1944, so these lugs would not have been welded on as the Feifel air cleaners were deleted begining August 1943, some brackets were gradually phased out leading up to Oct / Nov 1943, but for a little bit of detail I decided to add them.
Feifel air cleaner bolt holder mounts
This C hook was added in September 1943 to the rear hull as one of the Mid-production modifications.NOTE Update 2019. C hook should face inward !
C Hook on rear hull. Note taped off area for Exhaust shrouds and exhaust stubs to go back

Many thanks for loooking ..... more to follow.


.
Last edited by Wildboar44 on Wed Dec 25, 2019 12:06 am, edited 6 times in total.
Yesterday is our history, Tomorrow is an eternal mistery, Today is a gift, its why its called "The Present".
Post Reply

Return to “Tiger I”