as stated in my thread where i am asking for help, i start here the building process thread of this vehicle
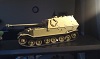
I've purchased a second hand old Pz IV tank to start with. Low profile gearboxes and asiatam track tensioner system are already installed, also, some needed corrections to the road train have been done, lower the 4th return roller -4mm and raise the gearboxes shafts +4mm
this is the PzIV when i purchased it:


Started the hull modifications, stripping the tank from the turret, and all external bits:


i emptied completely the hull, discarded the old Rx14, speaker, plastic gearboxes, etc...

and stared the dirty work. First of all, the rear engine plate wasn't like the HL, it has an inclination ,so, cut and paste


i used a bier can alu to cover the zone:


the rear end return rollers lowered 4mm:

the gearboxes shaft location raised 4mm:

from the external chassis of two old and unserviceable video recorders, i made the internal perimetral reinforcements of the lower hull and the new 4mm gearbox support plate:


support gearbox installed, metal hull reinforcements installed, low profile gears installed, liquid resin 'installed' on the bottom, now you cannot flex the hull anymore!
regarding the resin tip, i saw it on several German forums, so i took the decision to try it. The resin, added to the perimetral metal reinforcement of the lower hull, they do that the lower hull couldn't be flexed any more. It has his downside too, the weight. I've now in the process of reinforce the road wheels insertions on the hull from the downside...


i have removed the plastic 'tensioners' to fit the asiatam ones. this is how i did it:
1-) cut the INNER molded part of the tensioners (the part were the nut is). To do it i used for my first time the thread method, because is the better way to cut this part without touch ANYTHING around. I've been impressed of how easy it is!.
2-) drill the hole for the tensioner axle/shaft. To do it i used a drill of the same diameter of the current axle, i inserted it to the bottom of the hole (so it is a tight fit and the danger of deviating doing the hole is minor) , with the hull lying on it's side, take care to have it vertical, and slowly drilling the hole from outside to inside. When the tensioner arrives i will drill the appropriate diameter for the shaft.
3-) cut the outer molded part of the tensioners using the same thread method.
4-) with the cutter of the image and the mini hammer, and with the hull hold between my knees, cut with care both sides and get rid of the excess plastic that the thread has not cut (in my case the cuts were no too straight)
5-) file to left the sides very polite and vertical
6-) use a long and straight stick of the appropriate diameter to verify that both tensioners are facing each other in the right way
the pics:


now the side view looks like a PzIV with the complete road train on the correct position, a lot of work still to do...

more to follow
best regards