Off to a good start Marc.
The neatness of your wiring bodes well for the future. This hobby can be frustrating at times but stick at it and the results will be very gratifying - oh - it is also very addictive. please keep posting pictures of this build.
HL King Tiger Build So Far (March 23 2014)
-
billpe
- Warrant Officer 2nd Class
- Posts: 1144
- Joined: Tue Jan 29, 2013 1:59 pm
- Location: The bowels of Kent
Re: Marc780 HL King Tiger Build Part7-All Wired up No Way to
Its entirely dependent on the battalion and date. Tigers in Combat 1 has style, font and location for Wehrmacht Heavy Tank Battalions and Tigers in Combat 2 for all the SS ones. http://www.tiif.de/ also has this information.Marc780 wrote: People put the KT numbers and the cross in various places, I'm guessing there probably is no one "right" location for the turret numbers/crosses on a late war German tank.
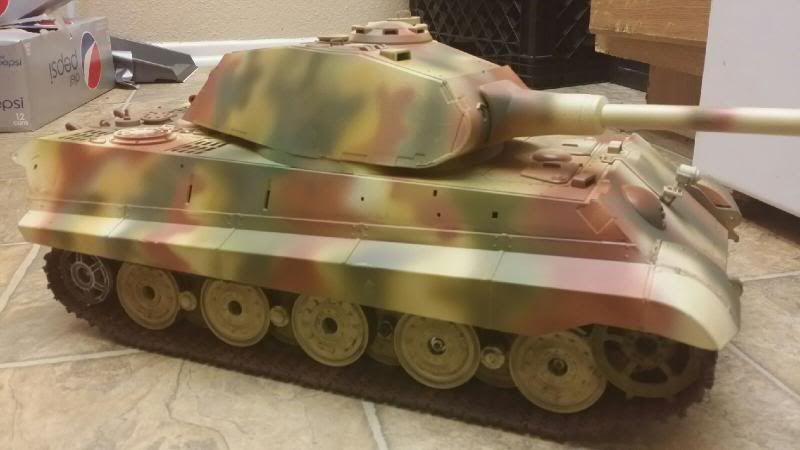
Marc780 Part 8-Stencil Flop and repaint
I tried doing the lettering on the turret using a stencil set. The results were discouraging - just not good enough. In fact they looked as if done by a drunken monkey wiht a brush. Unless you do the letter perfectly, of course, the whole thing doesn't look right. And this was nowhere near perfect. I'm just going to use the decals now!
Unfortunately I used paint for the letters so i had to undo that. That involved spot repainting with the airbrush. I do like how the effect came out. I resprayed in spots using dunkel "sand" from model master and olive drab. Here's the results...i think i'm about done with the paint on this tank!

There is still much to do, to finish a proper job on this tank. Most important i'm waiting transmiter and crystal and it doesnt even run...So that comes first naturally.
After that I have faster mabuchi motors on the way-i want more torque and climbing ability. Although the stock motors are about fast enough, I have enough tio worry about with this troublesome tank so i may just wait til i have a good reason to tear it all apart again.
Still need to do the fitting of the fan on the RX18, fitting the cables on the side of the hull, the jack, the rear fenders. Fitting nylon spacer under the drive sprocket on the drive shaft for stability. To top it all off, i have a new HL Tiger 1 on the way too!!! For that reason I've been trying to do a lot lately, i want the King Tiger to be up and running and just about done when the new tank gets here...or close as possible.
If I have done everything right- with the complete re wiring of this tank from the old burnt up rx01/rx13 board to the new RX18 system- all i should have to do is plug in the crystals, plug in the turret wires, put the batteries in the transmitter and drive it off...if if IF!
I did some of the decals tonight for the turret since like i said hand painting them not an option, for me! The only thing wrong with the decals really is you have no choice of numbers. I did something silly, because I didn't know better, i threw one of them in water because I thought that is how they work. I have not done ANY model decals in 30 years and in those days (when dinosaurs roamed the earth and a monogram tank model or a 1/32 ME109 cost $4) they were all water transfer.
The fact is the HL decals are dry transfer. I had to google that to find that out. You cut out your number, then peel off the back. Apply your number then use a pencil to press on the numbers through the clear plastic and they are supposed to stick. They are fiddly and you might need tweezers as they don't always stick right and sometimes try to pull off as you remove the clear plastic.
I am not sure whether to spray satin clear over these decals, I'm wondering if it would melt them. Sounds like a test of the extra decals is in order but I've done enough for now.

I gave it all a light coat of clear satin so i can get A good idea of how good the paint looks. I may stop right here or else, just do a very light wash of arroyo burnt umber just to highlight the seams plus a light drybrushing to blend the colors fully. One thing I've (re) learned about scale modelling is rushing a paint job is always a poor idea- when in doubt i learnt to leave things alone for a while no matter how eager to see results! I'll allow a couple days for the paint to hardened- the perfect excuse too. Now if only the dang transmitter would get here...
Unfortunately I used paint for the letters so i had to undo that. That involved spot repainting with the airbrush. I do like how the effect came out. I resprayed in spots using dunkel "sand" from model master and olive drab. Here's the results...i think i'm about done with the paint on this tank!


There is still much to do, to finish a proper job on this tank. Most important i'm waiting transmiter and crystal and it doesnt even run...So that comes first naturally.
After that I have faster mabuchi motors on the way-i want more torque and climbing ability. Although the stock motors are about fast enough, I have enough tio worry about with this troublesome tank so i may just wait til i have a good reason to tear it all apart again.
Still need to do the fitting of the fan on the RX18, fitting the cables on the side of the hull, the jack, the rear fenders. Fitting nylon spacer under the drive sprocket on the drive shaft for stability. To top it all off, i have a new HL Tiger 1 on the way too!!! For that reason I've been trying to do a lot lately, i want the King Tiger to be up and running and just about done when the new tank gets here...or close as possible.
If I have done everything right- with the complete re wiring of this tank from the old burnt up rx01/rx13 board to the new RX18 system- all i should have to do is plug in the crystals, plug in the turret wires, put the batteries in the transmitter and drive it off...if if IF!
I did some of the decals tonight for the turret since like i said hand painting them not an option, for me! The only thing wrong with the decals really is you have no choice of numbers. I did something silly, because I didn't know better, i threw one of them in water because I thought that is how they work. I have not done ANY model decals in 30 years and in those days (when dinosaurs roamed the earth and a monogram tank model or a 1/32 ME109 cost $4) they were all water transfer.
The fact is the HL decals are dry transfer. I had to google that to find that out. You cut out your number, then peel off the back. Apply your number then use a pencil to press on the numbers through the clear plastic and they are supposed to stick. They are fiddly and you might need tweezers as they don't always stick right and sometimes try to pull off as you remove the clear plastic.
I am not sure whether to spray satin clear over these decals, I'm wondering if it would melt them. Sounds like a test of the extra decals is in order but I've done enough for now.

I gave it all a light coat of clear satin so i can get A good idea of how good the paint looks. I may stop right here or else, just do a very light wash of arroyo burnt umber just to highlight the seams plus a light drybrushing to blend the colors fully. One thing I've (re) learned about scale modelling is rushing a paint job is always a poor idea- when in doubt i learnt to leave things alone for a while no matter how eager to see results! I'll allow a couple days for the paint to hardened- the perfect excuse too. Now if only the dang transmitter would get here...
Last edited by Marc780 on Tue Apr 22, 2014 2:17 pm, edited 1 time in total.
-
scalawag
Re: Marc780 Part 8-Stencil Flop and repaint
Hi Marc,
If you are using Tamiya clear the decals should be alright. The H/L decals are very limited, and the film on them is quite thick. There are much better decal sets around, I tend to use the ones from Peddinghaus.
http://www.ebay.co.uk/sch/m.html?_odkw= ... &_from=R40
Don't be put off by it being from Germany the service is really good. These are the traditional waterside decals.

Re: Marc780 Part 8-Stencil Flop and repaint
Seconding scallywag with the peddinghaus decals, very quick delivery and high quality!
I feel your pain about the stencils, I made up some balkencross ones for my sturm tiger and the end result was so bad I had to repaint and use decals! Took several hours to get back to square one.
I feel your pain about the stencils, I made up some balkencross ones for my sturm tiger and the end result was so bad I had to repaint and use decals! Took several hours to get back to square one.
-
PainlessWolf

- Colonel
- Posts: 7868
- Joined: Sun Feb 26, 2012 9:09 pm
- Location: Southern Colorado Rocky Mountains
Re: Marc780 Part 8-Stencil Flop and repaint
Good Morning,
A Third here on forgetting the stencils and using the Peddinghaus. ;o)
regards,
Painless
A Third here on forgetting the stencils and using the Peddinghaus. ;o)
regards,
Painless
...Money!? What's that!?...
Re: Marc780 Part 8-Stencil Flop and repaint
And here I thought stencils were the way to go.  I already bought the decals but still went with stencils. viewtopic.php?f=22&t=8956&start=340 - See Update 11/01/13 - Applying the Stencils.
You can probably notice in that thread (And maybe its a quirk of mine ) that I seem to be more fascinated with how things get done than the end result.
Were you able to get some photos of the markings you did with the stencils before you repainted? What type/brand of stencil did you use? Did you use an airbrush? I don't know but maybe I could identify what went wrong when you tried to paint using stencils. It could help others in this forum who want to try stencils but are intimidated by it.
I'm not saying stencils are superior to decals, Its a matter of taste. Although I had some anxious moments when I tried painting unit markings using stencils and considering it was my first time using this technique, I was pretty satisfied with the results. In fact it was one of the more gratifying parts of my build.
You can probably notice in that thread (And maybe its a quirk of mine
Were you able to get some photos of the markings you did with the stencils before you repainted? What type/brand of stencil did you use? Did you use an airbrush? I don't know but maybe I could identify what went wrong when you tried to paint using stencils. It could help others in this forum who want to try stencils but are intimidated by it.
I'm not saying stencils are superior to decals, Its a matter of taste. Although I had some anxious moments when I tried painting unit markings using stencils and considering it was my first time using this technique, I was pretty satisfied with the results. In fact it was one of the more gratifying parts of my build.
Re: Marc780 Part 8-Stencil Flop and repaint
Apologies, I have now read your previous post which contains a picture of the stencil you used. I think your issues are more to do with the stencil. The type of stencils you used, although flexible as you can create any combination of letters/number would be enormously difficult to use as it would be a royal pain to cut the individual numbers/letters and align them so they would look neat.
I would not use them. Again I think it would be better to choose any of the prepared unit numbers/marking available specifically for your king tiger. You can't change the numbers but at least it is easier to apply without making any alignment mistakes.
I had good experience using these from rctank.de - http://www.rctank.de/KING-TIGER_1
Re: Marc780 Part 8-Stencil Flop and repaint
Jeff101 i have to say those numbers came out perfectly! Probably the best way to go over a Zimmer it surface too rather then decals. I wish I had the skill and patience. unfortunately I doubt I'll ever make something good enough for Master's class but I have to say your panther sure is in that category.
Marc780 KT Part 9 Adding a Fan to the RX18 Box
Not sure whether this deserves a post all its own because i only did the one thing to the tank (transmiiter and crystals still not here-i've never worked so hard on something that doesn't function in all my life...)
I sent away for a Evercool 25 mm sized, 8000 rpm, 5 volt fan from amazon. It cost $11 and i got that one because it puts out lots of air for the size. However I'd get a 30 mm fan next time as there is plenty of room on the RX18 board box for that size a fan (but no bigger really). With either size fan you have to obliterate the reference decal on top so that is no use anymore, so it doesn't matter, either size will do.
I popped the 4 side latches of the plastic case, removed the board from the plastic case (it just falls out) and traced the outline of the fan. Realizing i'd need material to glue the fan too (i used glue not screws, didn't want to risk any metal in here) I traced around a nickel with a felt pen and that was the right size to cut. I dremeled the hole, clenaed up the jagged plastic bits then did the vent holes on the side. I cut holes only in the BOTTOM half of the case (i dont think there's enough plastic material on top half for vent holes unless you drill them small). I went on the conservative side cutting vent holes so as not to cut the plastic case to a useless swiss cheese box.
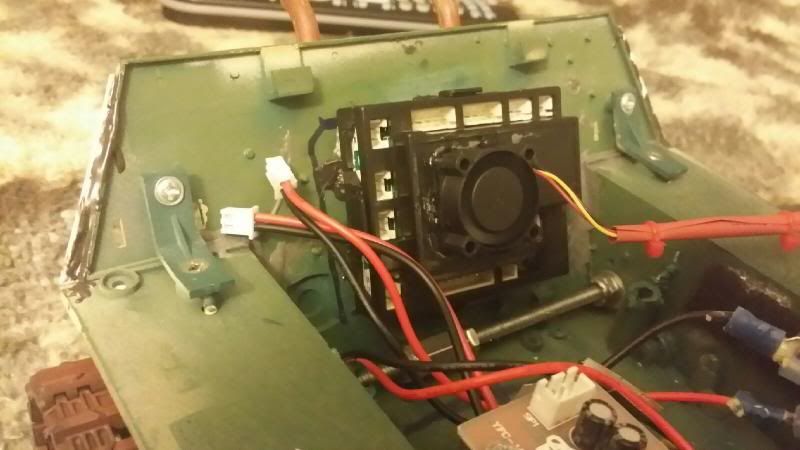
I ran the fan connected to a battery to see which direction the fan blows (I'd hate to glue the fan on the case facing the wrong way...that would suck really.) Then i glued the fan over the hole with Gorilla brand glue, the super glue (it works great-no runs and dries in seconds and super strong). (In the USA they sell a brand of glue by this name "gorilla glue" and there are several varieties of it. They make a dark brown kind for wood and metal, a brand of duct tape, and the super glue, in both a gel and a liquid. I would strongly advise NOT to use the brown (foaming) kind of Gorilla glue for gluing a fan like this. If you've never used that type of gorilla glue before, be aware the glue foams up as it dries making a mess of everything within 2 inches of it! So would probably even wreck the plastic box. If you just use the Gorilla "super glue" kind there will be no worries!)
As a test put it together to make sure the fan would still work and not be hitting the circuit board or the like, connected it to the tank battery (its wired straight to the on off switch meaning of course, on at all times). And it works fine. The little fan really does put out lots air for being so tiny -for its size it's loud like a giant bumble bee and all that sound is the fan blowing like mad! I tried several other types, computer fans of varying sizes before i got this this fan, and none of them were anywhere near as powerful.
But like i said next time i'd use a 30 mm size fan (I can't recommend the ever cool fan Highly enough it's amazing)
Waiting and waiting for the parts I decided to neaten the eletrics so they weren't such a botched looking spaghetti bowl. I shortened all the wires that were too long, used zip ties and shirnk tubing to make them neater and added a couple cable guides. I also added a 5 amp fuse to the power lead to the RX18. There is no holder needed-all you need is two female solderless connectors, that fit the fuse leads tightly enough (you can crimp them a bit with pliers to make them tighter if you have to).
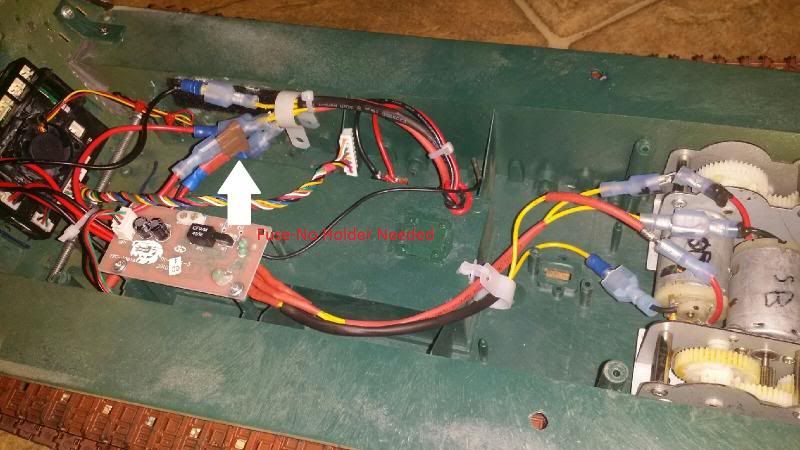
If i did do everything right...all i need to do when the transmitter comes is hook up turret wires, install the crystals and drive...if if...
I sent away for a Evercool 25 mm sized, 8000 rpm, 5 volt fan from amazon. It cost $11 and i got that one because it puts out lots of air for the size. However I'd get a 30 mm fan next time as there is plenty of room on the RX18 board box for that size a fan (but no bigger really). With either size fan you have to obliterate the reference decal on top so that is no use anymore, so it doesn't matter, either size will do.
I popped the 4 side latches of the plastic case, removed the board from the plastic case (it just falls out) and traced the outline of the fan. Realizing i'd need material to glue the fan too (i used glue not screws, didn't want to risk any metal in here) I traced around a nickel with a felt pen and that was the right size to cut. I dremeled the hole, clenaed up the jagged plastic bits then did the vent holes on the side. I cut holes only in the BOTTOM half of the case (i dont think there's enough plastic material on top half for vent holes unless you drill them small). I went on the conservative side cutting vent holes so as not to cut the plastic case to a useless swiss cheese box.

I ran the fan connected to a battery to see which direction the fan blows (I'd hate to glue the fan on the case facing the wrong way...that would suck really.) Then i glued the fan over the hole with Gorilla brand glue, the super glue (it works great-no runs and dries in seconds and super strong). (In the USA they sell a brand of glue by this name "gorilla glue" and there are several varieties of it. They make a dark brown kind for wood and metal, a brand of duct tape, and the super glue, in both a gel and a liquid. I would strongly advise NOT to use the brown (foaming) kind of Gorilla glue for gluing a fan like this. If you've never used that type of gorilla glue before, be aware the glue foams up as it dries making a mess of everything within 2 inches of it! So would probably even wreck the plastic box. If you just use the Gorilla "super glue" kind there will be no worries!)
As a test put it together to make sure the fan would still work and not be hitting the circuit board or the like, connected it to the tank battery (its wired straight to the on off switch meaning of course, on at all times). And it works fine. The little fan really does put out lots air for being so tiny -for its size it's loud like a giant bumble bee and all that sound is the fan blowing like mad! I tried several other types, computer fans of varying sizes before i got this this fan, and none of them were anywhere near as powerful.
But like i said next time i'd use a 30 mm size fan (I can't recommend the ever cool fan Highly enough it's amazing)
Waiting and waiting for the parts I decided to neaten the eletrics so they weren't such a botched looking spaghetti bowl. I shortened all the wires that were too long, used zip ties and shirnk tubing to make them neater and added a couple cable guides. I also added a 5 amp fuse to the power lead to the RX18. There is no holder needed-all you need is two female solderless connectors, that fit the fuse leads tightly enough (you can crimp them a bit with pliers to make them tighter if you have to).
If i did do everything right...all i need to do when the transmitter comes is hook up turret wires, install the crystals and drive...if if...
Last edited by Marc780 on Sat Apr 26, 2014 8:22 am, edited 3 times in total.
