Building a Mid-Production Normandy Tiger 1
Forum rules
This section is for posting a build log of your Heng Long tank.
Questions relating to issues you are having with your tank(s) should be posted in the General Questions forum here: viewforum.php?f=14
This section is for posting a build log of your Heng Long tank.
Questions relating to issues you are having with your tank(s) should be posted in the General Questions forum here: viewforum.php?f=14
Re: Building a Mid-Production Normandy Tiger 1
Looks great cant wait to see it painted mate...........Top job..... 
-
Red Devils

- Staff Sergeant
- Posts: 872
- Joined: Sun May 06, 2012 2:38 pm
- Location: Edmonton, Alberta, Canada
- Contact:
Re: Building a Mid-Production Normandy Tiger 1
Wow tanks,
I don't know how missed this one, I guess the ol' sniper eyes are fading but buddy, your killing this one. Well done.
By the way, where does one find that turret stowage box?
Later buddy,
Derek
I don't know how missed this one, I guess the ol' sniper eyes are fading but buddy, your killing this one. Well done.
By the way, where does one find that turret stowage box?
Later buddy,
Derek
The Princess Patricia's Canadian Light Infantry
First in the Field - Since 1914.
First in the Field - Since 1914.
-
tanks_for_the_memory

- Sergeant
- Posts: 501
- Joined: Tue Jan 04, 2011 4:50 pm
- Location: London
Re: Building a Mid-Production Normandy Tiger 1
Thanks for the kind comments… very encouraging. Believe me I can hardly wait to get the painting started as well!
To reiterate what I said somewhere way, way above this project is a mixture of scratch building and parts from various sources:
Asiatam / Taigen (the brands seem to be interchangeable): readily available from sellers like Welshdragon and Forgebear frequently praised on this site;
Tamiya: spare sprues for the Tiger 1 can be bought off ebay from a couple of very efficient Japanese sellers. Download the instruction book as a free pdf from the Tamiya website and then pick the ones you need. Order 2 or more at once and the postage starts to make sense. They arrive well-packed and super-fast;
Hachette: these were part of the Build You Own Tiger magazine series. This is still on-going, but it’s a very slow and expensive way to build a non-running (but super-detailed) late model Tiger 1. Issues frequently appear on ebay sold by people who have given up and that’s how I obtained mine (I recently sold on a few on ebay myself). The quality varies enormously, but the stowage bin, cupola and MG are gems.
Schumo: some metal, some resin. Pretty high grade, but not all expensive – e.g. the later model sprocket caps.
Aber: these are mostly photo-etch, superbly designed but expensive and, in places, very challenging to build. Some, however – e.g. the radio antenna – are relatively cheap and simple.
Finally, a few bits and pieces by unknown makers (e.g. the spare track link holders which I will be covering in due course).
Now, to follow on an almost logical way from the changes to ‘Basic changes to any Tiger 1 production model’ section above, I will now turn to…
Specific changes to mid-production Tiger 1
This section will detail changes specific to a mid production Tiger. I am certainly not presenting myself as some sort of authority on the tank – I’ve just read a lot of books, stared at a lot of photos and scratched my head a good deal. I emphasise that these features are for the mid-production, rubber-wheeled variant: some (but not all) will also apply to the later steel-wheeled model.
In fact, once you have made the alterations outlined above to bring the basic HL Tiger up to scratch there isn’t that much further to go. For the most part they are fairly cosmetic changes and to my mind these are also the most fun because they really bring the tank to life.
These are the most obvious differences between the early and mid production Tigers. Not all were introduced at the same time so I am going to deal with the modifications relevant to my Normandy tank. Since it is loosely based on the Tiger numbered ‘334’ of s.SS-Pz.Abt.101 then we are dealing with a vehicle produced around September/October 1943, several months after the introduction of the lower, cast form of cupola but just before the appearance of the gun travel lock.
1. Zimmerit;
2. Later cast, lower profile cupola;
3. Relocated turret roof fan and loader’s periscope (but not the close defence weapon);
4. Spare track links on turret sides;
5. Deleted smoke dischargers on turret sides;
6. Deleted armoured pistol port on turret side (for a time the port remained, although with a simple plug and chain);
7. Turret side escape hatch cast without bevelled edges;
8. Deleted Feifel air cleaners (although part of the venting on the engine deck often remained in place);
9. Altered rear engine deck openings;
10. Headlights deleted from front corners on top deck and replaced with single light on bracket in middle of front plate.
11. Re-arranged tool stowage with addition of ‘C’ hooks, etc;
12. Later flat (as opposed to domed) sprocket caps;
13. Tracks with cast-in ice cleats.
I will now cover each of these topics in an order which bears little or no relation to the above sequence (partly because I haven't yet finished them all!)
After that I will cover some of the other optional changes - e.g. removing front mud guards, battle damage, etc...
To reiterate what I said somewhere way, way above this project is a mixture of scratch building and parts from various sources:
Asiatam / Taigen (the brands seem to be interchangeable): readily available from sellers like Welshdragon and Forgebear frequently praised on this site;
Tamiya: spare sprues for the Tiger 1 can be bought off ebay from a couple of very efficient Japanese sellers. Download the instruction book as a free pdf from the Tamiya website and then pick the ones you need. Order 2 or more at once and the postage starts to make sense. They arrive well-packed and super-fast;
Hachette: these were part of the Build You Own Tiger magazine series. This is still on-going, but it’s a very slow and expensive way to build a non-running (but super-detailed) late model Tiger 1. Issues frequently appear on ebay sold by people who have given up and that’s how I obtained mine (I recently sold on a few on ebay myself). The quality varies enormously, but the stowage bin, cupola and MG are gems.
Schumo: some metal, some resin. Pretty high grade, but not all expensive – e.g. the later model sprocket caps.
Aber: these are mostly photo-etch, superbly designed but expensive and, in places, very challenging to build. Some, however – e.g. the radio antenna – are relatively cheap and simple.
Finally, a few bits and pieces by unknown makers (e.g. the spare track link holders which I will be covering in due course).
Now, to follow on an almost logical way from the changes to ‘Basic changes to any Tiger 1 production model’ section above, I will now turn to…
Specific changes to mid-production Tiger 1
This section will detail changes specific to a mid production Tiger. I am certainly not presenting myself as some sort of authority on the tank – I’ve just read a lot of books, stared at a lot of photos and scratched my head a good deal. I emphasise that these features are for the mid-production, rubber-wheeled variant: some (but not all) will also apply to the later steel-wheeled model.
In fact, once you have made the alterations outlined above to bring the basic HL Tiger up to scratch there isn’t that much further to go. For the most part they are fairly cosmetic changes and to my mind these are also the most fun because they really bring the tank to life.
These are the most obvious differences between the early and mid production Tigers. Not all were introduced at the same time so I am going to deal with the modifications relevant to my Normandy tank. Since it is loosely based on the Tiger numbered ‘334’ of s.SS-Pz.Abt.101 then we are dealing with a vehicle produced around September/October 1943, several months after the introduction of the lower, cast form of cupola but just before the appearance of the gun travel lock.
- Actually Tiger 232 of s.SS-Pz.Abt.101 - so a late production model - but showing classic combination or lower cupola, central headlight and zimmerit - note differences between pattern on hull and turret.jpg (39.94 KiB) Viewed 14443 times
2. Later cast, lower profile cupola;
3. Relocated turret roof fan and loader’s periscope (but not the close defence weapon);
4. Spare track links on turret sides;
5. Deleted smoke dischargers on turret sides;
6. Deleted armoured pistol port on turret side (for a time the port remained, although with a simple plug and chain);
7. Turret side escape hatch cast without bevelled edges;
8. Deleted Feifel air cleaners (although part of the venting on the engine deck often remained in place);
9. Altered rear engine deck openings;
10. Headlights deleted from front corners on top deck and replaced with single light on bracket in middle of front plate.
11. Re-arranged tool stowage with addition of ‘C’ hooks, etc;
12. Later flat (as opposed to domed) sprocket caps;
13. Tracks with cast-in ice cleats.
I will now cover each of these topics in an order which bears little or no relation to the above sequence (partly because I haven't yet finished them all!)
After that I will cover some of the other optional changes - e.g. removing front mud guards, battle damage, etc...
- Nice close-up of battle damage to Tiger 211 of s.SS-Pz.Abt.101. It shows how much these beasts could endure, although this was enough to stop the tank and kill some of the crew.jpg (45.37 KiB) Viewed 14443 times
My Mid-Production Normandy Tiger 1 build thread: http://www.rctankwarfare.co.uk/forums/v ... =22&t=8350
-
tanks_for_the_memory
- Sergeant
- Posts: 501
- Joined: Tue Jan 04, 2011 4:50 pm
- Location: London
Re: Building a Mid-Production Normandy Tiger 1
Zimmerit
This seems to strike fear and dread into some people, but for me (if you’ll forgive the pun) it’s the icing on the cake. Perhaps it’s something to do with the contrast between the heavy steel panzers and the somewhat dainty patterns the Germans applied on top of them (the same might be said of their camouflage). Besides, once you get into mid and late production Tigers you have no choice: apart from a few exotic hybrids resurrected from tank schools and workshops towards the end of the war (e.g. the well-known Fehrmann group), all mid and late-production Tigers had factory applied coating of zimmerit paste – and certainly all Tiger 1s in Normandy.
It’s easy to be daunted by the replication of zimmerit and although I had applied it to 1/35th scale models in my youth I was a little nervous myself. For this reason I took what I thought to be the lazy option by going for the stick on version bought off the internet. It looks fairly convincing and it’s quick to apply. Because it’s rubberised it should absorb any knocks from reckless driving and it’s also easy to cut away and drill into to create realistic battle damage. But that’s where the advantages end.
For a start it’s not actually that easy to stick on. The glue smells like the sort of stuff you use to fix a puncture on a bike – very powerful and, if applied too liberally, quite capable of melting the plastic underneath. The shape and patterning of the zimmerit is also of variable quality. The mantlet portion, for instance, is very nicely moulded and fits snugly around the gunner’s sights and machine gun port – but it should also extend around the sides. [N.B. It is also designed for the HL Tiger with the centrally positioned gun, so it certainly won’t fit a Tamiya mantlet.] Meanwhile, the turret side strips, which don’t quite fit, simply blank out the side vision ports and cover the side escape hatch in a very unconvincing way. Also, as soon as soon as you start to make changes to the tank – e.g. removing side mud guards – you will have to start filling in the gaps. Ironically, by the time I had finished adding or replacing the bits I didn’t like, I realised that it would have been far easier to have done the whole thing from scratch! So no, I’m not recommending it.
Where I needed to add or replace zimmerit I used standard Milliput and made the indentations with my trusty screwdriver using the existing portions as my guide. If you are applying it from scratch it is worth noting that most Normandy Tigers had a slightly different pattern – thicker indentations, bigger gaps – on the turret sides (but not the mantlet). I presume this was because the turret zimmerit was applied at a different stage of the manufacturing process from the hull.
A few other things I only managed to work out after studying photographs: the zimmerit was applied to the turret before the stowage bin was attached – so it should be visible if you are opening up the gap in the middle of the bin top. On the other hand it was not applied inside the rear exhaust shields (presumably because of the danger of it catching fire from the heat).
At the risk of stirring up a hornet’s nest I am afraid that I do not subscribe to the school of thought that the zimmerit was left off the front upper hull between the nose and glacis plate (i.e. in front of the driver’s visor and hull MG). I agree that in many photos the ridged pattern appears to be absent here, but I believe this is simply because in black and white images (which are of variable quality anyway) the angle at which the light falls on this area (which is close to horizontal) fails to provide the same contrast as it does on the vertical planes (such as the nose and glacis). There is also a pretty strong logical argument that there would be little point in applying anti-magnetic paste to the glacis plate when, in order to reach it, any (suitably courageous!) enemy soldier would have to reach over the more thinly armoured upper nose area. I agree that the German application of zimmerit didn’t always make total sense (e.g. it was sometimes applied to mudguards and schurzen), but leaving it off here seems a step too far. I would be happy to be provided with any conclusive proof to the contrary, however!
Because the pre-formed zimmerit is designed to stop short of the point where the upper nose plate joins the front one I chose to move my zimmerit forward to overlap this join. I then had to fill in the gaps left between the upper nose and the glacis.
Later on in this blog you will find out that I decided to take a totally different approach to the zimmerit...
- Early shot before many subsequent changes. It shows well the advantages and disadvantages of the Taigen stick-on zimmerit.jpg (43.47 KiB) Viewed 14440 times
It’s easy to be daunted by the replication of zimmerit and although I had applied it to 1/35th scale models in my youth I was a little nervous myself. For this reason I took what I thought to be the lazy option by going for the stick on version bought off the internet. It looks fairly convincing and it’s quick to apply. Because it’s rubberised it should absorb any knocks from reckless driving and it’s also easy to cut away and drill into to create realistic battle damage. But that’s where the advantages end.
For a start it’s not actually that easy to stick on. The glue smells like the sort of stuff you use to fix a puncture on a bike – very powerful and, if applied too liberally, quite capable of melting the plastic underneath. The shape and patterning of the zimmerit is also of variable quality. The mantlet portion, for instance, is very nicely moulded and fits snugly around the gunner’s sights and machine gun port – but it should also extend around the sides. [N.B. It is also designed for the HL Tiger with the centrally positioned gun, so it certainly won’t fit a Tamiya mantlet.] Meanwhile, the turret side strips, which don’t quite fit, simply blank out the side vision ports and cover the side escape hatch in a very unconvincing way. Also, as soon as soon as you start to make changes to the tank – e.g. removing side mud guards – you will have to start filling in the gaps. Ironically, by the time I had finished adding or replacing the bits I didn’t like, I realised that it would have been far easier to have done the whole thing from scratch! So no, I’m not recommending it.
- This shows the added zimmerit on the mantlet and turret sides, glacis plate and hull side where mudguard had been removed.jpg (89.94 KiB) Viewed 14440 times
A few other things I only managed to work out after studying photographs: the zimmerit was applied to the turret before the stowage bin was attached – so it should be visible if you are opening up the gap in the middle of the bin top. On the other hand it was not applied inside the rear exhaust shields (presumably because of the danger of it catching fire from the heat).
- A lot has changed since this was taken - new tool box, new lower hull - but it shows the extended zimmerit now possible because of the rear decking rearrangement and the cut-outs for the Divisional insignia and mufflers.jpg (35.4 KiB) Viewed 14440 times
- Another rear view showing the pretty neat fit around the rear hull furniture, although the turrret escape hatch still needs attention.jpg (37.76 KiB) Viewed 14440 times
- This Tiger seen in Italy in March 44 is the slightly later mid-production model with travel lock, but it shows clearly how the zimmerit was not applied inside the muffler shields.jpg (37.21 KiB) Viewed 14440 times
Because the pre-formed zimmerit is designed to stop short of the point where the upper nose plate joins the front one I chose to move my zimmerit forward to overlap this join. I then had to fill in the gaps left between the upper nose and the glacis.
- On the glacis plate the Taigen zimmerit also needs quite a lot of work to fill in gaps around the MG and driver's visor - the remaining work was the result of my decision to move it forward to overlap the front of the hull.jpg (35.4 KiB) Viewed 14440 times
- On the other hand they do save quite a lot of work when it comes to sides of the turret and hull - and look pretty convincing!.jpg (36.97 KiB) Viewed 14440 times
- A new approach to zimmerit using Magic Sculp.jpg (35.91 KiB) Viewed 13098 times
- Overall the Magic Sculp gives a much more pleasing look than the old Taigen zimmerit....jpg (36.2 KiB) Viewed 13098 times
- The Magic Sculp zimmerit is a vast improvement.jpg (36.2 KiB) Viewed 13098 times
Last edited by tanks_for_the_memory on Tue Jun 10, 2014 1:22 am, edited 2 times in total.
My Mid-Production Normandy Tiger 1 build thread: http://www.rctankwarfare.co.uk/forums/v ... =22&t=8350
-
tanks_for_the_memory
- Sergeant
- Posts: 501
- Joined: Tue Jan 04, 2011 4:50 pm
- Location: London
Re: Building a Mid-Production Normandy Tiger 1
Later Cupola
The most obvious difference between the early and mid-to-late Tigers is probably the lower commander’s cupola, which replaced the ‘drum’ style in 1943. There are some pretty expensive replacements parts out there, but I went for the metal one made by Asiatam [now branded as Taigen], which is readily available, reasonably priced and has a nice working spring action. It also comes with an AA mount (which is pretty basic) and, strangely, an MG42 in place of the usual MG34. Has anyone ever seen a photo of an MG42 used on a Tiger 1? Since the MG used on the AA mount would actually have been one of the two internal MGs from the Tank I think this very unlikely.
After you prise off the old Heng Long cupola (easily done by running a knife along the seam) the Asiatam cupola appears to be designed to simply sit neatly on the lower half (the bit still attached to the roof). Unfortunately this means that the cupola is far too high, which looks odd, especially as the reason the real thing was changed was to stop the commander being such an easy target. There’s a great story in the book ‘Tigers in the Mud’ by panzer ace Otto Carius about him bending down to light a cigarette just as his old-style cupola was blown off by a Russian tank shell. One of his crew had only just chastised him for smoking (which was officially verboten in Tigers anyway) – but it saved his life!
Anyway, what I did was to get rid of what remained of the old cupola base leaving only the very lowest ring to serve as the weld seam. I found the best way to do this was to use a rotary tool with a sanding wheel and simply work away from the inside of the hole until this was all that was left. The new cupola then fits snugly into the hole with its base flush with the underside of the turret roof.
Bear in mind that this also deletes one of the mounting points for the bb trough. This obviously has repercussions for those who want to retain the HL bb gun, but it is also worth knowing (which I didn’t at the time) that this same mounting point is also used for the Asiatam recoil unit (see my fix for this above).
The Asiatam cupola is an open one-piece casting so that the armoured periscope covers have no bottom and, of course, no periscopes. I was going to ignore this but it started to bug me. Putting in a bottom to the periscope covers is actually pretty easy. I simply cut out a circle from a piece of thin plastic card (using my Jakar compass cutter) and then test fitted it into place. I then scribed in the diameter of the internal hole using the cupola itself and cut it out roughly with a craft knife. The disc was then glued into place and clamped onto the underside of the cupola. When it dried I smoothed the inner circle using a drill and sander.
The periscopes themselves were made rather simply by cutting a strip of thick plastic card into blocks of the appropriate width and gluing these onto a thin strip which matched the width of the housings. The gap between each block was sufficient to allow them to sit snugly inside the armoured covers. I then inserted them one at a time, trimming the front of the strip to make it flush with the outer edge. I could have done it better, I know, but I hope that once the whole thing is painted and I have put a touch of gloss paint on the blocks they will look the part.
To replicate the cupola’s weld seam the outline of the original drum cupola which I had left intact on the original roof was then scribed with my trusty pyrograve (essentially a low temperature soldering iron with a fine tip) which is still working fine 30 years after I bought it! This was then softened a little with liquid cement to prevent it looking too harsh.
I have left off the AA mount for now – but I have a lovely detailed mount and gun from the Hachette Tiger of which more later. Incidentally the Hachette cupola is itself a very nice piece, although being entirely made of plastic I remain unconvinced that it would stand up to much handling. [See later on in this blog that I decided to use the Hachette cupola after all!]
Once again, if you look further along in this build you will see that I replaced the Taigen cupola with the Hachette part, heavily modified, which also allowed me to use the new Schumo resin periscopes.
Turret top
For any mid or late production Tiger the armoured extraction fan needs to be deleted from the five o’clock position and a new one placed in the middle above the gun breach. Asiatam sell a set which includes the new style of fan along with the loader’s periscope shield and a close-defence weapon. The fan needs a little work to make it convincing: it misses the series of tabs around the outside for the attachment of a waterproof cover (which remained even though these tanks were no longer submersible) and there should be a weld bead where it joins to the turret roof. The fan that comes with the Hachette kit is not much better: it has the weld bead but not the tabs and the securing bolts protrude from the top, whereas they ought to be recessed (as they are on the Asiatam fan). The Asiatam periscope cover is also a little odd because it doesn’t allow for the forward slope of the roof – I had to file the bottom and mount it on plastic card before adding a weld bead from Milliput. With hindsight I should simply have made one from bent brass. The Hachette cover, on the other hand, is far too thick – although it does come with an actual periscope which I used after cutting an appropriate hole in the roof. The close-defence weapon (or nahverteidigungswaffe - essentially a grenade launcher) doesn’t belong on a mid-production Tiger at all: it only featured on the late production models with the thickened turret roof, Tiger II loader’s hatch, etc.
Pistol port
The armoured pistol port beside the commander disappeared from the turret at around the same time that the new cupola was introduced. However, it’s often overlooked that a number of mid-production tanks (presumably the next in the line) still had a pistol port, albeit with a simple plug and internal chain. Among these Tigers was ‘334’ shown above (see the photo taken at Lulworth) and at least one other that was knocked out alongside the Battalion commander Wittman at the time of his death. The HL armoured port is easily prised off. After that I simply drilled a hole (perhaps slightly too high) and created a plug from a 1/35th scale German Teller mine (which I just happened to have lying around). Should you want to go further there is actually a rather nice working metal plug and chain available on-line for the King Tiger turret which looks like it will fit the bill perfectly.
Turret side escape hatch cast without bevelled edges
The mid-production escape hatch was essentially the same as the earlier model (i.e. no cut-off hinge to accommodate a turret ring guard), but it was simplified so that the edges were no longer bevelled – i.e. shaped so that they ran at an angle away from the turret sides. The earlier type was presumably designed to decrease the chance of a ricochet taking off the hatch, but was discontinued as it involved additional machining. This is a small difference and easily corrected once you add zimmerit. Luckily the HL hatch can be prised away from the turret. Having done this I simply covered it with milliput and built up the sides to the correct profile before adding the indentations. This also helped me do away with the totally unconvincing stick-on zimmerit portion which had (wrongly) faithfully replicated the bevelled profile of the original. The HL hatch, by the way, is not actually round (as it should be) but slightly oval – but I can live with that.
- Asiatam cupola before periscopes added and weld bead textured. On left new fan cover with Milliput weld bead.JPG (66.47 KiB) Viewed 14416 times
- Under side sealed with disc of plasticard - in the back ground the original rear turret fix before I replaced the stowage bin.jpg (24.48 KiB) Viewed 14416 times
Anyway, what I did was to get rid of what remained of the old cupola base leaving only the very lowest ring to serve as the weld seam. I found the best way to do this was to use a rotary tool with a sanding wheel and simply work away from the inside of the hole until this was all that was left. The new cupola then fits snugly into the hole with its base flush with the underside of the turret roof.
Bear in mind that this also deletes one of the mounting points for the bb trough. This obviously has repercussions for those who want to retain the HL bb gun, but it is also worth knowing (which I didn’t at the time) that this same mounting point is also used for the Asiatam recoil unit (see my fix for this above).
The Asiatam cupola is an open one-piece casting so that the armoured periscope covers have no bottom and, of course, no periscopes. I was going to ignore this but it started to bug me. Putting in a bottom to the periscope covers is actually pretty easy. I simply cut out a circle from a piece of thin plastic card (using my Jakar compass cutter) and then test fitted it into place. I then scribed in the diameter of the internal hole using the cupola itself and cut it out roughly with a craft knife. The disc was then glued into place and clamped onto the underside of the cupola. When it dried I smoothed the inner circle using a drill and sander.
The periscopes themselves were made rather simply by cutting a strip of thick plastic card into blocks of the appropriate width and gluing these onto a thin strip which matched the width of the housings. The gap between each block was sufficient to allow them to sit snugly inside the armoured covers. I then inserted them one at a time, trimming the front of the strip to make it flush with the outer edge. I could have done it better, I know, but I hope that once the whole thing is painted and I have put a touch of gloss paint on the blocks they will look the part.
- Inserting my 'magazine' of periscopes.....jpg (24.83 KiB) Viewed 14416 times
I have left off the AA mount for now – but I have a lovely detailed mount and gun from the Hachette Tiger of which more later. Incidentally the Hachette cupola is itself a very nice piece, although being entirely made of plastic I remain unconvinced that it would stand up to much handling. [See later on in this blog that I decided to use the Hachette cupola after all!]
- Cupola now has periscopes added, weld bead textured and turret fan has been detailed.jpg (21.31 KiB) Viewed 14416 times
- Plan view showing both rain cover supports, locking latch (brass) and hatch stop (white plastic card).jpg (28.83 KiB) Viewed 12931 times
For any mid or late production Tiger the armoured extraction fan needs to be deleted from the five o’clock position and a new one placed in the middle above the gun breach. Asiatam sell a set which includes the new style of fan along with the loader’s periscope shield and a close-defence weapon. The fan needs a little work to make it convincing: it misses the series of tabs around the outside for the attachment of a waterproof cover (which remained even though these tanks were no longer submersible) and there should be a weld bead where it joins to the turret roof. The fan that comes with the Hachette kit is not much better: it has the weld bead but not the tabs and the securing bolts protrude from the top, whereas they ought to be recessed (as they are on the Asiatam fan). The Asiatam periscope cover is also a little odd because it doesn’t allow for the forward slope of the roof – I had to file the bottom and mount it on plastic card before adding a weld bead from Milliput. With hindsight I should simply have made one from bent brass. The Hachette cover, on the other hand, is far too thick – although it does come with an actual periscope which I used after cutting an appropriate hole in the roof. The close-defence weapon (or nahverteidigungswaffe - essentially a grenade launcher) doesn’t belong on a mid-production Tiger at all: it only featured on the late production models with the thickened turret roof, Tiger II loader’s hatch, etc.
- On left loader's periscope and metal cover with milliput weld beams.jpg (29.02 KiB) Viewed 14416 times
The armoured pistol port beside the commander disappeared from the turret at around the same time that the new cupola was introduced. However, it’s often overlooked that a number of mid-production tanks (presumably the next in the line) still had a pistol port, albeit with a simple plug and internal chain. Among these Tigers was ‘334’ shown above (see the photo taken at Lulworth) and at least one other that was knocked out alongside the Battalion commander Wittman at the time of his death. The HL armoured port is easily prised off. After that I simply drilled a hole (perhaps slightly too high) and created a plug from a 1/35th scale German Teller mine (which I just happened to have lying around). Should you want to go further there is actually a rather nice working metal plug and chain available on-line for the King Tiger turret which looks like it will fit the bill perfectly.
- Close up of Tiger 334 showing open pistol port and many other interesting details!.jpg (21.08 KiB) Viewed 14416 times
- Last style of pistol port - made from a 1 35th scale German telermine. Photo taken before I replaced stowage bin and track hangers.jpg (39.84 KiB) Viewed 14416 times
The mid-production escape hatch was essentially the same as the earlier model (i.e. no cut-off hinge to accommodate a turret ring guard), but it was simplified so that the edges were no longer bevelled – i.e. shaped so that they ran at an angle away from the turret sides. The earlier type was presumably designed to decrease the chance of a ricochet taking off the hatch, but was discontinued as it involved additional machining. This is a small difference and easily corrected once you add zimmerit. Luckily the HL hatch can be prised away from the turret. Having done this I simply covered it with milliput and built up the sides to the correct profile before adding the indentations. This also helped me do away with the totally unconvincing stick-on zimmerit portion which had (wrongly) faithfully replicated the bevelled profile of the original. The HL hatch, by the way, is not actually round (as it should be) but slightly oval – but I can live with that.
- Loader's hatch after I decided to scrap the original zimmerit and redo it completely.jpg (22.07 KiB) Viewed 14416 times
- Close-up of loader's escape hatch with milliput zimmerit.jpg (33.13 KiB) Viewed 14416 times
Last edited by tanks_for_the_memory on Mon Jul 28, 2014 12:02 am, edited 4 times in total.
My Mid-Production Normandy Tiger 1 build thread: http://www.rctankwarfare.co.uk/forums/v ... =22&t=8350
-
tanks_for_the_memory
- Sergeant
- Posts: 501
- Joined: Tue Jan 04, 2011 4:50 pm
- Location: London
Re: Building a Mid-Production Normandy Tiger 1
Well another Christmas Day has come and gone - the third since I started this project. So I had better get on with it hadn't I?
Gears, wheels and tracks update
New gears
Part of the delay since my last posting was caused by my decision to upgrade the gears in this Tiger. Ever since opting for the Taigen/Asiatam lower hull I had struggled to make the old gears sit properly in the new one.
The HL metal gears came from the standard metal tracks Tiger 1 and seemed to work fine until I swapped the tracks for the Taigen late-pattern metal variety. For some reason the left sprocket and the new tracks never seemed to get on. It was obviously an alignment problem and it's possible that one of my axles was bent because it didn't go away once I moved the old metal gears into the new hull.
Another struggle was getting the old gears to sit in the new lower hull. The metal floor pan has a number of holes for the gears to screw into but only one of them seemed to match on each side.
So I bit the bullet and opted for Taigen 4-1 ratio short shaft metal gearboxes with steel gears. These came from Steve at Welsh Dragon who describes them as: "Taigen's top of the range gearboxes at an affordable price". Again a pretty heavy blow to the wallet (almost £40) but they do run very well and provide a much more realistic motion to the tank. Unsurprisingly they also matched up much better with the holes in the floor pan!
Something else to bear mind: the old HL metal sprockets will not fit these gears because the axle screws are bigger. Luckily I had already acquired Taigen sprockets because I needed the metal idlers.
Wheels
This came as a bit of a surprise. Having had at least 6 HL Tiger 1's pass through my hands it was only recently that I noticed that some of them come with different (and better) road wheels. This also explained why the new metal axles I had brought from Welsh Dragon when I upgraded to the new lower hull were too short.
Basically there are two types. One set have a shorter axle with the screw head hidden when the outer wheel is attached; the other have a longer axle which goes through both halves of the wheel with the screw head exposed. I suppose the latter might be stronger, but the advantage of the former is that the inner wheel has the correct detail complete with hexagonal hub and oil nipple. These are virtually identical to the Tamiya wheels.
Luckily the other Tiger I had in the house had the better wheels and so I was able to swap them for the ones which came from my metal-tracked HL Tiger. The only question I have is: which ones are the old ones and which are the new?
Tracks
I have already covered the late-pattern Taigen tracks above. However since then I decided to obtain some metal tracks for my Stug III and came to hear of Impact tracks. These are marketed by Mitosal of Singapore: http://mitosal.com/
Like the Taigen tracks they are of the closed-pin type (meaning that, like the real thing, the track pin cannot be seen from the inside of the track). However they come in a nice dull metal and lack the prominent sink holes which blight the Taigen links. They also have better scaled pins in my opinion. Like Taigen metal tracks they certainly aren't cheap - especially when postage is taken into account.
Having already gone for the Taigen tracks I couldn't really justify buying a completely new set. However since I was ordering some Impact tracks for my Stug I decided to get some Impact Tiger links at the same time to use for the spares on my turret (my Tiger is not going to have spares mounted on the hull front).
I should add that Mitosal's service was impeccable: friendly and efficient and there is no language difficulty at all. They also do a nice range of cast screw heads, etc.
Gears, wheels and tracks update
New gears
Part of the delay since my last posting was caused by my decision to upgrade the gears in this Tiger. Ever since opting for the Taigen/Asiatam lower hull I had struggled to make the old gears sit properly in the new one.
The HL metal gears came from the standard metal tracks Tiger 1 and seemed to work fine until I swapped the tracks for the Taigen late-pattern metal variety. For some reason the left sprocket and the new tracks never seemed to get on. It was obviously an alignment problem and it's possible that one of my axles was bent because it didn't go away once I moved the old metal gears into the new hull.
Another struggle was getting the old gears to sit in the new lower hull. The metal floor pan has a number of holes for the gears to screw into but only one of them seemed to match on each side.
So I bit the bullet and opted for Taigen 4-1 ratio short shaft metal gearboxes with steel gears. These came from Steve at Welsh Dragon who describes them as: "Taigen's top of the range gearboxes at an affordable price". Again a pretty heavy blow to the wallet (almost £40) but they do run very well and provide a much more realistic motion to the tank. Unsurprisingly they also matched up much better with the holes in the floor pan!
Something else to bear mind: the old HL metal sprockets will not fit these gears because the axle screws are bigger. Luckily I had already acquired Taigen sprockets because I needed the metal idlers.
Wheels
This came as a bit of a surprise. Having had at least 6 HL Tiger 1's pass through my hands it was only recently that I noticed that some of them come with different (and better) road wheels. This also explained why the new metal axles I had brought from Welsh Dragon when I upgraded to the new lower hull were too short.
Basically there are two types. One set have a shorter axle with the screw head hidden when the outer wheel is attached; the other have a longer axle which goes through both halves of the wheel with the screw head exposed. I suppose the latter might be stronger, but the advantage of the former is that the inner wheel has the correct detail complete with hexagonal hub and oil nipple. These are virtually identical to the Tamiya wheels.
Luckily the other Tiger I had in the house had the better wheels and so I was able to swap them for the ones which came from my metal-tracked HL Tiger. The only question I have is: which ones are the old ones and which are the new?
- The better HL road wheels have the correct inner rim detail over the axles.jpg (53.73 KiB) Viewed 14326 times
- The detail is very close in quality to the Tamiya wheels - complete with oil nipple.jpg (48.15 KiB) Viewed 14326 times
I have already covered the late-pattern Taigen tracks above. However since then I decided to obtain some metal tracks for my Stug III and came to hear of Impact tracks. These are marketed by Mitosal of Singapore: http://mitosal.com/
Like the Taigen tracks they are of the closed-pin type (meaning that, like the real thing, the track pin cannot be seen from the inside of the track). However they come in a nice dull metal and lack the prominent sink holes which blight the Taigen links. They also have better scaled pins in my opinion. Like Taigen metal tracks they certainly aren't cheap - especially when postage is taken into account.
Having already gone for the Taigen tracks I couldn't really justify buying a completely new set. However since I was ordering some Impact tracks for my Stug I decided to get some Impact Tiger links at the same time to use for the spares on my turret (my Tiger is not going to have spares mounted on the hull front).
I should add that Mitosal's service was impeccable: friendly and efficient and there is no language difficulty at all. They also do a nice range of cast screw heads, etc.
- Impact late pattern Tiger 1 tracks on the left, Taigen on the right.jpg (54.19 KiB) Viewed 14326 times
- View from the side - Impact tracks on the left, Taigen on the right. They are of comparable thickness.jpg (43.99 KiB) Viewed 14326 times
- View from the inside - the Impact tracks certainly have less prominent sink holes.jpg (52.07 KiB) Viewed 14326 times
- The Impact tracks are closest - the track pins are also better scaled.jpg (51.84 KiB) Viewed 14326 times
Last edited by tanks_for_the_memory on Thu Dec 27, 2012 8:13 pm, edited 1 time in total.
My Mid-Production Normandy Tiger 1 build thread: http://www.rctankwarfare.co.uk/forums/v ... =22&t=8350
-
tanks_for_the_memory
- Sergeant
- Posts: 501
- Joined: Tue Jan 04, 2011 4:50 pm
- Location: London
Re: Building a Mid-Production Normandy Tiger 1
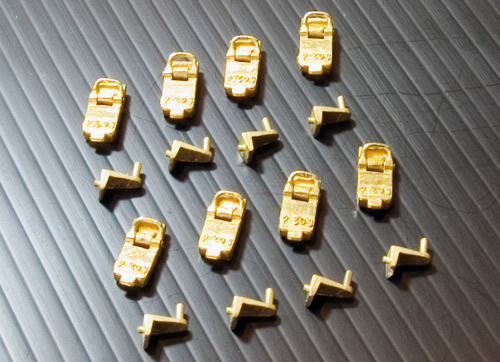
Spare track links on turret sides
These were one of the earliest modifications to the basic Tiger 1 - spare track links hung from the turret sides started appearing before the drum cupola was replaced by lower cast type.
Presumably the aim was not just to stow spare track links - but also to afford additional armour protection, particularly against hollow charge AP rounds. The Germans seem to have had considerable faith in the armour-boosting properties of spare tracks, but whether they actually succeeded in achieving this - or simply providing shot traps for incoming rounds - is a matter of debate.
Anyway, once the smoke dischargers disappear from the turret sides (there was a short overlap) the track links are a distinctive part of the tank's look and essential for any Tiger from the mid to late production run.
There are at least five options on the market:
1. Aber
2. Schumo
3. Maker unknown
4. Hachette (from 'Build Your Own Tiger Tank' magazine)
5. Taigen/Asiatam
1 & 2 are the priciest (and the Aber ones aren't available separately as far as I know); 4 are at least moveable, but lack any casting numbers; 5 are very crude but at least have strength and simplicity on their side.
And 3? Well these were my choice. Only problem is there is nothing on the packaging to show who makes them. Welsh Dragon don't sell them either, but Tank Zone do. They're almost half the price of the more expensive type and very nice. You can find them here (at least when I last looked):
http://www.tankzone.co.uk/images/inlet/trackholders.jpg
Of course they don't come with the spare links themselves, but I would recommend Impact (see above). The trouble with using any Heng Long spare links is that they are a) 'open pinned' (and this shows) and b) the wrong early type.
The 'Maker Unknown' track holders and brackets come with a handy paper template which you cut out and place over the side of the turret to show exactly where they should go. Unfortunately, as can be seen from photos elsewhere in this post, I originally used the Taigen brackets - and attempted to place them by eye - so when I came to fit the better ones properly I had already made a bit of a mess of my zimmerit!
Originally there were three brackets attached to the other side of the turret, but crews in the field soon discovered that one made opening the engine hatch difficult - so it was soon deleted. This set does provide the missing third one however.
The draw-back with most of these hanger sets is the fact that there isn't an awful lot of strength in attaching the upper hangers to the turret sides. The real things were welded along the very edge of the tops of the turret sides. So I decided to beef mine up a bit by drilling into the underside and gluing lengths of metal rod in place with 5 minute epoxy. Once set these were then pushed into holes drilled into the turret top and the weld beads made using Milliput gave a little extra strength. So far they have held.
The lower brackets are less of a problem because they have decent sized pegs to insert them into the lower turret sides.
The track links themselves sit well onto the lower brackets and the idea is that the upper brackets clamp them to the turret sides. So far I have used a little Blutack to keep them in line, but I suspect I may have to try something a little more permanent in the end. But I will leave this until after I have almost finished and decided whether to leave any without a track link.
Again, if you leap forward in this blog you will see that I found a better way of attaching the track hangers to the turret...
- The Tiger suddenly looks more business-like.jpg (29.67 KiB) Viewed 14321 times
Presumably the aim was not just to stow spare track links - but also to afford additional armour protection, particularly against hollow charge AP rounds. The Germans seem to have had considerable faith in the armour-boosting properties of spare tracks, but whether they actually succeeded in achieving this - or simply providing shot traps for incoming rounds - is a matter of debate.
Anyway, once the smoke dischargers disappear from the turret sides (there was a short overlap) the track links are a distinctive part of the tank's look and essential for any Tiger from the mid to late production run.
There are at least five options on the market:
1. Aber
2. Schumo
3. Maker unknown
4. Hachette (from 'Build Your Own Tiger Tank' magazine)
5. Taigen/Asiatam
1 & 2 are the priciest (and the Aber ones aren't available separately as far as I know); 4 are at least moveable, but lack any casting numbers; 5 are very crude but at least have strength and simplicity on their side.
And 3? Well these were my choice. Only problem is there is nothing on the packaging to show who makes them. Welsh Dragon don't sell them either, but Tank Zone do. They're almost half the price of the more expensive type and very nice. You can find them here (at least when I last looked):
http://www.tankzone.co.uk/images/inlet/trackholders.jpg
- Track holders from unknown manufacturer - available from Tankzone as I type.jpg (72.98 KiB) Viewed 14147 times
The 'Maker Unknown' track holders and brackets come with a handy paper template which you cut out and place over the side of the turret to show exactly where they should go. Unfortunately, as can be seen from photos elsewhere in this post, I originally used the Taigen brackets - and attempted to place them by eye - so when I came to fit the better ones properly I had already made a bit of a mess of my zimmerit!
Originally there were three brackets attached to the other side of the turret, but crews in the field soon discovered that one made opening the engine hatch difficult - so it was soon deleted. This set does provide the missing third one however.
- Track hangers from underneath reinforced with plasticard and metal rod.jpg (43.14 KiB) Viewed 14321 times
- Corresponding holes drilled around top of turret sides.jpg (43.15 KiB) Viewed 14321 times
The lower brackets are less of a problem because they have decent sized pegs to insert them into the lower turret sides.
The track links themselves sit well onto the lower brackets and the idea is that the upper brackets clamp them to the turret sides. So far I have used a little Blutack to keep them in line, but I suspect I may have to try something a little more permanent in the end. But I will leave this until after I have almost finished and decided whether to leave any without a track link.
- Track hangers installed with Milliput weld beads.jpg (25.37 KiB) Viewed 14321 times
- And the two installed on the other side.jpg (24.46 KiB) Viewed 14321 times
- They certainly look the part.jpg (45.79 KiB) Viewed 14321 times
- Another view of the track hangers with Impact tracks in place.jpg (32.02 KiB) Viewed 14274 times
- Another view with Impact track links installed.jpg (30.24 KiB) Viewed 14274 times
- The turret track hangers back in place and awaiting weld beads.jpg (33.88 KiB) Viewed 11420 times
Last edited by tanks_for_the_memory on Sun Jun 28, 2015 11:20 pm, edited 3 times in total.
My Mid-Production Normandy Tiger 1 build thread: http://www.rctankwarfare.co.uk/forums/v ... =22&t=8350
-
Red Devils
- Staff Sergeant
- Posts: 872
- Joined: Sun May 06, 2012 2:38 pm
- Location: Edmonton, Alberta, Canada
- Contact:
Re: Building a Mid-Production Normandy Tiger 1
Tanks, your Tiger Turret details are great. Your work will be a template for my turret. Well done buddy...
Derek
Derek
The Princess Patricia's Canadian Light Infantry
First in the Field - Since 1914.
First in the Field - Since 1914.
-
tanks_for_the_memory
- Sergeant
- Posts: 501
- Joined: Tue Jan 04, 2011 4:50 pm
- Location: London
Re: Building a Mid-Production Normandy Tiger 1
Front headlight
Another distinctive feature of the later Tiger 1 was the single front headlight to replace the twin headlights at the front corners of the superstructure. However this was another one of those changes introduced gradually. There was a transitional stage where the light was deleted from the radio operator/machine gunner's side leaving only the light on the driver's side and some tanks had the centrally mounted light along with the latter.
If you look at the picture above (and detail below) you can see that at least one of the Tiger's in Battalion 101 had the interim arrangement - i.e. no radio operator's side headlight but no central headlight either. This was Tiger '323' - i.e. the third tank of the second platoon of the third company (you read the number from right to left). This would be quite a useful short cut for someone who is aiming for a Normandy mid-production Tiger 1 but does not want to remove the moulded-on tools - because there is no need to move the jack block.
Also worth noting is the fact that the bow machine gun is not fitted on the march - either to spare it from dust or because it was kept in the turret handy for the cupola AA mount.
Anyway, substituting the front mounted headlight is not as simple as it looks. It's easy enough to dispose of the old HL headlights and their mounts - although be sure to keep the wiring circuit intact if you want the new headlight to light up.
There seems to be only one suitable replacement on the market - made by Taigen. The light itself is nicely made, with a tiny working bulb and a removable cover. Note that, despite dire warnings on the packaging, the bulb works perfectly well as part of the old HL wiring circuit and will not blow.
The bracket for the light, however, is rather crude - simply a thick inverted 'L' of metal with a plug to fit into a hole which needs to be drilled into the glacis. The real thing was 'hung' on a metal bracket shaped from a strip which was bent over the top of the glacis plate. To support it there was a triangular metal support underneath.
I decided to make things a little difficult for myself by filing away the old, simple bracket to leave just the mounting base. Interestingly the Germans simply carried on using the old mounts which had been used on the superstructure top. I then glued this onto a bracket of suitable width and thickness bent from brass strip. This is a good example of a situation where metal is absolutely the right material over plastic because not only can it be bent - it is also strong enough to hold the light in place. The triangular support which sits underneath was also cut from brass sheet, although I added a strip to the side where it attached to the glacis plate which I then 'buried' under Milliput.
The wires for the light were run through tiny holes drilled in the bracket and then through corresponding hold in the glacis plate - they are effectively hidden by being overshadowed by the bracket.
So what else is needed? The real thing ran the connecting wire through a bent piece of metal tubing. For this I used some of that plastic covered wire which is used to secure toys to their packaging (there was plenty of that around after Christmas). The connecting plug on the light was added from a Tamiya part, the one on top of the superstructure was scratchbuilt from plastic tubing and sprue. Finally I removed the moulded on jack block (which was moved back to accomodate the socket for the new light on the hull roof) and replaced it with a Tamiya part.
- Tiger 323 of schwere SS-Panzer-Abteilung 101 during training exercises near Amiens May 44.jpg (31.4 KiB) Viewed 14274 times
If you look at the picture above (and detail below) you can see that at least one of the Tiger's in Battalion 101 had the interim arrangement - i.e. no radio operator's side headlight but no central headlight either. This was Tiger '323' - i.e. the third tank of the second platoon of the third company (you read the number from right to left). This would be quite a useful short cut for someone who is aiming for a Normandy mid-production Tiger 1 but does not want to remove the moulded-on tools - because there is no need to move the jack block.
- Close-up shows driver's side headlight still mounted, but no central or radio operator's headlight.jpg (24.69 KiB) Viewed 14274 times
Anyway, substituting the front mounted headlight is not as simple as it looks. It's easy enough to dispose of the old HL headlights and their mounts - although be sure to keep the wiring circuit intact if you want the new headlight to light up.
There seems to be only one suitable replacement on the market - made by Taigen. The light itself is nicely made, with a tiny working bulb and a removable cover. Note that, despite dire warnings on the packaging, the bulb works perfectly well as part of the old HL wiring circuit and will not blow.
- taigen-working-headlight-for-heng-long-tiger-1-late-1-16-scale-358-p[ekm]300x176[ekm].jpg (4.03 KiB) Viewed 14274 times
- Close up of opened up driver's visor - also showing original Taigen headlight mount.jpg (81.91 KiB) Viewed 14274 times
I decided to make things a little difficult for myself by filing away the old, simple bracket to leave just the mounting base. Interestingly the Germans simply carried on using the old mounts which had been used on the superstructure top. I then glued this onto a bracket of suitable width and thickness bent from brass strip. This is a good example of a situation where metal is absolutely the right material over plastic because not only can it be bent - it is also strong enough to hold the light in place. The triangular support which sits underneath was also cut from brass sheet, although I added a strip to the side where it attached to the glacis plate which I then 'buried' under Milliput.
- Front headlight from left side - Taigen light, cover and base mounted on brass strip.jpg (34.26 KiB) Viewed 14274 times
- Another view of front headlight from right side.jpg (34.19 KiB) Viewed 14274 times
So what else is needed? The real thing ran the connecting wire through a bent piece of metal tubing. For this I used some of that plastic covered wire which is used to secure toys to their packaging (there was plenty of that around after Christmas). The connecting plug on the light was added from a Tamiya part, the one on top of the superstructure was scratchbuilt from plastic tubing and sprue. Finally I removed the moulded on jack block (which was moved back to accomodate the socket for the new light on the hull roof) and replaced it with a Tamiya part.
- Tamiya jack block with added brass corner mounts beside the triangular support for the headlight bracket.jpg (29.92 KiB) Viewed 14274 times
- Upper view showing wire tubing running over top of glacis plate - note jack block in new position.jpg (38.63 KiB) Viewed 14274 times
My Mid-Production Normandy Tiger 1 build thread: http://www.rctankwarfare.co.uk/forums/v ... =22&t=8350
-
tigerace007
- Recruit
- Posts: 32
- Joined: Wed Oct 27, 2010 7:22 am
Re: Building a Mid-Production Normandy Tiger 1
Stunning build! And exactly what I am aiming to do , well except mine will be late version steel wheels.
Cheers,
Stu
Cheers,
Stu
