Page 1 of 1
Opening Hatches, fitting metal ones
Posted: Sun Oct 13, 2024 6:21 pm
by Mindstorm
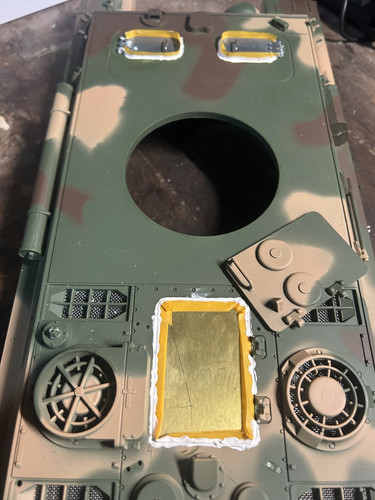
Heng Long Panther upper hull, i carefully cut out the driver's and enginecover hatch.
I used the Taigen front hatches and my own custom made engine cover, but i am not satisfied with the shape/gaps between the new hatches and the "holes" they cover.
So i surrounded the edges of the hatches with painters-tape and filled the gaps with (Vallejo) putty, but now im having trouble getting the hatches out without damaging the putty edge.
Any tips on how to solve this in a proper way (removing the putty and starting over is optional but not preferred)
Thx for reading
Re: Opening Hatches, fitting metal ones
Posted: Sun Oct 13, 2024 6:54 pm
by Pavel
before starting work, it was necessary to apply a separating layer to the part, and then seal the seam, usually 90% of the putty does not stick to silicone oil....
To remove a part with masking tape, wet it by immersing the part in water, tape is 99% made of paper, over time it will begin to dissolve, you will apply a little force and take out what is stuck...
Re: Opening Hatches, fitting metal ones
Posted: Mon Oct 14, 2024 6:15 am
by Mindstorm
Okay thanks!
Re: Opening Hatches, fitting metal ones
Posted: Mon Oct 14, 2024 1:45 pm
by Jofaur86
Re: Opening Hatches, fitting metal ones
Posted: Mon Oct 14, 2024 3:37 pm
by Mindstorm
Jofaur86 wrote: ↑Mon Oct 14, 2024 1:45 pm

Hello, if I may?
Wow looks great, will surely do, but my concern was mainly with het outer edges of the hull, eg. The edges of the hatches from the Taigon Panther, are slightly differently curved than the HL upperhull.
I’ve got the hatches out now, but the puttied-edge is slightly damaged on some spots, so i will need to repair those with some additional putty.
After im satisfied with the hull on the outside, i will oil the hatches up and put them in place, and than set them in place with a piece of tape.
Than i can reapply the putty around the hatches, bit this time from inside the hull, as with the first time, the putty didnt reach the full thickness of the hull-plate, thus leaving a messy edge when the hatches are open.
Re: Opening Hatches, fitting metal ones
Posted: Mon Oct 14, 2024 5:22 pm
by Exhibitedbrute
If you look close at the photo you will find there is a thin plasticard layer around the inside of the hatch opening to fill the gap. If you can do this and maintain the shape you need, the damaged area can be filled and sanded to match
Re: Opening Hatches, fitting metal ones
Posted: Tue Oct 15, 2024 12:14 am
by tankme
As a suggesting in the future...I have removed hatches using a very small drill bit. Either drill a bunch of tiny holes and connect them with a hobby knife or drill one hole and use some fishing line or dental floss as a saw to remove the hatch. The fishing line or dental floss will break during this process, but it uses friction to cut and will cut a very thin line around the hatch so cleanup is minimal. Just work the line back and fourth like a hand pulled wire saw.
Re: Opening Hatches, fitting metal ones
Posted: Tue Oct 15, 2024 9:56 am
by Jofaur86

Thanks to "Reservoir" for the tip...personally I use the mini forest technique, but next time I'll try dental floss
