Haya Australian Centurion Mk5/1
-
Ecam

- Warrant Officer 2nd Class
- Posts: 1430
- Joined: Sun Jul 13, 2014 6:30 pm
- Location: Lake of the Ozarks, USA
Re: Haya Australian Centurion Mk5/1
Fantastic. Sooo much talent on this forum.
"Don't believe everything you see on the internet" - George S. Patton
Eric
Eric
-
Raminator

- Warrant Officer 2nd Class
- Posts: 1267
- Joined: Tue Aug 11, 2015 9:57 am
- Location: Newcastle, Australia
Re: Haya Australian Centurion Mk5/1
Impressive surgery on the exhausts, they're nearly unrecognisable from the starting point!
-
Estnische

- Warrant Officer 2nd Class
- Posts: 1065
- Joined: Tue Jun 07, 2016 11:52 pm
- Location: Wollongong, Australia
Re: Haya Australian Centurion Mk5/1
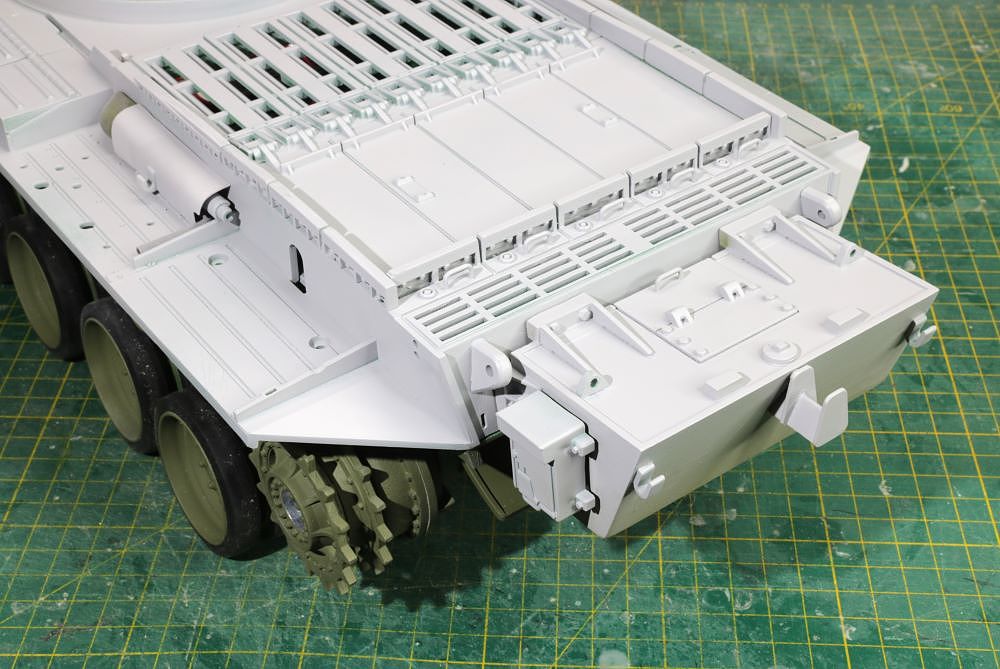
The initial production Centurion had a major short-coming in that the initial fuel range was as little as 100km! In the early days the initial solution was to develop a mono-wheeled 200 gallon fuel trailer to be towed behind. However there were several incidents with these trailers and their flexible fuel lines. After several Centurions were burnt-out, they were very unpopular with the crews.
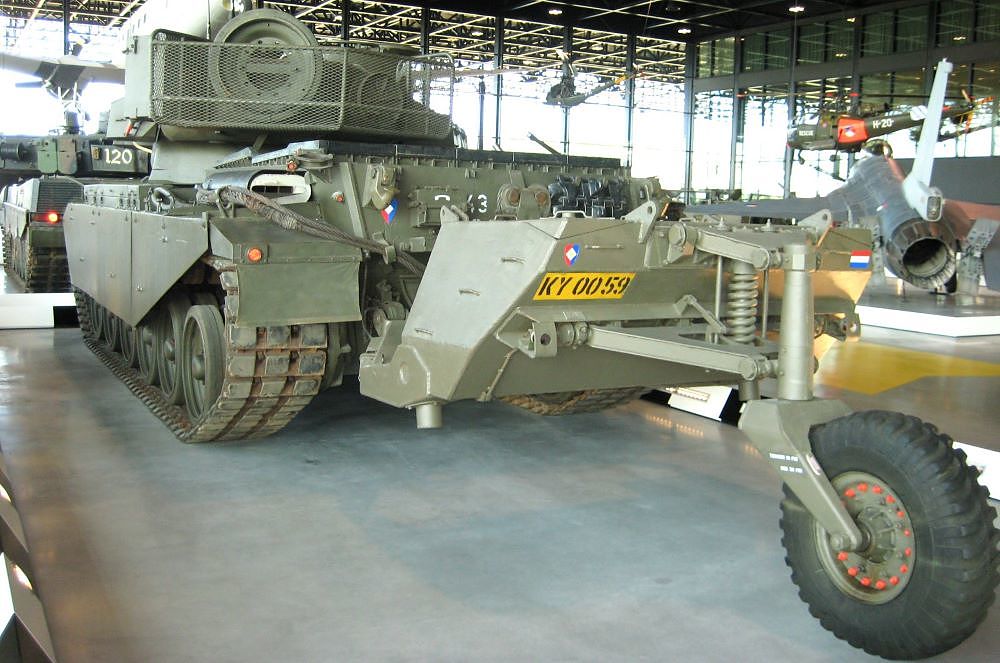
None of these fuel trailers were used in Vietnam as by 1963, as a new solution had been developed – a 100 gallon armoured fuel tank bolted to the hull rear plate.
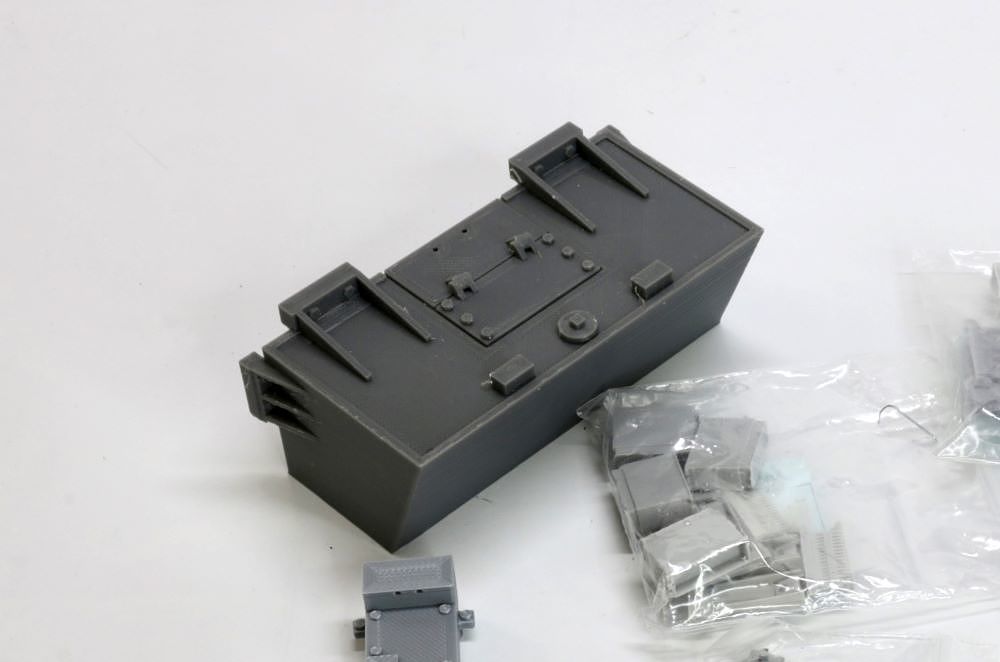
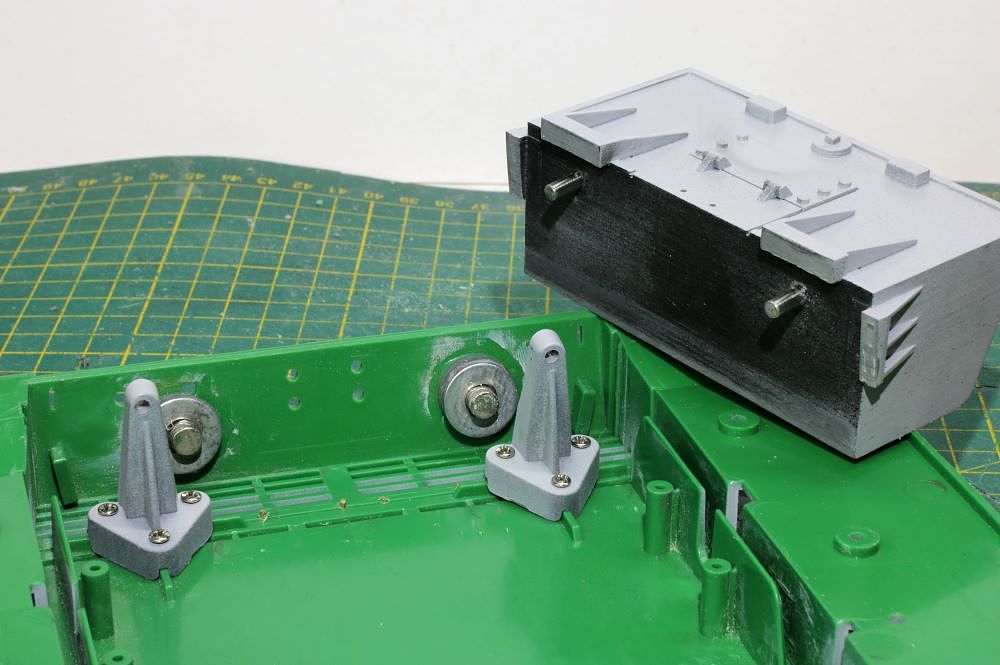
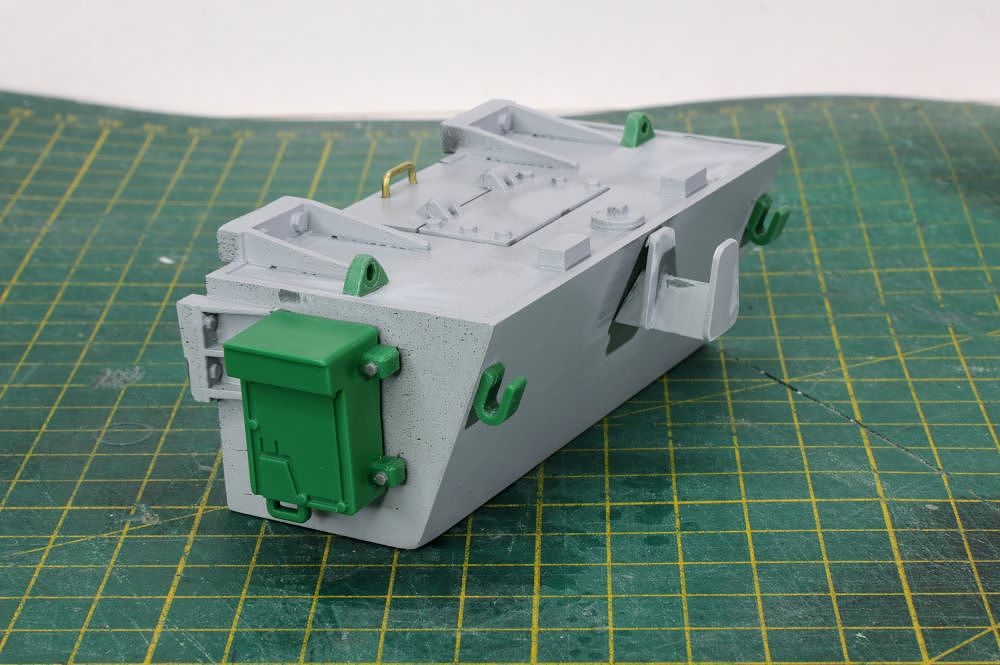
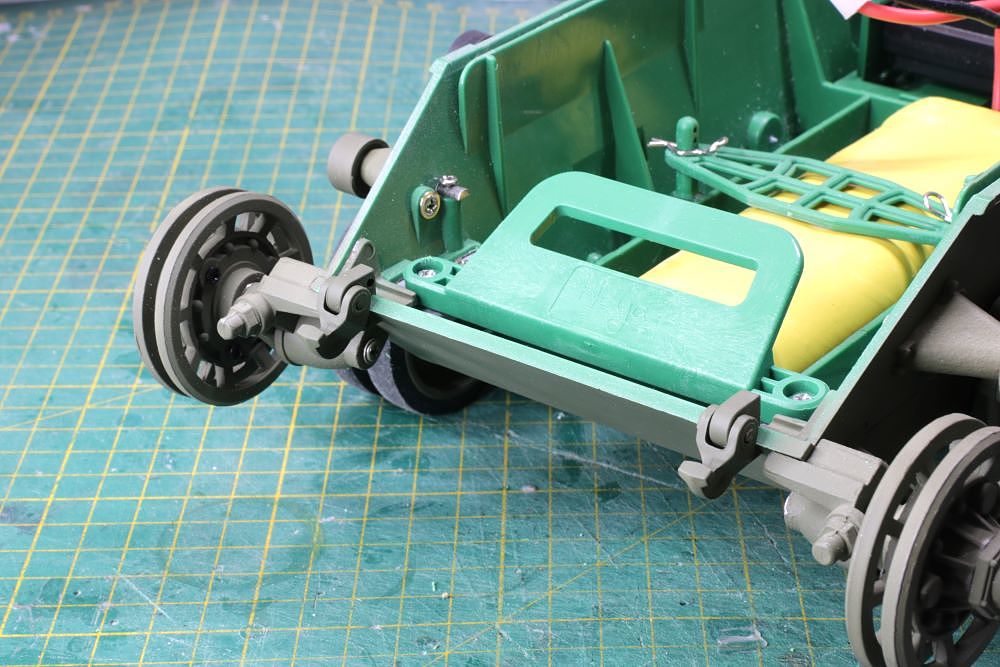
One of my initial purchases along with the Haya kit was a 3D printed fuel tank. It has very nice details, but of course being 3D printed it had many print lines to be smoothed, with several coats of primer – paint, sand, repeat.
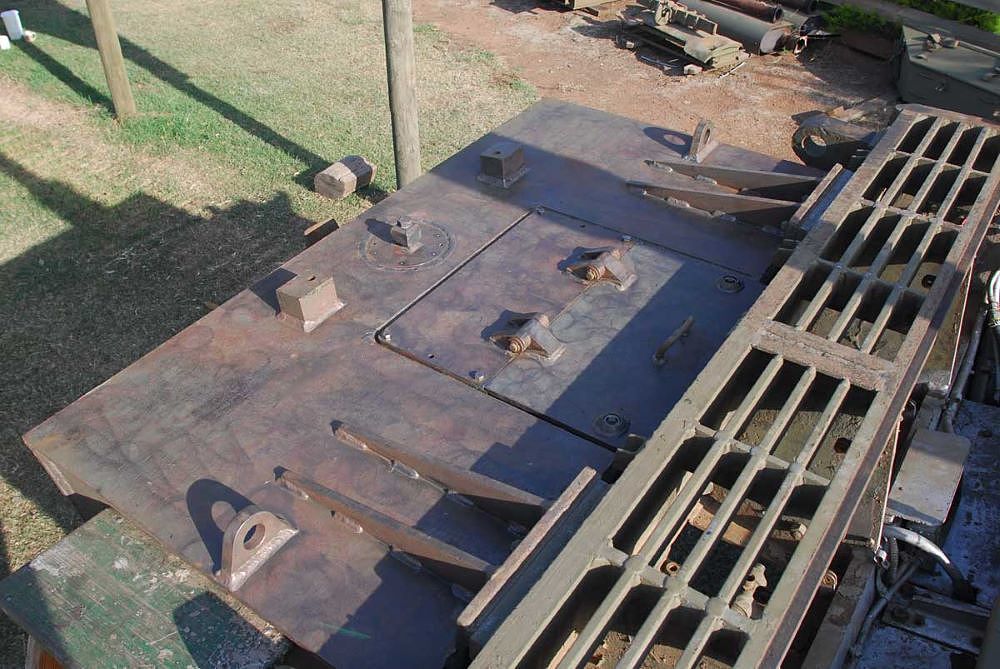
Mounting the fuel tank is a major issue as it will block the standard upper hull rear locking bolts – the Phillips heads you can see below the upper hull overhang. As it stands, access is needed as it is the only way to open the hull to charge the battery. At Tiger Day, Martin from Haya showed me how the extra piece for the Haya Sho’t Cal rear lower hull causes the same problem and is attached with magnets, so I borrowed the idea.
I want the tank to be mounted precisely, so I made brass locating tubes with 4mm outside diameter, that will accept guide pins. The tube mountings are reinforced with steel washers on the inside, and have button magnets glued on the end of the tubes.
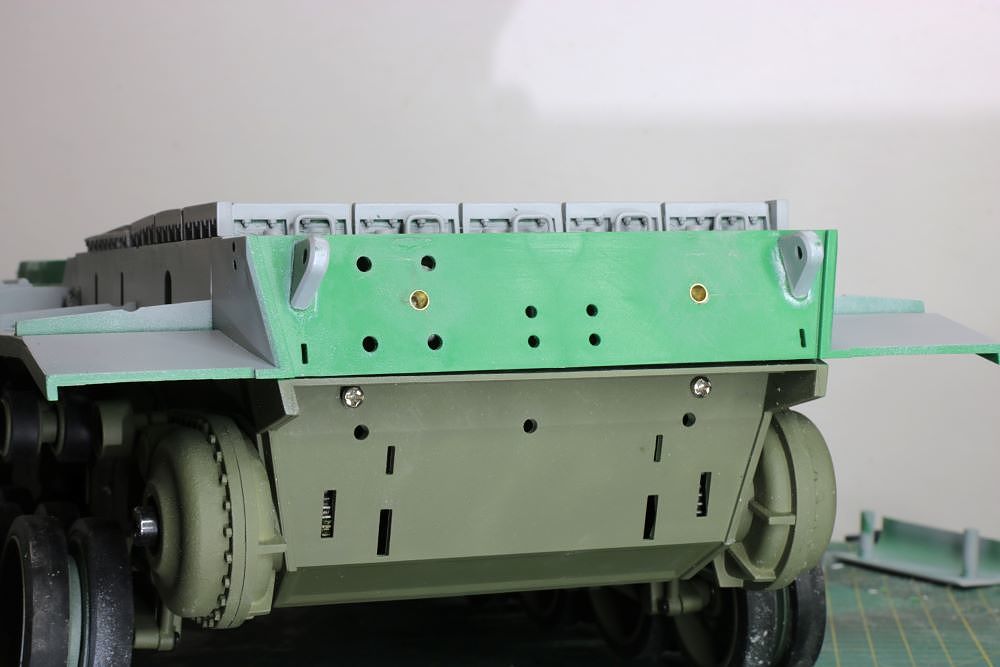
As the hull rear plate slopes slightly, I incorporated some wedge into the rear mounting blocks. The fuel tank was pinned with 3.5mm steel drill bit shanks that are a snug fit inside the brass tubes. There is a satisfying clunk when the magnets grab the pins.
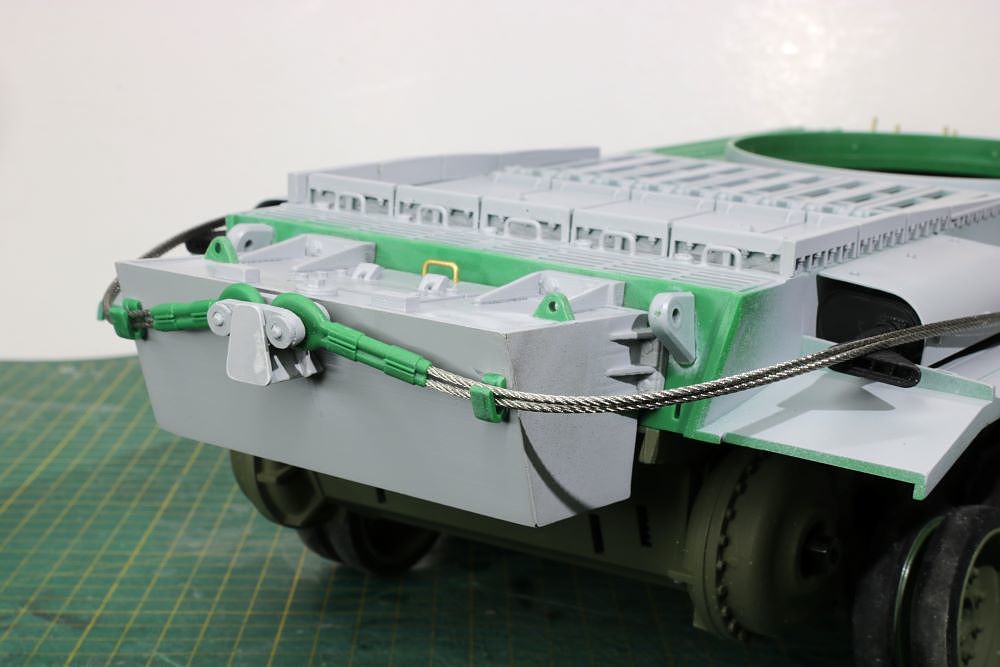
Also, the addition of the fuel tank meant relocation of some rear-hull fittings, including adapting the tow cable hooks to look like the alternative ones on the rear, and the infantry rear intercom to the left side.
I had a choice of two intercoms – one that came from Haya and a 3D printed one. I found the Haya one more accurate in shape, and just added some extra bolt details. Although the fuel tank details were quite good, I needed to at a handle to the access hatch, and lifting eye attachments to finish it off.
The central tow cable mount is completely different to the Mk3 version provided in the kit, so I scratch built it from a piece of Pantiger hull using the AFV 1/35 kit as a reference. Similarly, the tow cable joiner link is completely different, but I cut up the Haya one as the base for the new one. In hindsight, I probably didn't need the magnets as the cable system restrains the fuel tank from sliding out of the locating tubes.
None of these fuel trailers were used in Vietnam as by 1963, as a new solution had been developed – a 100 gallon armoured fuel tank bolted to the hull rear plate.
One of my initial purchases along with the Haya kit was a 3D printed fuel tank. It has very nice details, but of course being 3D printed it had many print lines to be smoothed, with several coats of primer – paint, sand, repeat.
Mounting the fuel tank is a major issue as it will block the standard upper hull rear locking bolts – the Phillips heads you can see below the upper hull overhang. As it stands, access is needed as it is the only way to open the hull to charge the battery. At Tiger Day, Martin from Haya showed me how the extra piece for the Haya Sho’t Cal rear lower hull causes the same problem and is attached with magnets, so I borrowed the idea.
I want the tank to be mounted precisely, so I made brass locating tubes with 4mm outside diameter, that will accept guide pins. The tube mountings are reinforced with steel washers on the inside, and have button magnets glued on the end of the tubes.
As the hull rear plate slopes slightly, I incorporated some wedge into the rear mounting blocks. The fuel tank was pinned with 3.5mm steel drill bit shanks that are a snug fit inside the brass tubes. There is a satisfying clunk when the magnets grab the pins.
Also, the addition of the fuel tank meant relocation of some rear-hull fittings, including adapting the tow cable hooks to look like the alternative ones on the rear, and the infantry rear intercom to the left side.
I had a choice of two intercoms – one that came from Haya and a 3D printed one. I found the Haya one more accurate in shape, and just added some extra bolt details. Although the fuel tank details were quite good, I needed to at a handle to the access hatch, and lifting eye attachments to finish it off.
The central tow cable mount is completely different to the Mk3 version provided in the kit, so I scratch built it from a piece of Pantiger hull using the AFV 1/35 kit as a reference. Similarly, the tow cable joiner link is completely different, but I cut up the Haya one as the base for the new one. In hindsight, I probably didn't need the magnets as the cable system restrains the fuel tank from sliding out of the locating tubes.
-
Estnische
- Warrant Officer 2nd Class
- Posts: 1065
- Joined: Tue Jun 07, 2016 11:52 pm
- Location: Wollongong, Australia
Re: Haya Australian Centurion Mk5/1
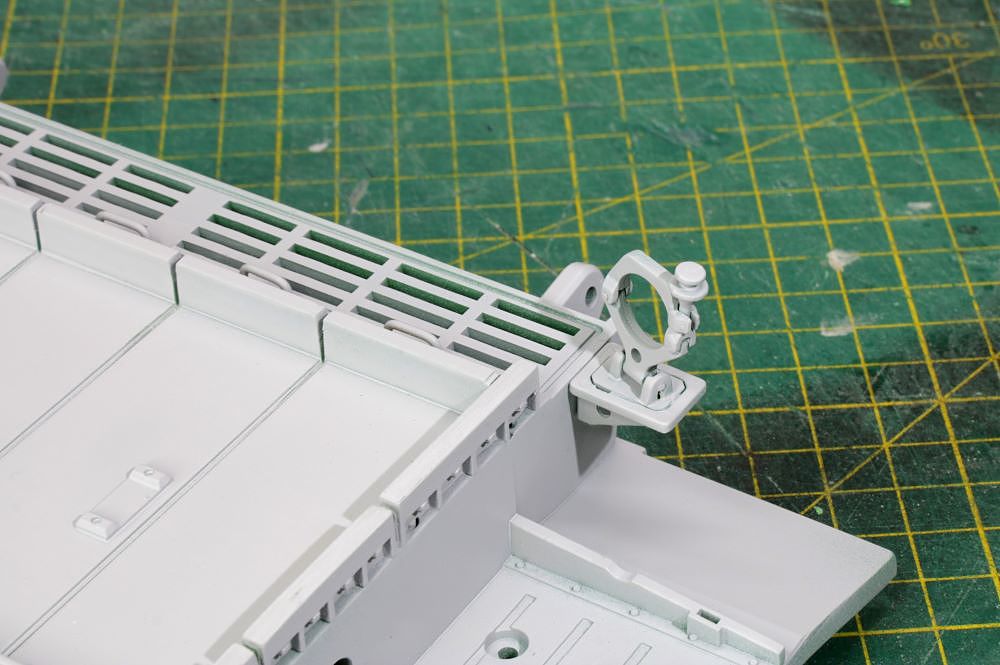
I had left off the tow point hooks until after the fuel tank was installed, so it was time for them to go on.
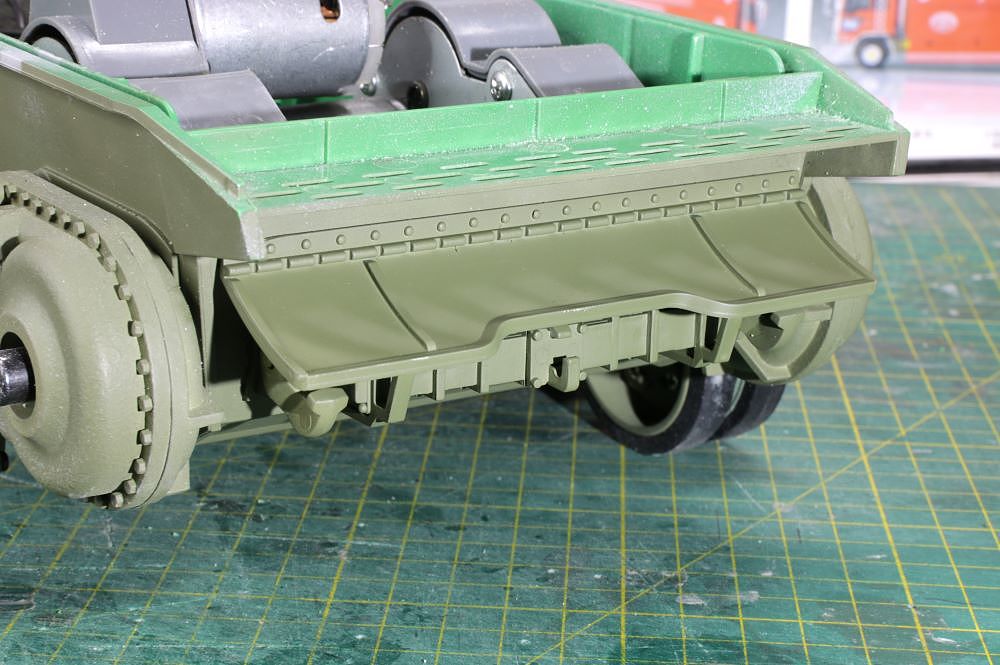
And the rear tow bar and hot air deflector.
I also installed some other bibs and bobs like the gun travel lock. Once again, a lack of clear instructions makes life interesting. This image from the Haya instructions shows the travel lock bolt on the inside. It also shows which parts to use and implies there are some fine screws and a pivot rod.
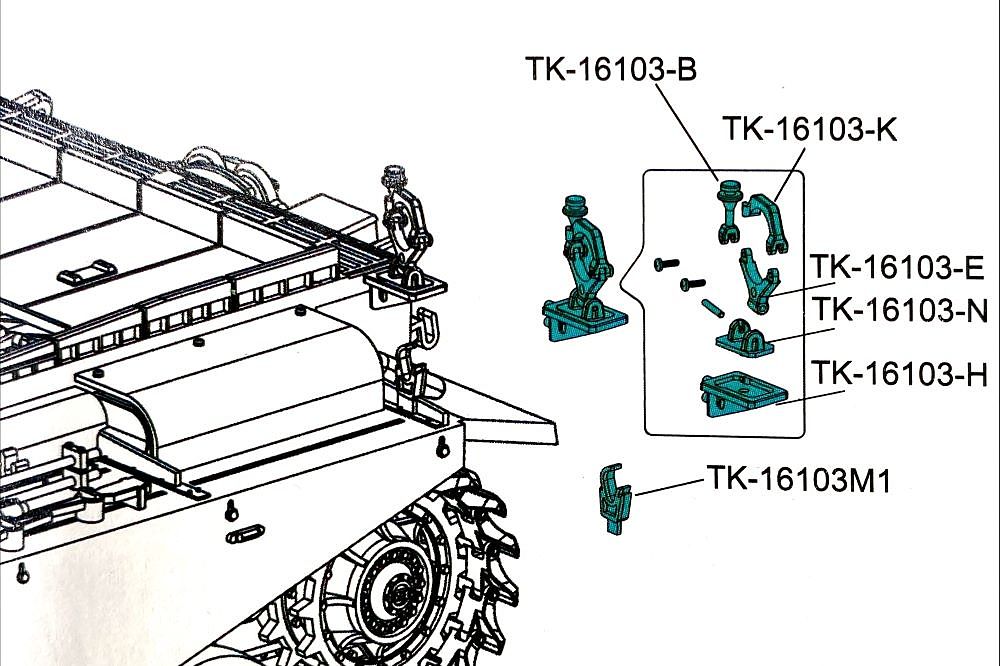
The photos I could find of Centurions have the lock bolt on the opposite side.

I searched through the sprues and bags - nothing like the rod and screws were provided. I can’t see that I will ever play with the lock, so I improvised with some scrap bits of plastic rod for the screws and press fit a piece of scrap drill bit as the rod. The lock was able to be rotated in its mount – an easy fix.
Going back over my posts it also dawned upon me that the rear of the track guards needed to be trimmed at the diagonal to match the Vietnam photos I have been posting.
And the rear tow bar and hot air deflector.
I also installed some other bibs and bobs like the gun travel lock. Once again, a lack of clear instructions makes life interesting. This image from the Haya instructions shows the travel lock bolt on the inside. It also shows which parts to use and implies there are some fine screws and a pivot rod.
The photos I could find of Centurions have the lock bolt on the opposite side.
I searched through the sprues and bags - nothing like the rod and screws were provided. I can’t see that I will ever play with the lock, so I improvised with some scrap bits of plastic rod for the screws and press fit a piece of scrap drill bit as the rod. The lock was able to be rotated in its mount – an easy fix.
Going back over my posts it also dawned upon me that the rear of the track guards needed to be trimmed at the diagonal to match the Vietnam photos I have been posting.
-
tankme

- Warrant Officer 1st Class
- Posts: 1995
- Joined: Tue Oct 31, 2017 3:51 pm
- Location: Elgin, TX
- Contact:
Re: Haya Australian Centurion Mk5/1
What are these "instructions" you speak of? Are they posted anywhere?
Derek
Too many project builds to list...
Too many project builds to list...
-
tankme
- Warrant Officer 1st Class
- Posts: 1995
- Joined: Tue Oct 31, 2017 3:51 pm
- Location: Elgin, TX
- Contact:
Re: Haya Australian Centurion Mk5/1
Mine is the kit so no instructions were included.
Derek
Too many project builds to list...
Too many project builds to list...
-
Estnische
- Warrant Officer 2nd Class
- Posts: 1065
- Joined: Tue Jun 07, 2016 11:52 pm
- Location: Wollongong, Australia
Re: Haya Australian Centurion Mk5/1
Oh - when I get back home I can copy them for you.
Re: Haya Australian Centurion Mk5/1
There are instruction video's on Haya's youtube page, if that is what you are after?
