Haya Australian Centurion Mk5/1
- Estnische
- Warrant Officer 2nd Class
- Posts: 1065
- Joined: Tue Jun 07, 2016 11:52 pm
- Location: Wollongong, Australia
Re: Haya Australian Centurion Mk5/1
Thanks for that - I don't have tracks on it yet, but I did notice the binding with the dual bearings. I will go over it when I get it moving.
- Estnische
- Warrant Officer 2nd Class
- Posts: 1065
- Joined: Tue Jun 07, 2016 11:52 pm
- Location: Wollongong, Australia
Re: Haya Australian Centurion Mk5/1
Getting the lower hull rolling feels like a big box ticked. Now on to the upper hull. I will start from the front and work my way back. This is a gate guard in Victoria.
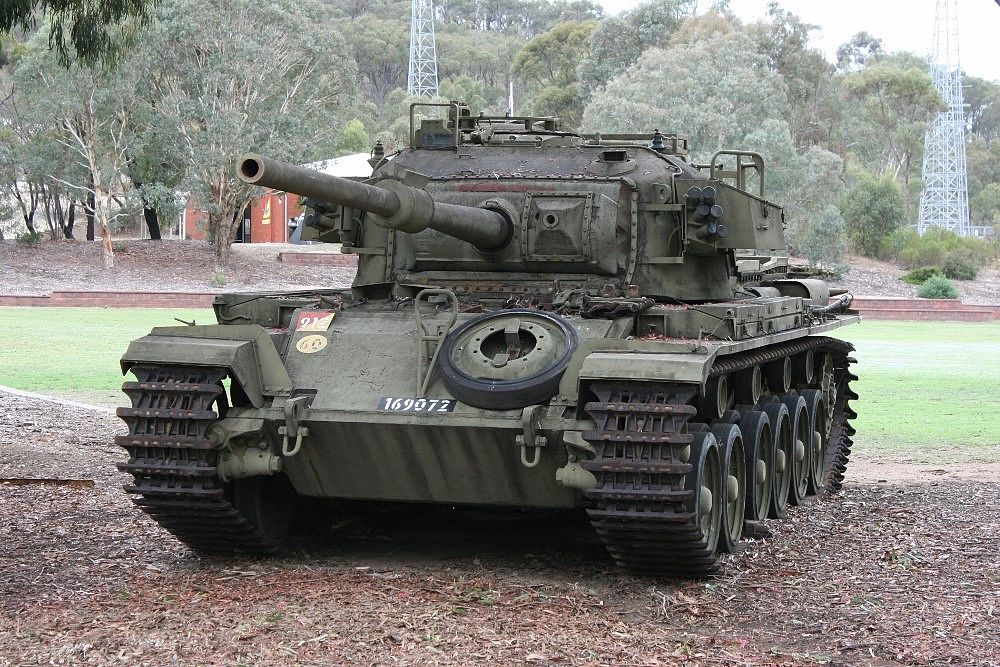
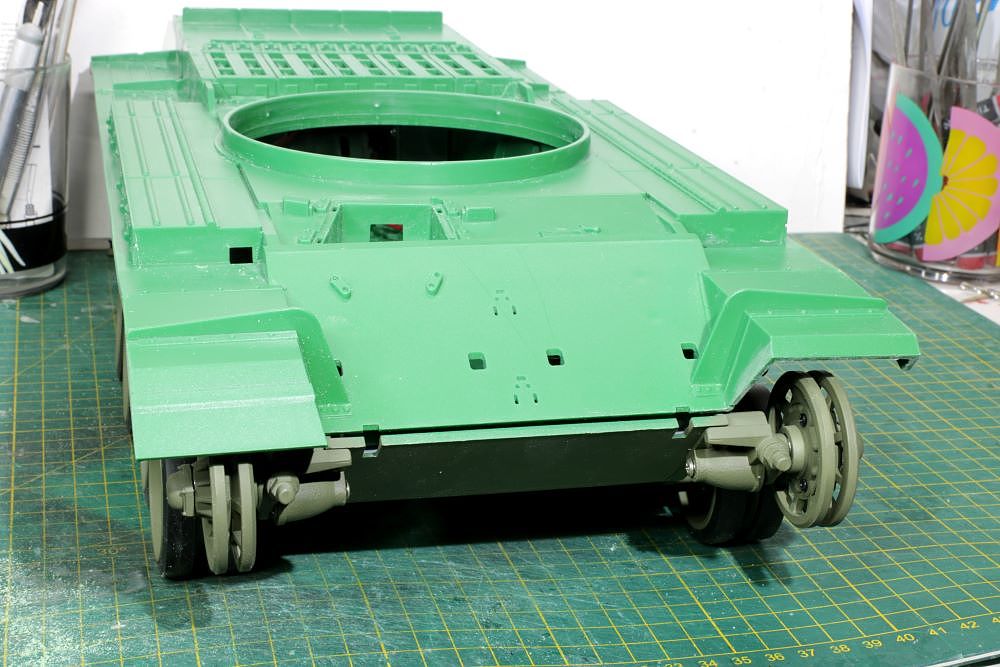
First thing is to trim the front track guards to the shape that the Australians pre-emptively cut-back before it got damaged in the jungle anyway. There are a number of versions, either half cutback like the one above to stop fouling on the tracks, or total cutback and replaced with plate steel to cut the vegetation on the way through. I’m going for the former, so I can keep some of the nice track guard bracketry that Haya moulded. The original guard shape is on the left.
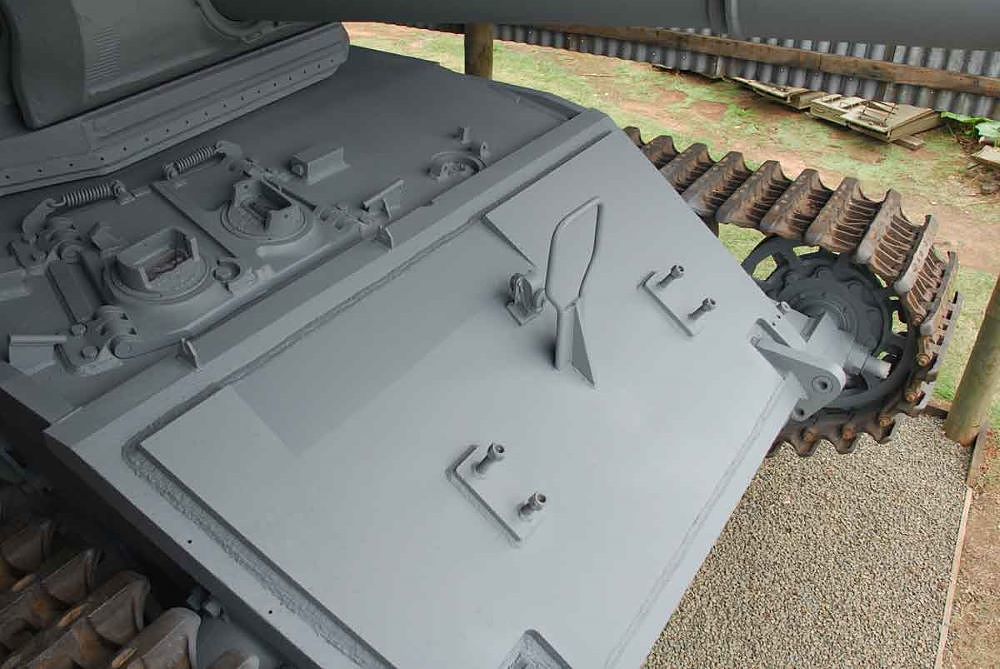
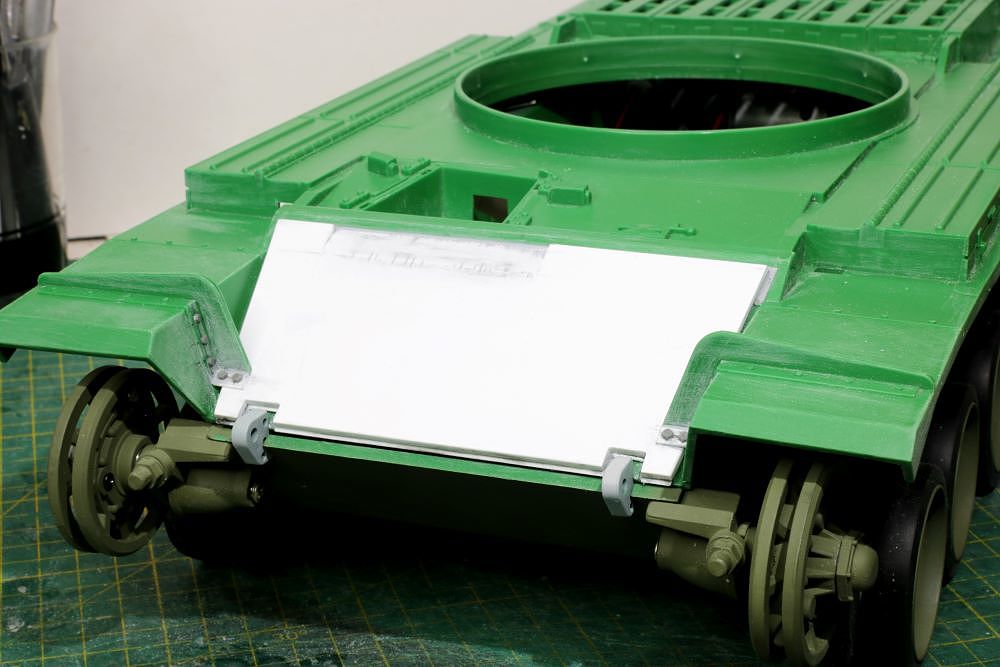
Next comes the applique armour for the glacis. This requires the light bracket fittings and spare track link holders to be deleted from a glacis, an infield mod for Vietnam.
The 1:1 Cent has the applique inset from the outline of the glacis by roughly the thickness of the front belly armour, and it is 44mm thick. At 1/16 scale it works out to be 2.75mm thick, near enough to 3mm so I will use a combination of 2mm and 1mm plasticard.
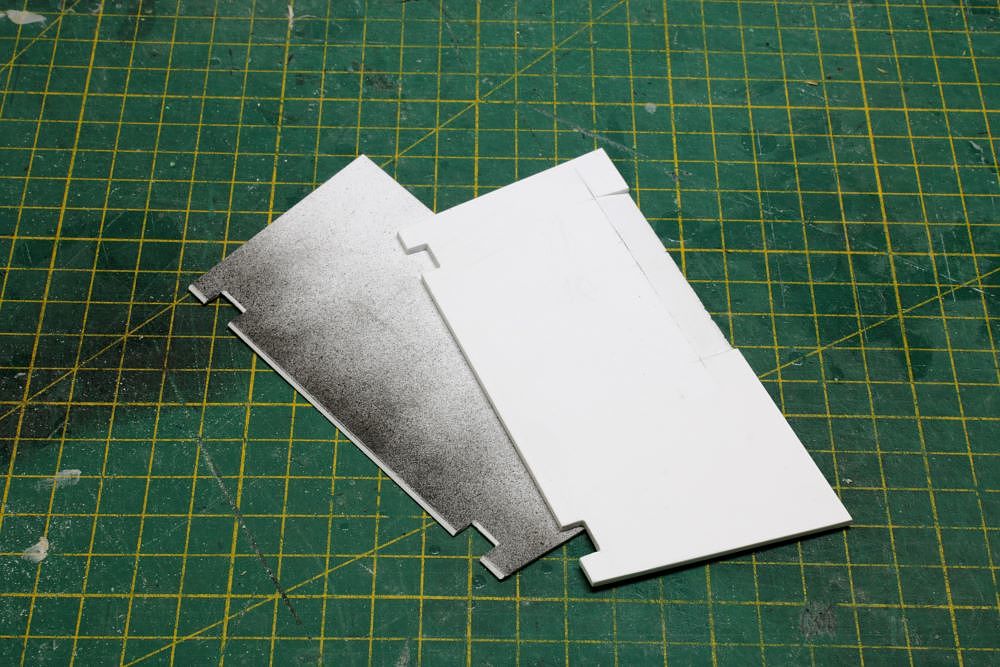
The applique had a partial bevel cut in at the top so as not the block the driver’s view forward. The combination of 1mm and 2mm layers will allow me to put the bevel only in the 2mm top plate and make it more precise. The same goes for the lower plate which allowed me to more accurate with the weld shape. The moulded track guard brackets had to be trimmed to allow the plates to slide underneath and then the missing parts of the brackets were reinstated.
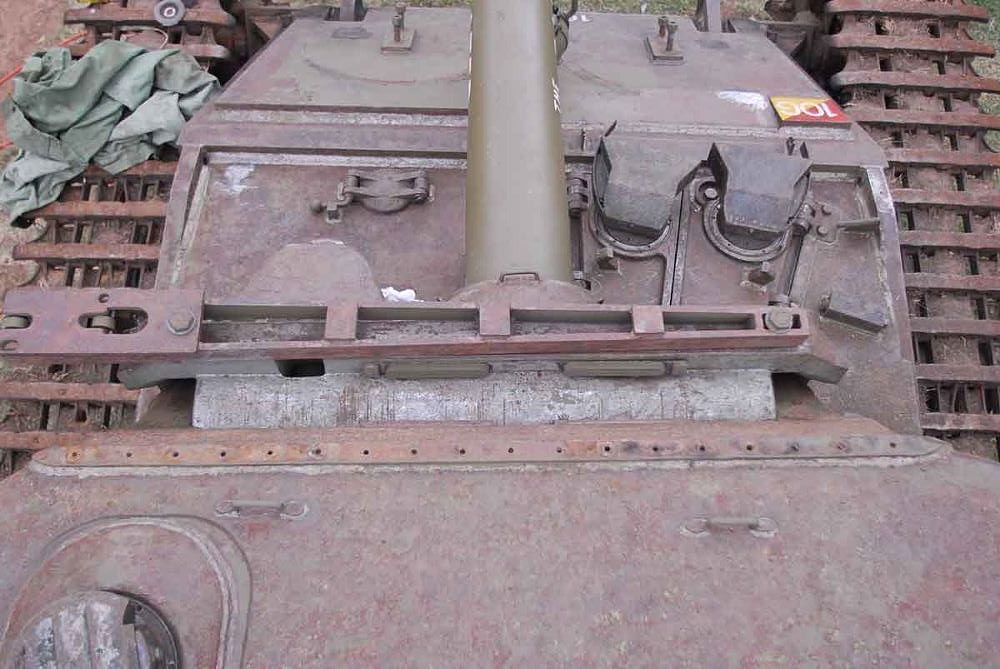
Raminator is kindly making some spare wheels for me, so I will wait for those before adding their mounting points. In the meantime, I worked on the driver’s position, which also houses the On/Off switch. Here is how the 1:1 Cent looks from above, with sheet metal visors over the periscopes, and curved side visors.
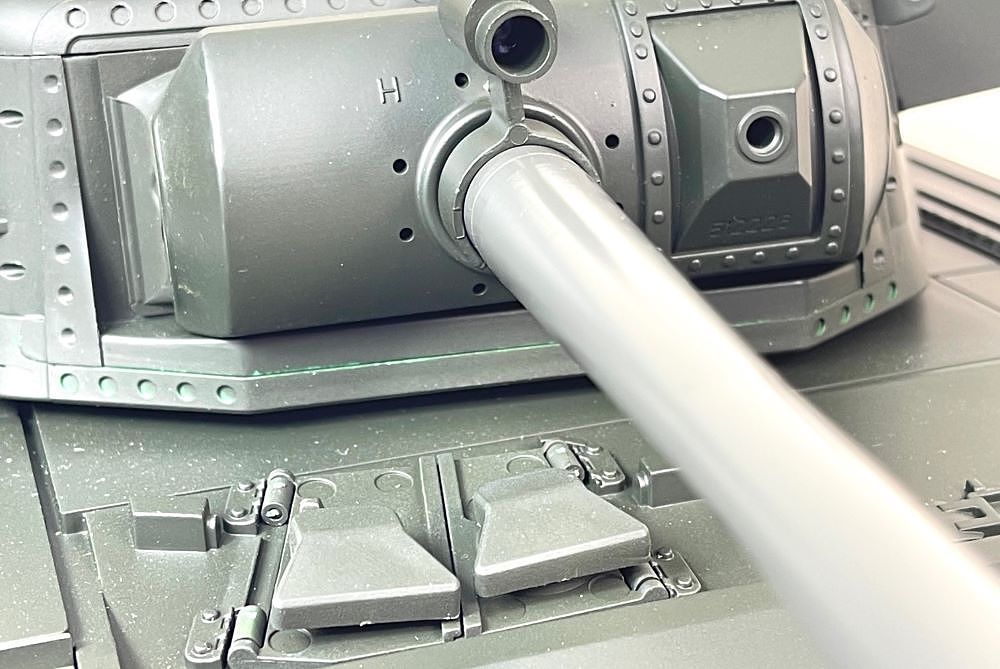
Here is how a pre-assembled Haya looks. The visors are blanked off blobs, and there are no curved side visors. Inside the hatches, the periscopes are at right-angles to the ‘front’ of the visor. Plenty of scope for correction?
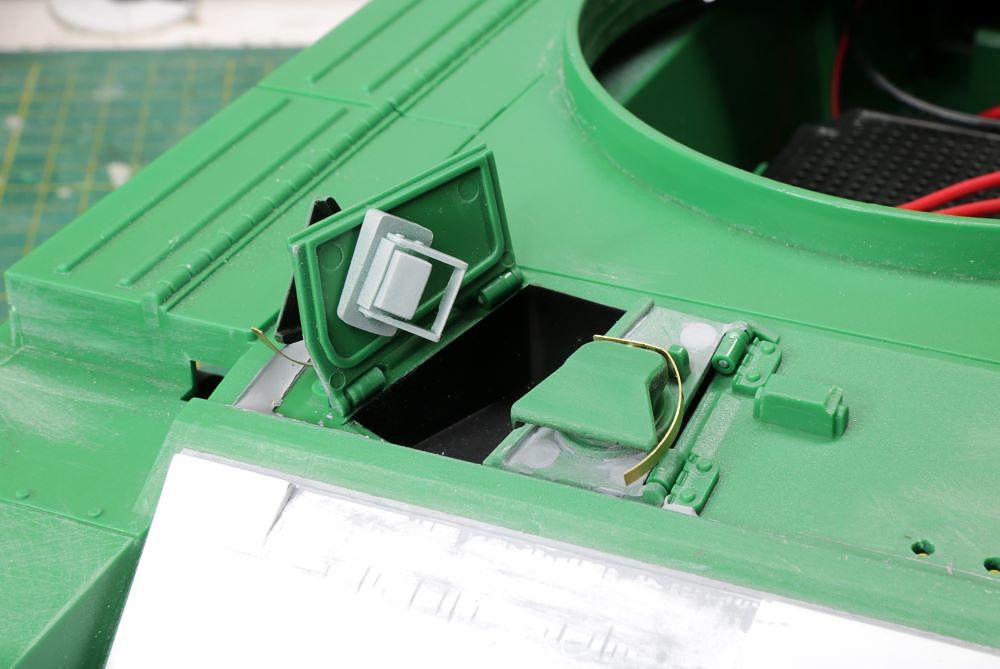
My first step was to fill the ugly plastic sink marks, then carve an opening at the front of the visors. Then I added brass strips as side visors. At this stage I have merely blacked out the interior of the visor, and assembled the driver’s hatches with the periscopes properly aligned and without any other paint for now. I don’t think I will add periscope glass, as no one will see it that far back.

First thing is to trim the front track guards to the shape that the Australians pre-emptively cut-back before it got damaged in the jungle anyway. There are a number of versions, either half cutback like the one above to stop fouling on the tracks, or total cutback and replaced with plate steel to cut the vegetation on the way through. I’m going for the former, so I can keep some of the nice track guard bracketry that Haya moulded. The original guard shape is on the left.

Next comes the applique armour for the glacis. This requires the light bracket fittings and spare track link holders to be deleted from a glacis, an infield mod for Vietnam.

The 1:1 Cent has the applique inset from the outline of the glacis by roughly the thickness of the front belly armour, and it is 44mm thick. At 1/16 scale it works out to be 2.75mm thick, near enough to 3mm so I will use a combination of 2mm and 1mm plasticard.

The applique had a partial bevel cut in at the top so as not the block the driver’s view forward. The combination of 1mm and 2mm layers will allow me to put the bevel only in the 2mm top plate and make it more precise. The same goes for the lower plate which allowed me to more accurate with the weld shape. The moulded track guard brackets had to be trimmed to allow the plates to slide underneath and then the missing parts of the brackets were reinstated.

Raminator is kindly making some spare wheels for me, so I will wait for those before adding their mounting points. In the meantime, I worked on the driver’s position, which also houses the On/Off switch. Here is how the 1:1 Cent looks from above, with sheet metal visors over the periscopes, and curved side visors.

Here is how a pre-assembled Haya looks. The visors are blanked off blobs, and there are no curved side visors. Inside the hatches, the periscopes are at right-angles to the ‘front’ of the visor. Plenty of scope for correction?

My first step was to fill the ugly plastic sink marks, then carve an opening at the front of the visors. Then I added brass strips as side visors. At this stage I have merely blacked out the interior of the visor, and assembled the driver’s hatches with the periscopes properly aligned and without any other paint for now. I don’t think I will add periscope glass, as no one will see it that far back.

- Ecam
- Warrant Officer 2nd Class
- Posts: 1430
- Joined: Sun Jul 13, 2014 6:30 pm
- Location: Lake of the Ozarks, USA
Re: Haya Australian Centurion Mk5/1
I think the work is really great. I am also enjoying the history on a tank I know very little about. Keep it up!
"Don't believe everything you see on the internet" - George S. Patton
Eric
Eric
- Estnische
- Warrant Officer 2nd Class
- Posts: 1065
- Joined: Tue Jun 07, 2016 11:52 pm
- Location: Wollongong, Australia
Re: Haya Australian Centurion Mk5/1
Thank you. I didn't know much until I started putting this together. It helps getting immersed in my tank. The various British Centurion Marks can be very confusing, and then there are the IDF and South African models.
- Raminator
- Warrant Officer 2nd Class
- Posts: 1267
- Joined: Tue Aug 11, 2015 9:57 am
- Location: Newcastle, Australia
Re: Haya Australian Centurion Mk5/1
Spare wheels and AN/PRC-77 radios, all ready to go:
Pretty pleased with how the radios turned out, the contact pins in the audio connectors actually printed successfully. They're a little hard to see in the photos and they'll disappear under paint, but at least I know they're there!
Probably the fastest I've turned anything around yet! I'll get them sent to you this week, Brett.
Pretty pleased with how the radios turned out, the contact pins in the audio connectors actually printed successfully. They're a little hard to see in the photos and they'll disappear under paint, but at least I know they're there!
Probably the fastest I've turned anything around yet!
- Estnische
- Warrant Officer 2nd Class
- Posts: 1065
- Joined: Tue Jun 07, 2016 11:52 pm
- Location: Wollongong, Australia
Re: Haya Australian Centurion Mk5/1
Thanks Raminator. Dan’s the Man!
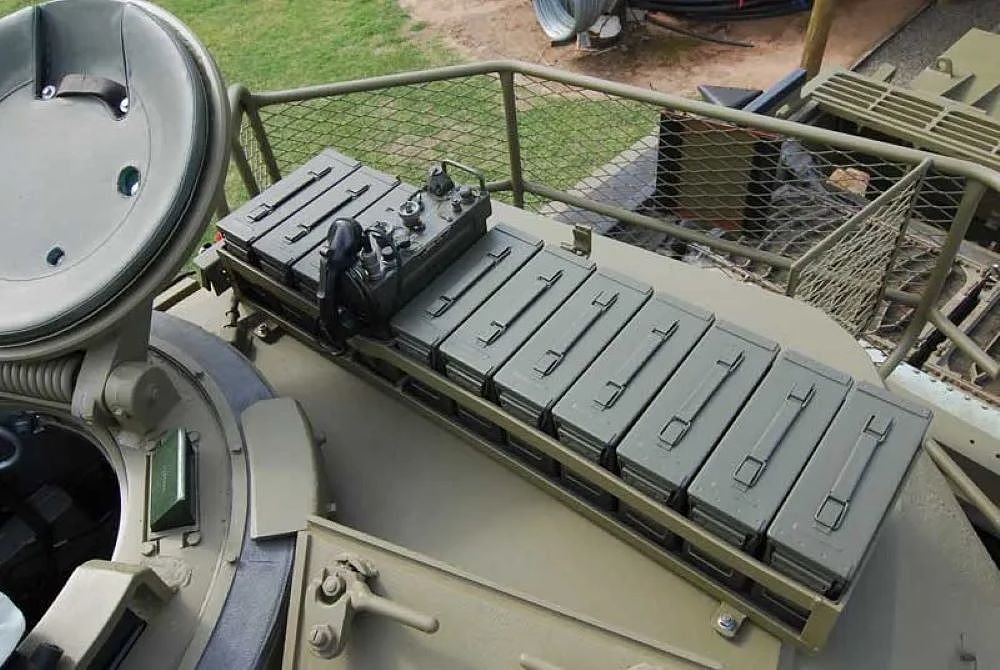
I’m sure the need for the wheels is obvious by now, but in case you are not sure about the radios, they will be a turret accessory. The standard Centurion was fitted with a British Larkspur radio system. For operations in Vietnam, the Australians also used the AN/PRC-25 (Army/Navy, Portable Radio, Communication) US radio, and later the AN/PRC-77. It was mounted at the rear of the turret with ammo boxes for the 30 cals.
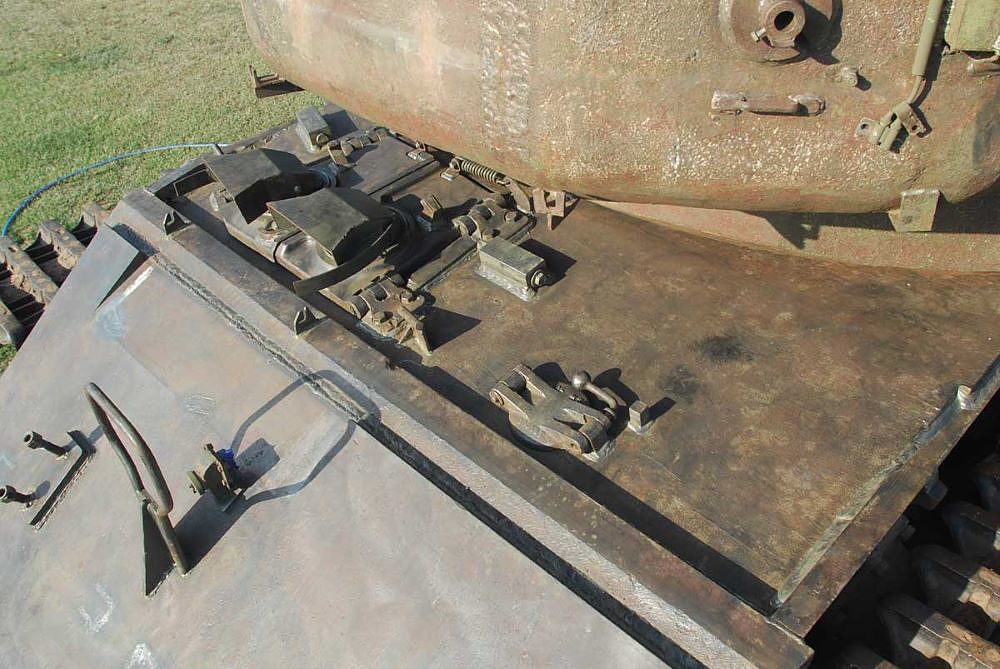
In the meantime, Centurions had filler caps in the hull roof, being filling points for a water tank at the front adjacent to the driver, and two internal fuel tanks at the rear. This other image of Paul Scott’s also shows the recessing of the top plate below the glacis plate, something which isn’t modelled on the Tongde Cent.
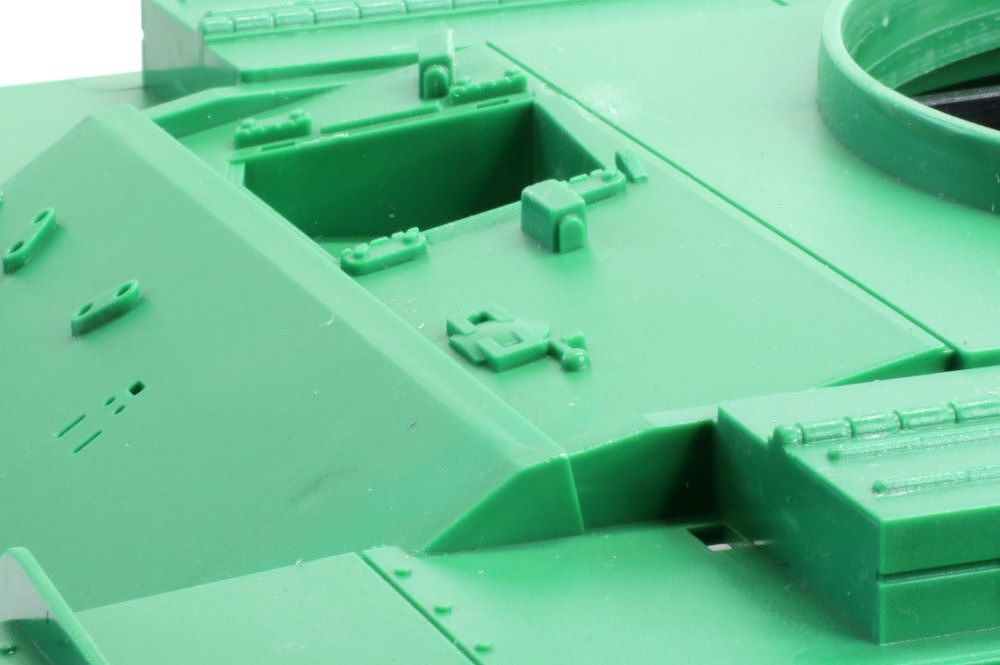
The Haya and Tongde fluid caps are very similar, lacking in depth, as seen on the deck in a previous post. There is a bit room for improvement there.
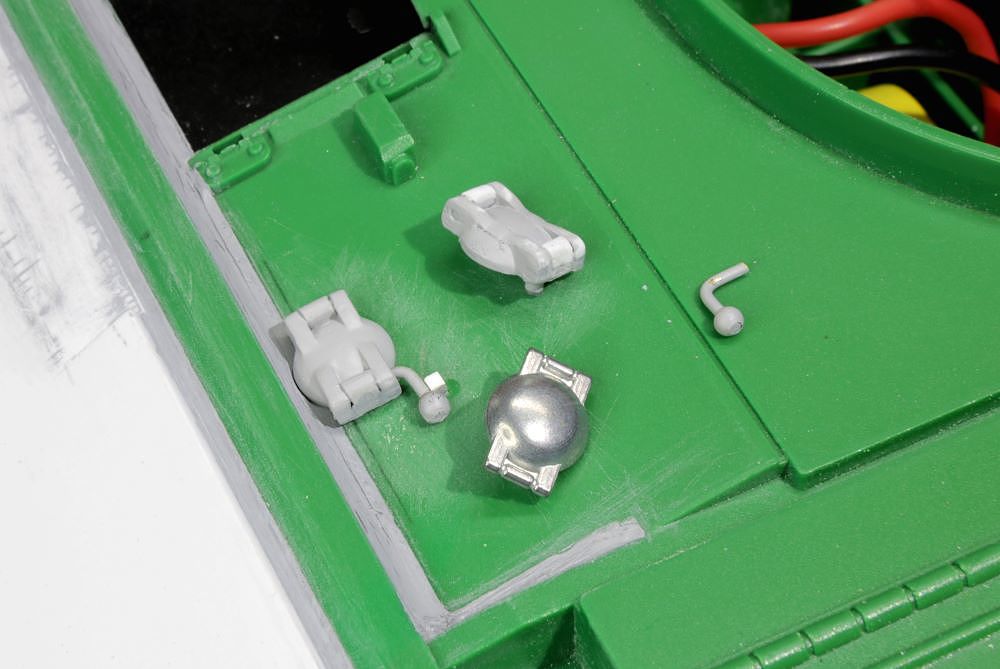
Inspired by someone else’s fuel cap modelling (I have forgotten who), I bought some Mato M10 caps that are a good starting point. To these caps, I added the ribs in plasticard and handles from brass rod and jewellery beads.
The standard Mk3 Cent had windscreen storage boxes on the glacis plate, this was later moved to the left of the driver’s hatch (the tent shaped box behind the Corporal) on the Mk5. This photo is from the first year of deployment – notice the smoke launchers that are still there, but other bits are showing signs of wear.
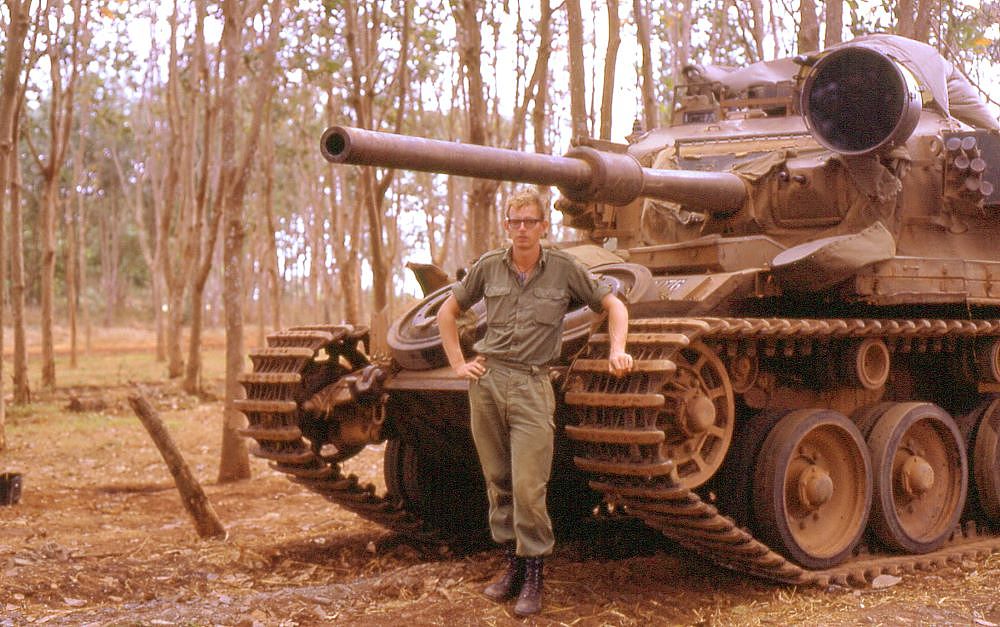
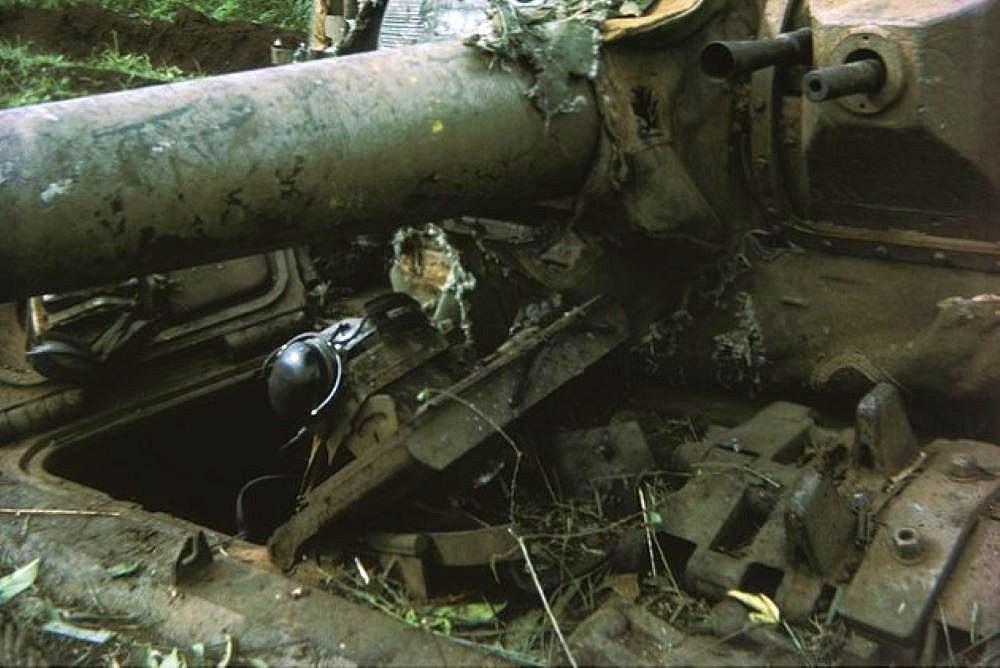
Few Vietnam photos show the box, as windscreens in the jungle were like ash trays on a motorbike. The box was deleted completely and replaced with two mounting blocks for spare track links. Interesting to note the flash suppressor on the 30 cal, as it seems to be a standard fitting in contemporary photos, but rarely seen on restored Centurions. I can only presume it is because the Defence Department disposed of them without MGs.
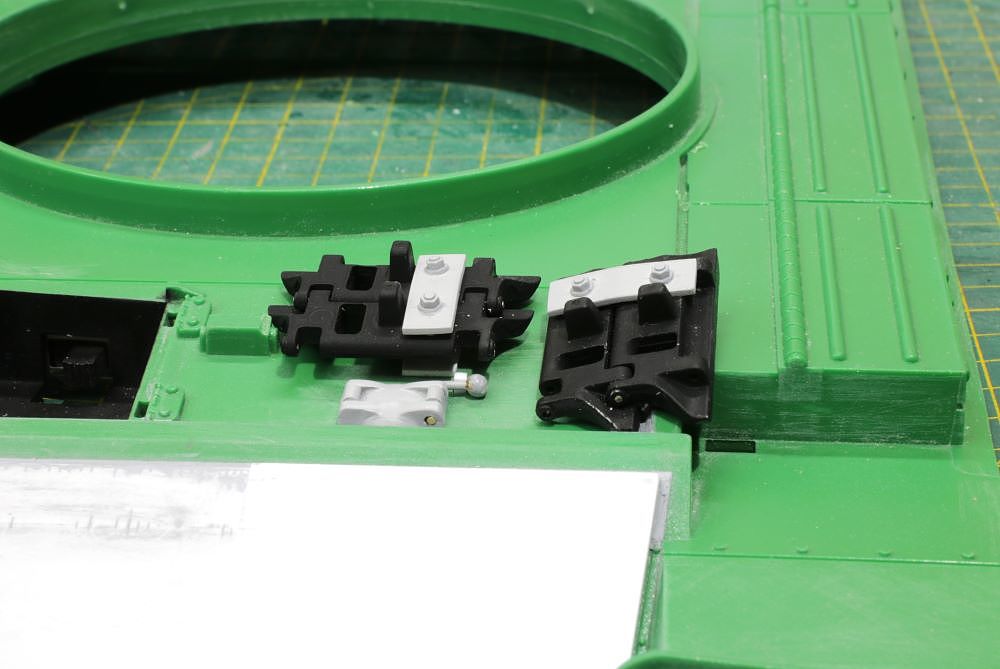
I added the mounting blocks and locking plates from plasticard and Meng nuts.
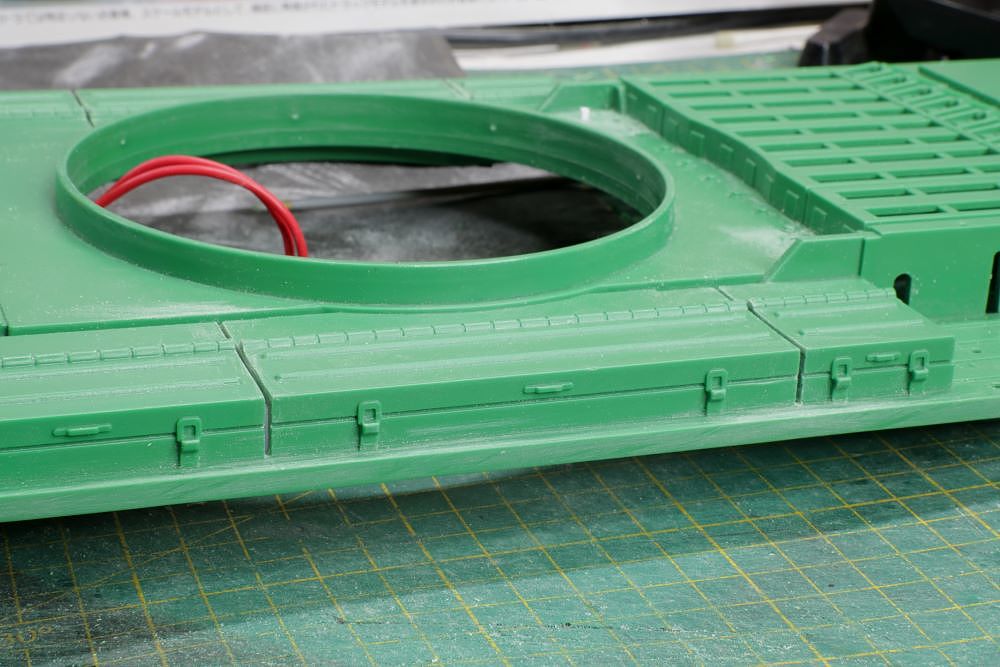
As mentioned earlier, the Haya side tool boxes are moulded in one piece. It is fairly straightforward to separate them. As there are no track guards underneath them, you can see through the gap down to the tracks, so sides were installed.
I’m sure the need for the wheels is obvious by now, but in case you are not sure about the radios, they will be a turret accessory. The standard Centurion was fitted with a British Larkspur radio system. For operations in Vietnam, the Australians also used the AN/PRC-25 (Army/Navy, Portable Radio, Communication) US radio, and later the AN/PRC-77. It was mounted at the rear of the turret with ammo boxes for the 30 cals.

In the meantime, Centurions had filler caps in the hull roof, being filling points for a water tank at the front adjacent to the driver, and two internal fuel tanks at the rear. This other image of Paul Scott’s also shows the recessing of the top plate below the glacis plate, something which isn’t modelled on the Tongde Cent.

The Haya and Tongde fluid caps are very similar, lacking in depth, as seen on the deck in a previous post. There is a bit room for improvement there.

Inspired by someone else’s fuel cap modelling (I have forgotten who), I bought some Mato M10 caps that are a good starting point. To these caps, I added the ribs in plasticard and handles from brass rod and jewellery beads.

The standard Mk3 Cent had windscreen storage boxes on the glacis plate, this was later moved to the left of the driver’s hatch (the tent shaped box behind the Corporal) on the Mk5. This photo is from the first year of deployment – notice the smoke launchers that are still there, but other bits are showing signs of wear.

Few Vietnam photos show the box, as windscreens in the jungle were like ash trays on a motorbike. The box was deleted completely and replaced with two mounting blocks for spare track links. Interesting to note the flash suppressor on the 30 cal, as it seems to be a standard fitting in contemporary photos, but rarely seen on restored Centurions. I can only presume it is because the Defence Department disposed of them without MGs.

I added the mounting blocks and locking plates from plasticard and Meng nuts.

As mentioned earlier, the Haya side tool boxes are moulded in one piece. It is fairly straightforward to separate them. As there are no track guards underneath them, you can see through the gap down to the tracks, so sides were installed.

- HERMAN BIX
- Brigadier
- Posts: 10356
- Joined: Sun Jan 12, 2014 12:15 am
- Location: Gold Coast,Australia
Re: Haya Australian Centurion Mk5/1
Nothing missed here Mr E, love the glacis thickening and track links.
Very good progress so far.
(I still want your Finnish StuG done though )
)
Very good progress so far.
(I still want your Finnish StuG done though
HL JAGDPANTHER,HL TIGER 1,HL PzIII MUNITIONSCHLEPPER, HL KT OCTOPUS,HL PANTHER ZU-FUSS,HL STuG III,HL T34/85 BEDSPRING,
HL PZIV MALTA,MATORRO JAGDTIGER,HL F05 TIGER,TAMIYA KT,HL PANTHERDOZER,HL EARLY PANTHER G,TAIGEN/RAMINATOR T34/76,
HL AN-BRI-RAM SU-85
HL PZIV MALTA,MATORRO JAGDTIGER,HL F05 TIGER,TAMIYA KT,HL PANTHERDOZER,HL EARLY PANTHER G,TAIGEN/RAMINATOR T34/76,
HL AN-BRI-RAM SU-85
- Estnische
- Warrant Officer 2nd Class
- Posts: 1065
- Joined: Tue Jun 07, 2016 11:52 pm
- Location: Wollongong, Australia
Re: Haya Australian Centurion Mk5/1
Gracias amigo.HERMAN BIX wrote: ↑Mon Nov 27, 2023 9:09 am Nothing missed here Mr E, love the glacis thickening and track links.
Very good progress so far.
(I still want your Finnish StuG done though)
How is that radio by Dan though!
Stug is down the list now - I haven't done much on the SiG either...
- HERMAN BIX
- Brigadier
- Posts: 10356
- Joined: Sun Jan 12, 2014 12:15 am
- Location: Gold Coast,Australia
Re: Haya Australian Centurion Mk5/1
Oh hell yeah that radio is just a reflection of how the kid is at what he does !
The Print Ninja , wouldn t put it past him to have it made as a working radio too

The Print Ninja , wouldn t put it past him to have it made as a working radio too
HL JAGDPANTHER,HL TIGER 1,HL PzIII MUNITIONSCHLEPPER, HL KT OCTOPUS,HL PANTHER ZU-FUSS,HL STuG III,HL T34/85 BEDSPRING,
HL PZIV MALTA,MATORRO JAGDTIGER,HL F05 TIGER,TAMIYA KT,HL PANTHERDOZER,HL EARLY PANTHER G,TAIGEN/RAMINATOR T34/76,
HL AN-BRI-RAM SU-85
HL PZIV MALTA,MATORRO JAGDTIGER,HL F05 TIGER,TAMIYA KT,HL PANTHERDOZER,HL EARLY PANTHER G,TAIGEN/RAMINATOR T34/76,
HL AN-BRI-RAM SU-85
- Raminator
- Warrant Officer 2nd Class
- Posts: 1267
- Joined: Tue Aug 11, 2015 9:57 am
- Location: Newcastle, Australia
Re: Haya Australian Centurion Mk5/1
Glad you guys like it, the flattery's going to go to my head though! 
Off to a good start with all the surface details Brett, that's the kind of stuff that really makes the surfaces pop. Let me know if there are any other bits that'd help!
Off to a good start with all the surface details Brett, that's the kind of stuff that really makes the surfaces pop. Let me know if there are any other bits that'd help!
