Scratchbuilt Leclerc

MonsieurTox
Corporal
Posts: 338
Joined: Thu Nov 04, 2021 4:30 pm
Location: Paris

Re: Scratchbuilt Leclerc

Post by MonsieurTox »

BarryC wrote: Sun Nov 27, 2022 7:28 pm Thank you sir!

That is what I've bought to use on my Abrams. Happy to see how nice it looks. :thumbup: :thumbup:

Barry
You are welcome!
You won't be disappointed with this stuff.
Practice on some scrap styrene or an old model kit first.
MonsieurTox
Corporal
Posts: 338
Joined: Thu Nov 04, 2021 4:30 pm
Location: Paris

Re: Scratchbuilt Leclerc

Post by MonsieurTox »

Hello guys,

I've modeled the road lights, it was not that easy, in particular the back of them. I 3d printed them but I'm planning to mold and cast them in regular resin.
IMG_20221204_132821.jpg
IMG_20221204_132821.jpg (1.05 MiB) Viewed 978 times
I created the hinges for the side armored skirts. They are functional but since the skirts are glued they won't work in the end.
IMG_20221204_132834.jpg
IMG_20221204_132834.jpg (625.89 KiB) Viewed 978 times
IMG_20221204_132845.jpg
IMG_20221204_132845.jpg (504.47 KiB) Viewed 978 times
I created the box of the turret with styrene. The welds are stretched sprues (from the 1/35 Tamiya Leclerc ;)) softened with Tamiya thin cement then shaped with an x acto blade.
IMG_20221204_132925.jpg
IMG_20221204_132925.jpg (544.02 KiB) Viewed 978 times
IMG_20221204_132917.jpg
IMG_20221204_132917.jpg (587.93 KiB) Viewed 978 times
MonsieurTox
Corporal
Posts: 338
Joined: Thu Nov 04, 2021 4:30 pm
Location: Paris

Re: Scratchbuilt Leclerc

Post by MonsieurTox »

Hello guys !

Here are some progress.

Continuing detailing the driver hatch :
leclerc46.jpg
leclerc46.jpg (738.31 KiB) Viewed 938 times
leclerc47.jpg
leclerc47.jpg (637.84 KiB) Viewed 938 times
I've started to fine detail the hull, handles, rivets etc...

Here are the hinges for the engine hatch made from styrene :
leclerc48.jpg
leclerc48.jpg (479.31 KiB) Viewed 938 times
The hatch is movable, it's just for fun because I have no real reason to get it working :
leclerc49.jpg
leclerc49.jpg (1.17 MiB) Viewed 938 times
leclerc50.jpg
leclerc50.jpg (1.22 MiB) Viewed 938 times
leclerc51.jpg
leclerc51.jpg (982.58 KiB) Viewed 938 times
leclerc52.jpg
leclerc52.jpg (1.07 MiB) Viewed 938 times
And finally the hinges of the front armored skirts :
leclerc53.jpg
leclerc53.jpg (895.24 KiB) Viewed 938 times
leclerc54.jpg
leclerc54.jpg (1.06 MiB) Viewed 938 times
User avatar
RiskyR
Lance Corporal
Posts: 148
Joined: Thu Dec 09, 2021 8:31 pm
Location: Netherlands

Re: Scratchbuilt Leclerc

Post by RiskyR »

For detailed parts you can clearly see that a resin printer is superior to a normal FDM printer. Looks superb!
In progress:
M4A1(75)
M4A1(76)W HVSS
M4A2 Fisher
MonsieurTox
Corporal
Posts: 338
Joined: Thu Nov 04, 2021 4:30 pm
Location: Paris

Re: Scratchbuilt Leclerc

Post by MonsieurTox »

RiskyR wrote: Fri Dec 16, 2022 6:56 pm For detailed parts you can clearly see that a resin printer is superior to a normal FDM printer. Looks superb!
Thank you RiskyR, yeah that's true for details resin printers are awesome, almost no cleaning (and sometimes not at all).

Here are some more details that go on the lower rear of the chassis :
IMG_20221217_211321.jpg
IMG_20221217_211321.jpg (845.48 KiB) Viewed 885 times
IMG_20221217_211258.jpg
IMG_20221217_211258.jpg (827.25 KiB) Viewed 885 times
Initially I 3d printed the front fenders or whatever it's called.
Then I thought it would be better to make them in styrene. I followed the way the original parts are built to create the curvature. It's not a smooth curve but folded plate into a faceted curve, I think it's an important feature that even Tamiya did not recreates on its kit.
IMG_20221217_211405.jpg
IMG_20221217_211405.jpg (1.65 MiB) Viewed 885 times
IMG_20221217_211435.jpg
IMG_20221217_211435.jpg (850.37 KiB) Viewed 885 times
IMG_20221217_211452.jpg
IMG_20221217_211452.jpg (1.12 MiB) Viewed 885 times
IMG_20221217_211504.jpg
IMG_20221217_211504.jpg (1020.52 KiB) Viewed 885 times
I u cut styrene plates, drilled holes then I scored the back with the back of an x-acto blade.
I was then able to shape them, ribs are glued on the back as well as bracket plates that attach to the hull (like on the full scale Leclerc).


Thanks for watching!
User avatar
HERMAN BIX
Brigadier
Posts: 10338
Joined: Sun Jan 12, 2014 12:15 am
Location: Gold Coast,Australia

Re: Scratchbuilt Leclerc

Post by HERMAN BIX »

hell of an effort going here Mr Tox and kudos to you for it too.
Sure will make an impressive AFV once you have finished, and a rare one too.
HL JAGDPANTHER,HL TIGER 1,HL PzIII MUNITIONSCHLEPPER, HL KT OCTOPUS,HL PANTHER ZU-FUSS,HL STuG III,HL T34/85 BEDSPRING,
HL PZIV MALTA,MATORRO JAGDTIGER,HL F05 TIGER,TAMIYA KT,HL PANTHERDOZER,HL EARLY PANTHER G,TAIGEN/RAMINATOR T34/76,
HL AN-BRI-RAM SU-85
User avatar
Raminator
Warrant Officer 2nd Class
Posts: 1267
Joined: Tue Aug 11, 2015 9:57 am
Location: Newcastle, Australia

Re: Scratchbuilt Leclerc

Post by Raminator »

You've got a real blend of traditional and modern techniques going on here, Mssr. Tox. A testament to what can be achieved!

I've found myself resin printing more and more parts, I just don't have the practical modelling skills to match my imagination. Unfortunately real life doesn't have an "undo" button like CAD software does! :haha:
MonsieurTox
Corporal
Posts: 338
Joined: Thu Nov 04, 2021 4:30 pm
Location: Paris

Re: Scratchbuilt Leclerc

Post by MonsieurTox »

HERMAN BIX wrote: Sat Dec 17, 2022 10:29 pm hell of an effort going here Mr Tox and kudos to you for it too.
Sure will make an impressive AFV once you have finished, and a rare one too.
Thank you Herman ! Yes it will be nice and rare when I finish it, I'm very close but to be honnest, I have already started another tank... it was too cold here to primer or paint so I switch to another project haha. I hope to get back on the Leclerc soon and ready for primer and paint once the weather will be warmer here.


Raminator wrote: Sun Dec 18, 2022 2:50 am You've got a real blend of traditional and modern techniques going on here, Mssr. Tox. A testament to what can be achieved!

I've found myself resin printing more and more parts, I just don't have the practical modelling skills to match my imagination. Unfortunately real life doesn't have an "undo" button like CAD software does! :haha:
Thank you Raminator, yes I'm trying to use every techniques I can use, trying to find which one is the most suitable for each part.
I'm also limited when it comes to 3D modelling organic shapes. I'm planning to do a M4A1 Sherman but the cast hull is quite a challenge to get it right. But I have a plan and it will be very close to the original as it will a scaled down 3D scan of an original Sherman. :)

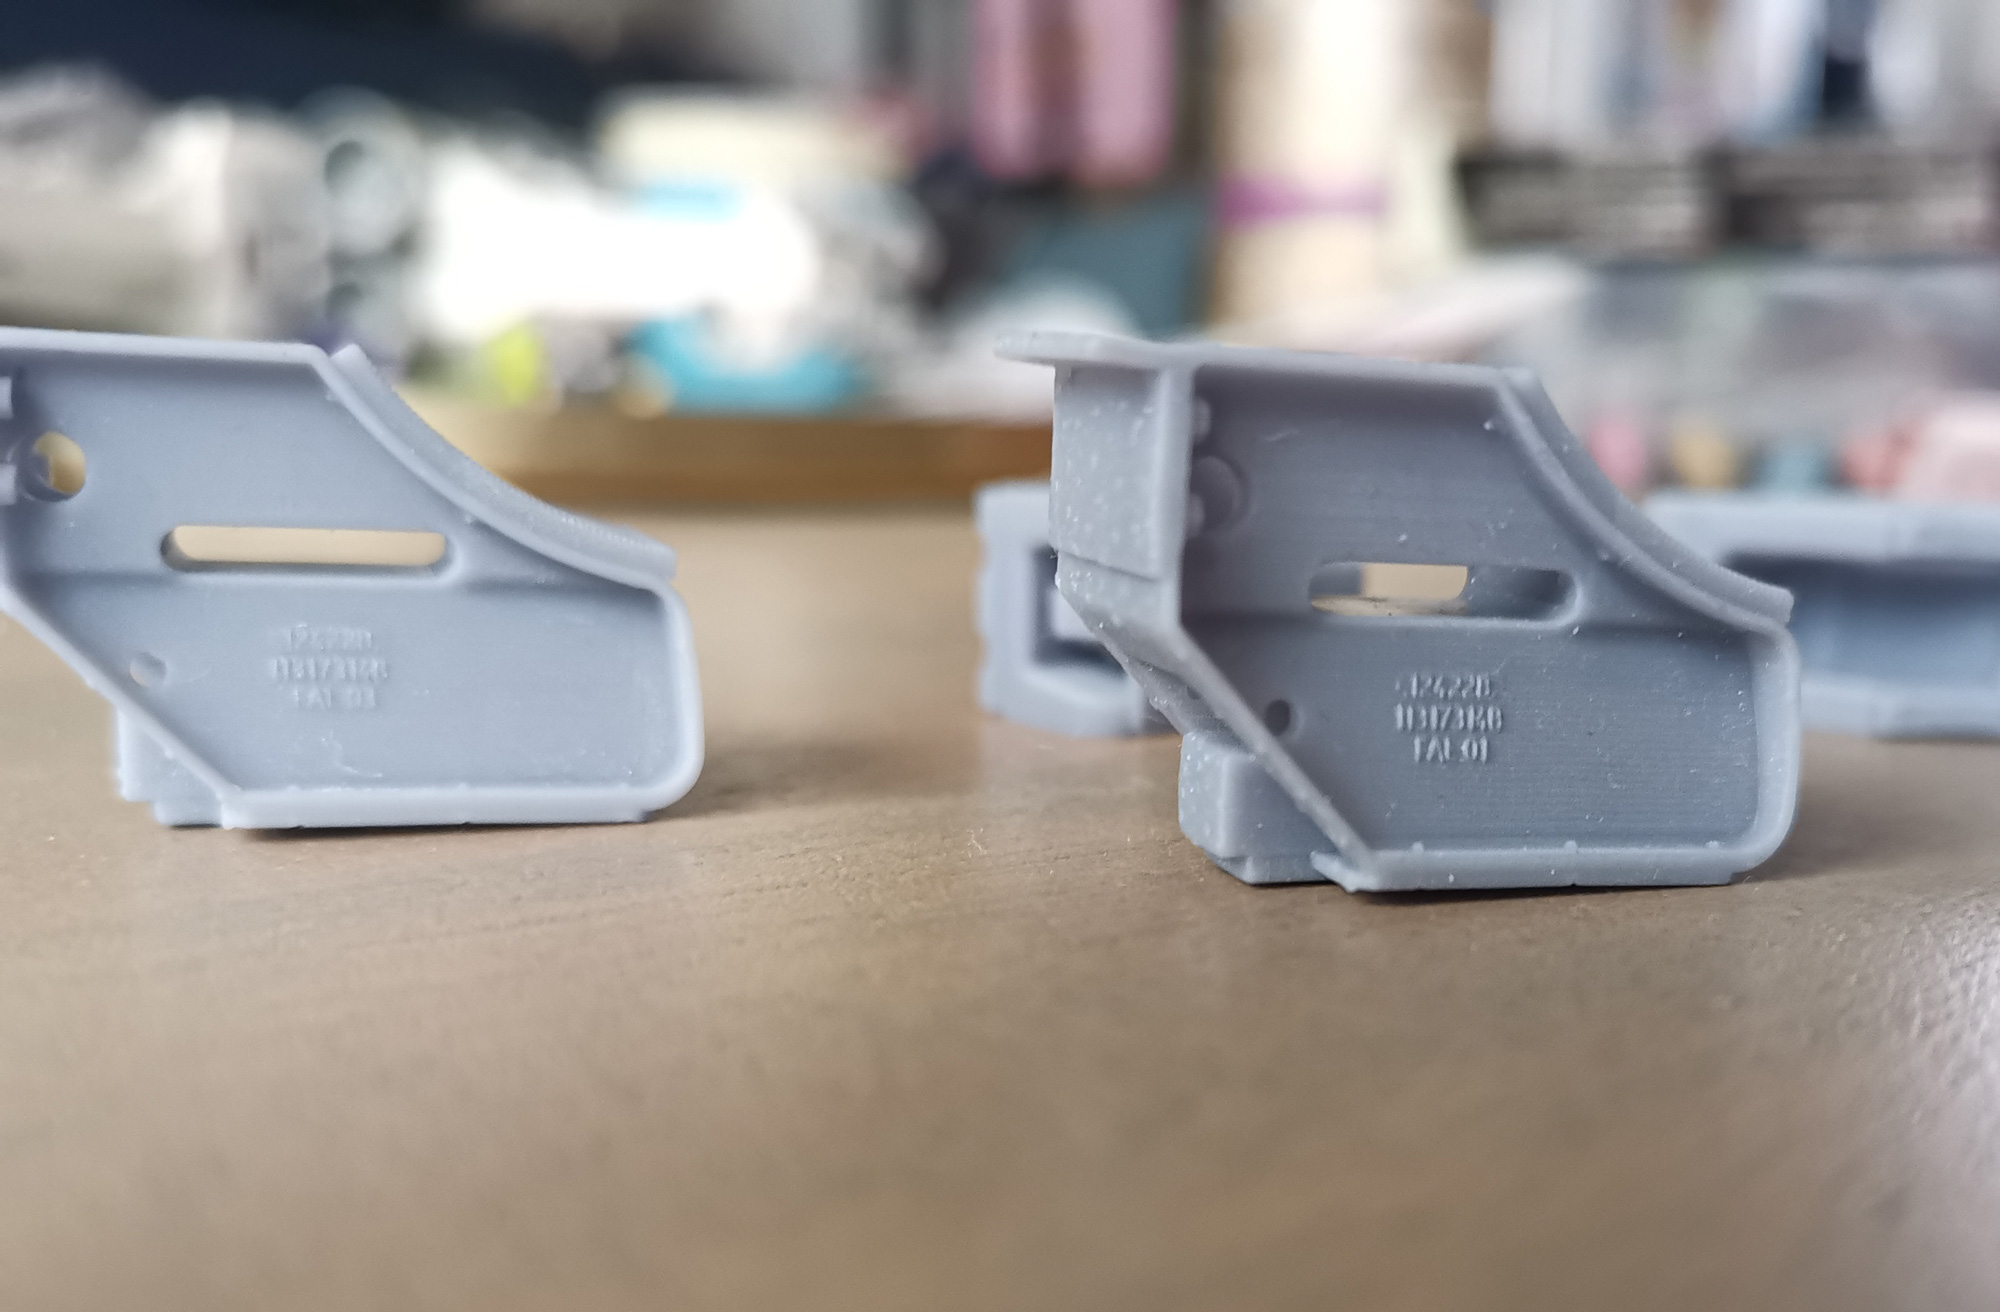
Well here are some updates on the Leclerc... which are not really hot stuff as I made those parts back in december. Just did not have time to post them.

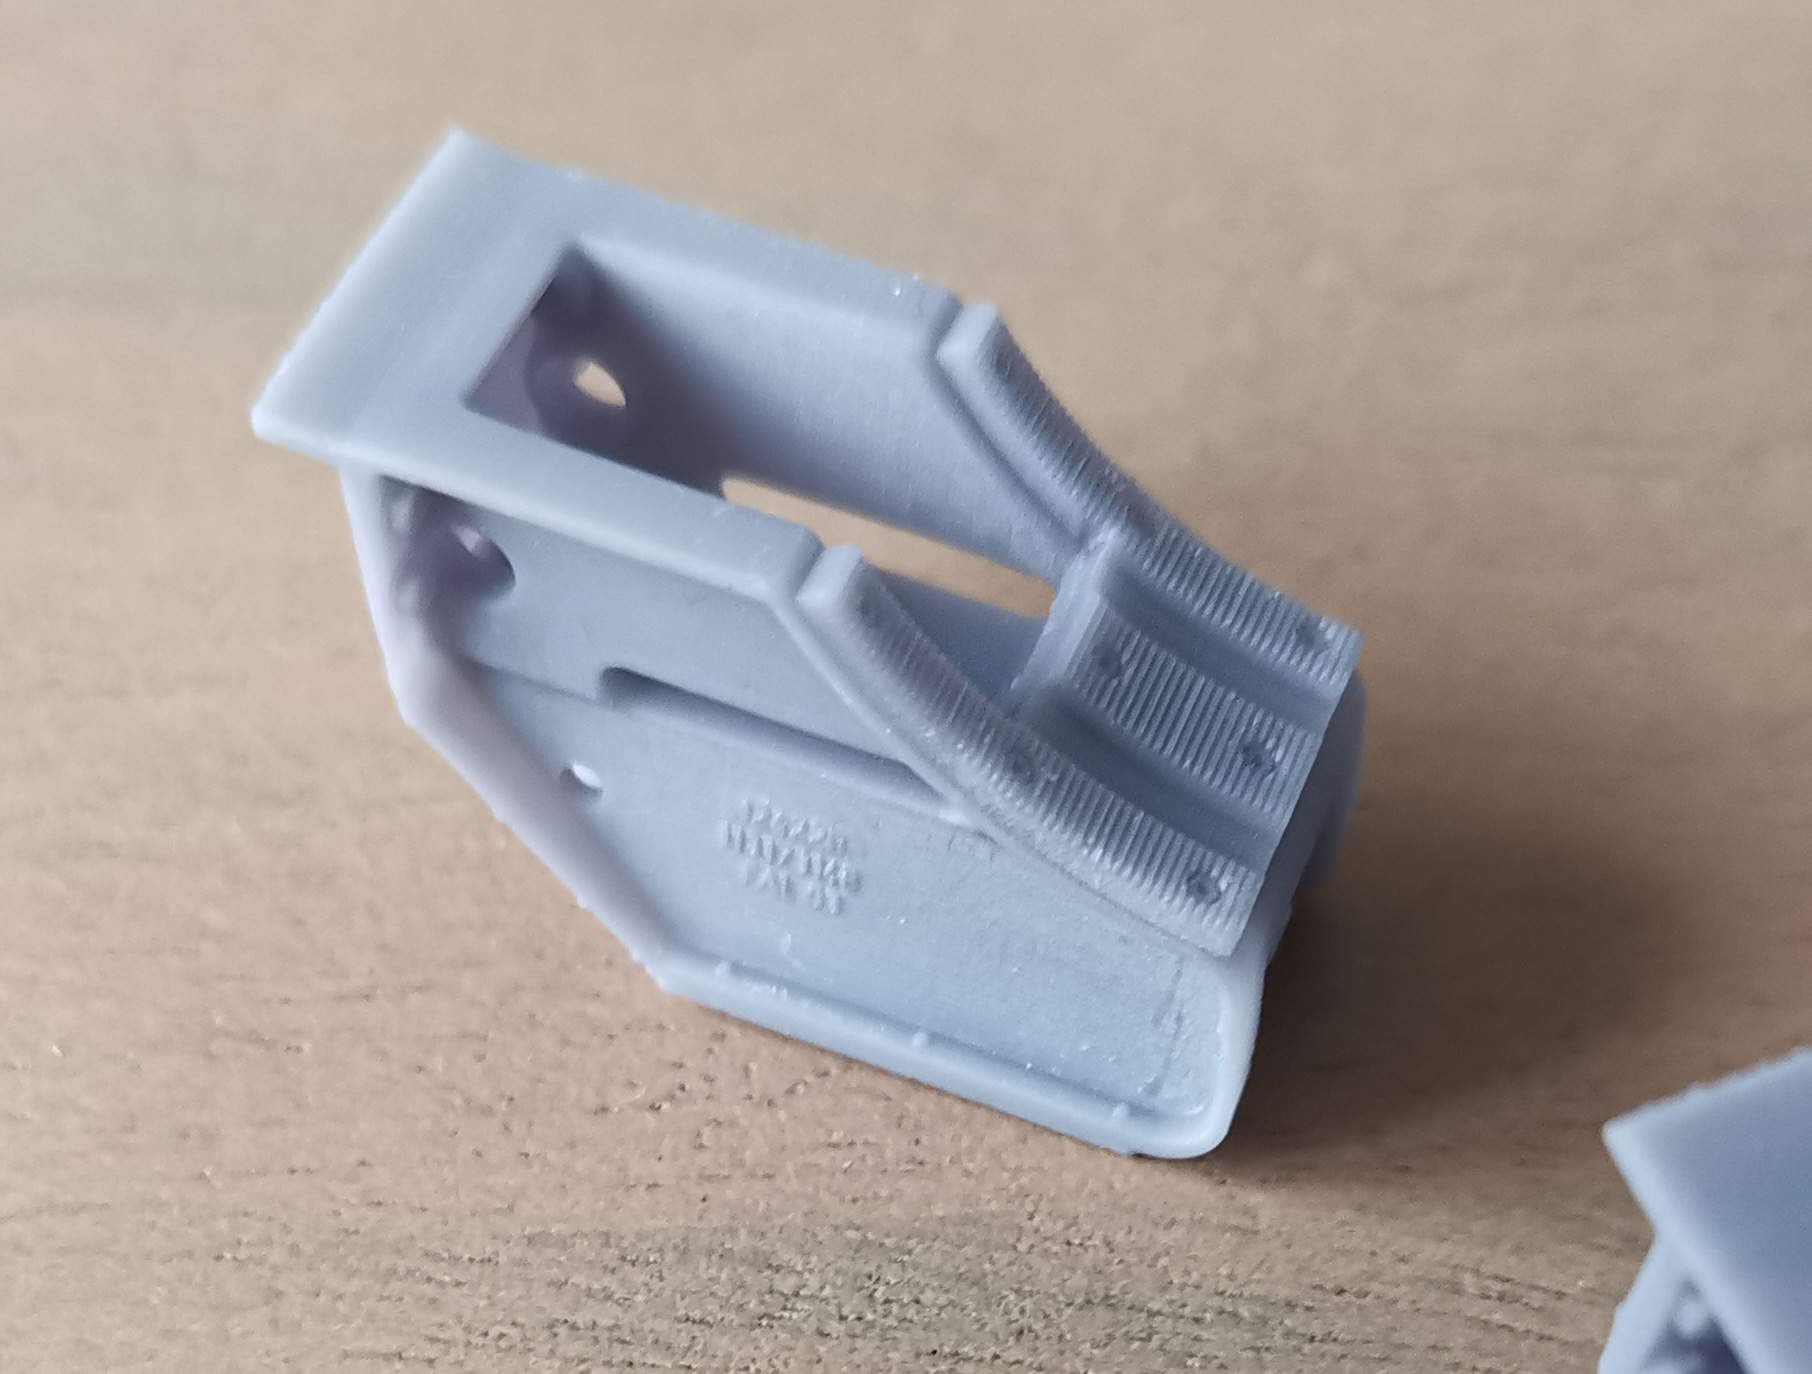
First the 4 supports of the additionnal fuel drums. The original parts are cast. I tired to model them as close as I could, printed them then added a cast texture with Tamiya putty thinned with acetone.

You can see some printing lines : they are hardly noticeable by eye or with a nail, and totally disappear with a coat of primer, and in thise case, with the cast texture.
leclerc55.jpg
leclerc55.jpg (392.07 KiB) Viewed 759 times
leclerc56.jpg
leclerc56.jpg (421.87 KiB) Viewed 759 times
leclerc57.jpg
leclerc57.jpg (468.74 KiB) Viewed 759 times
leclerc58.jpg
leclerc58.jpg (625.85 KiB) Viewed 759 times
leclerc59.jpg
leclerc59.jpg (543.75 KiB) Viewed 759 times
The hexagonal nuts on the bottom are Meng styrene stuff. That doesnt look like that but that's 64 nuts for the 4 supports, for nothing that will never be seen. :/


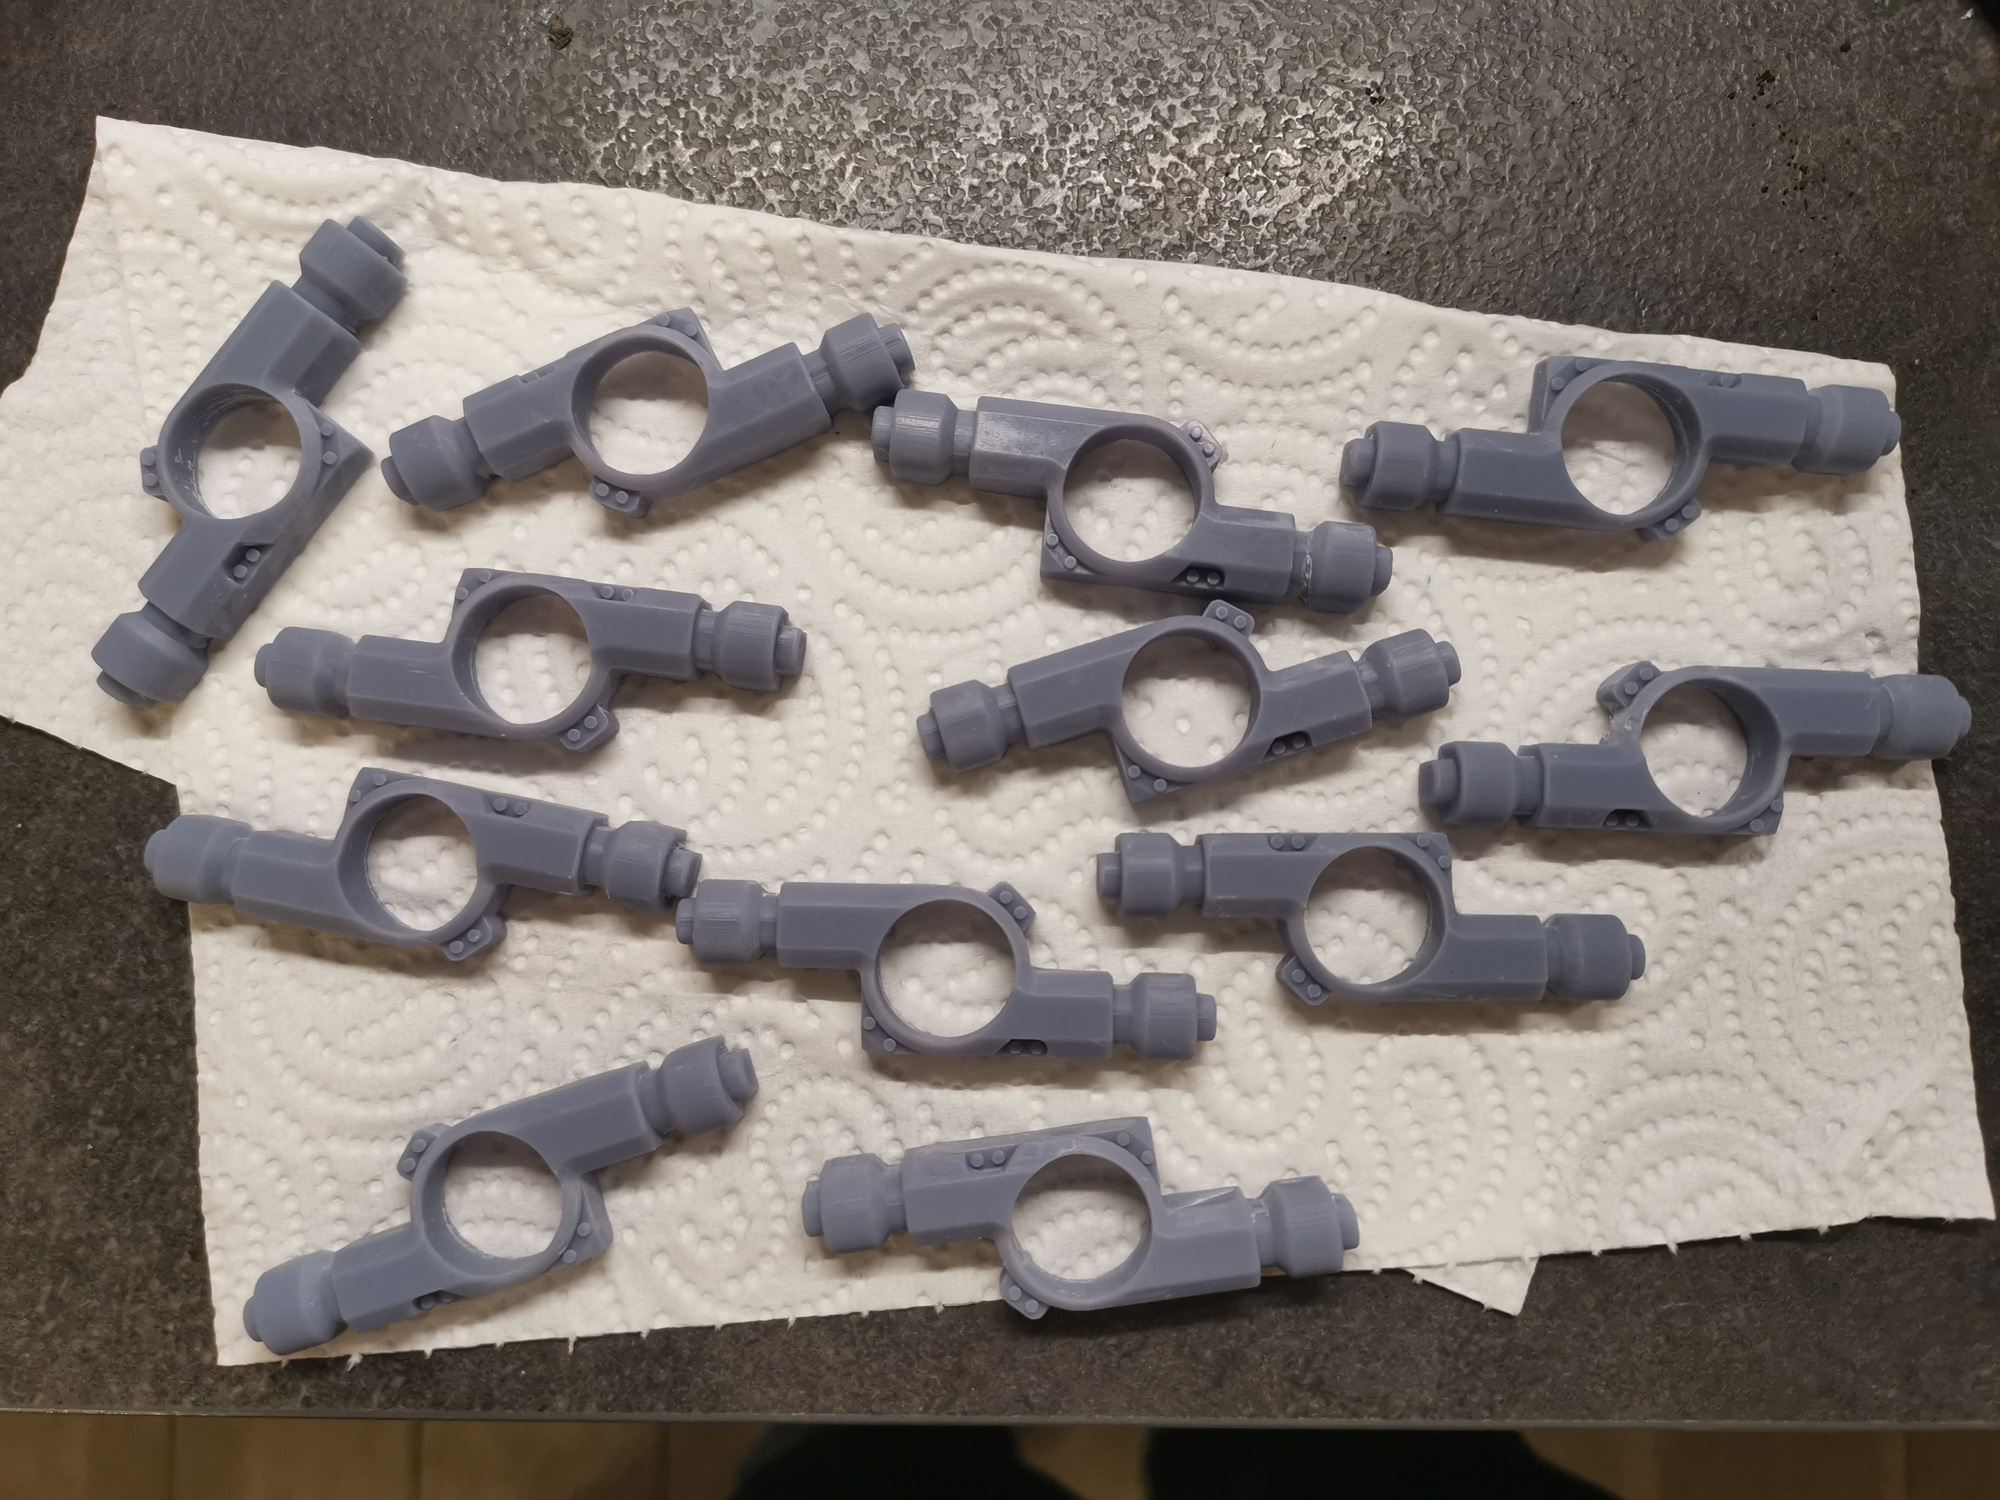
Next parts are the parts for locking the small frames that are on the engine hatch.
They are quite small and made of 3 parts each : 2 styrene parts : a roundel for the bottom and the top part. And a Meng styrene nut (diam 1mm to give you an idea of the size)
leclerc60.jpg
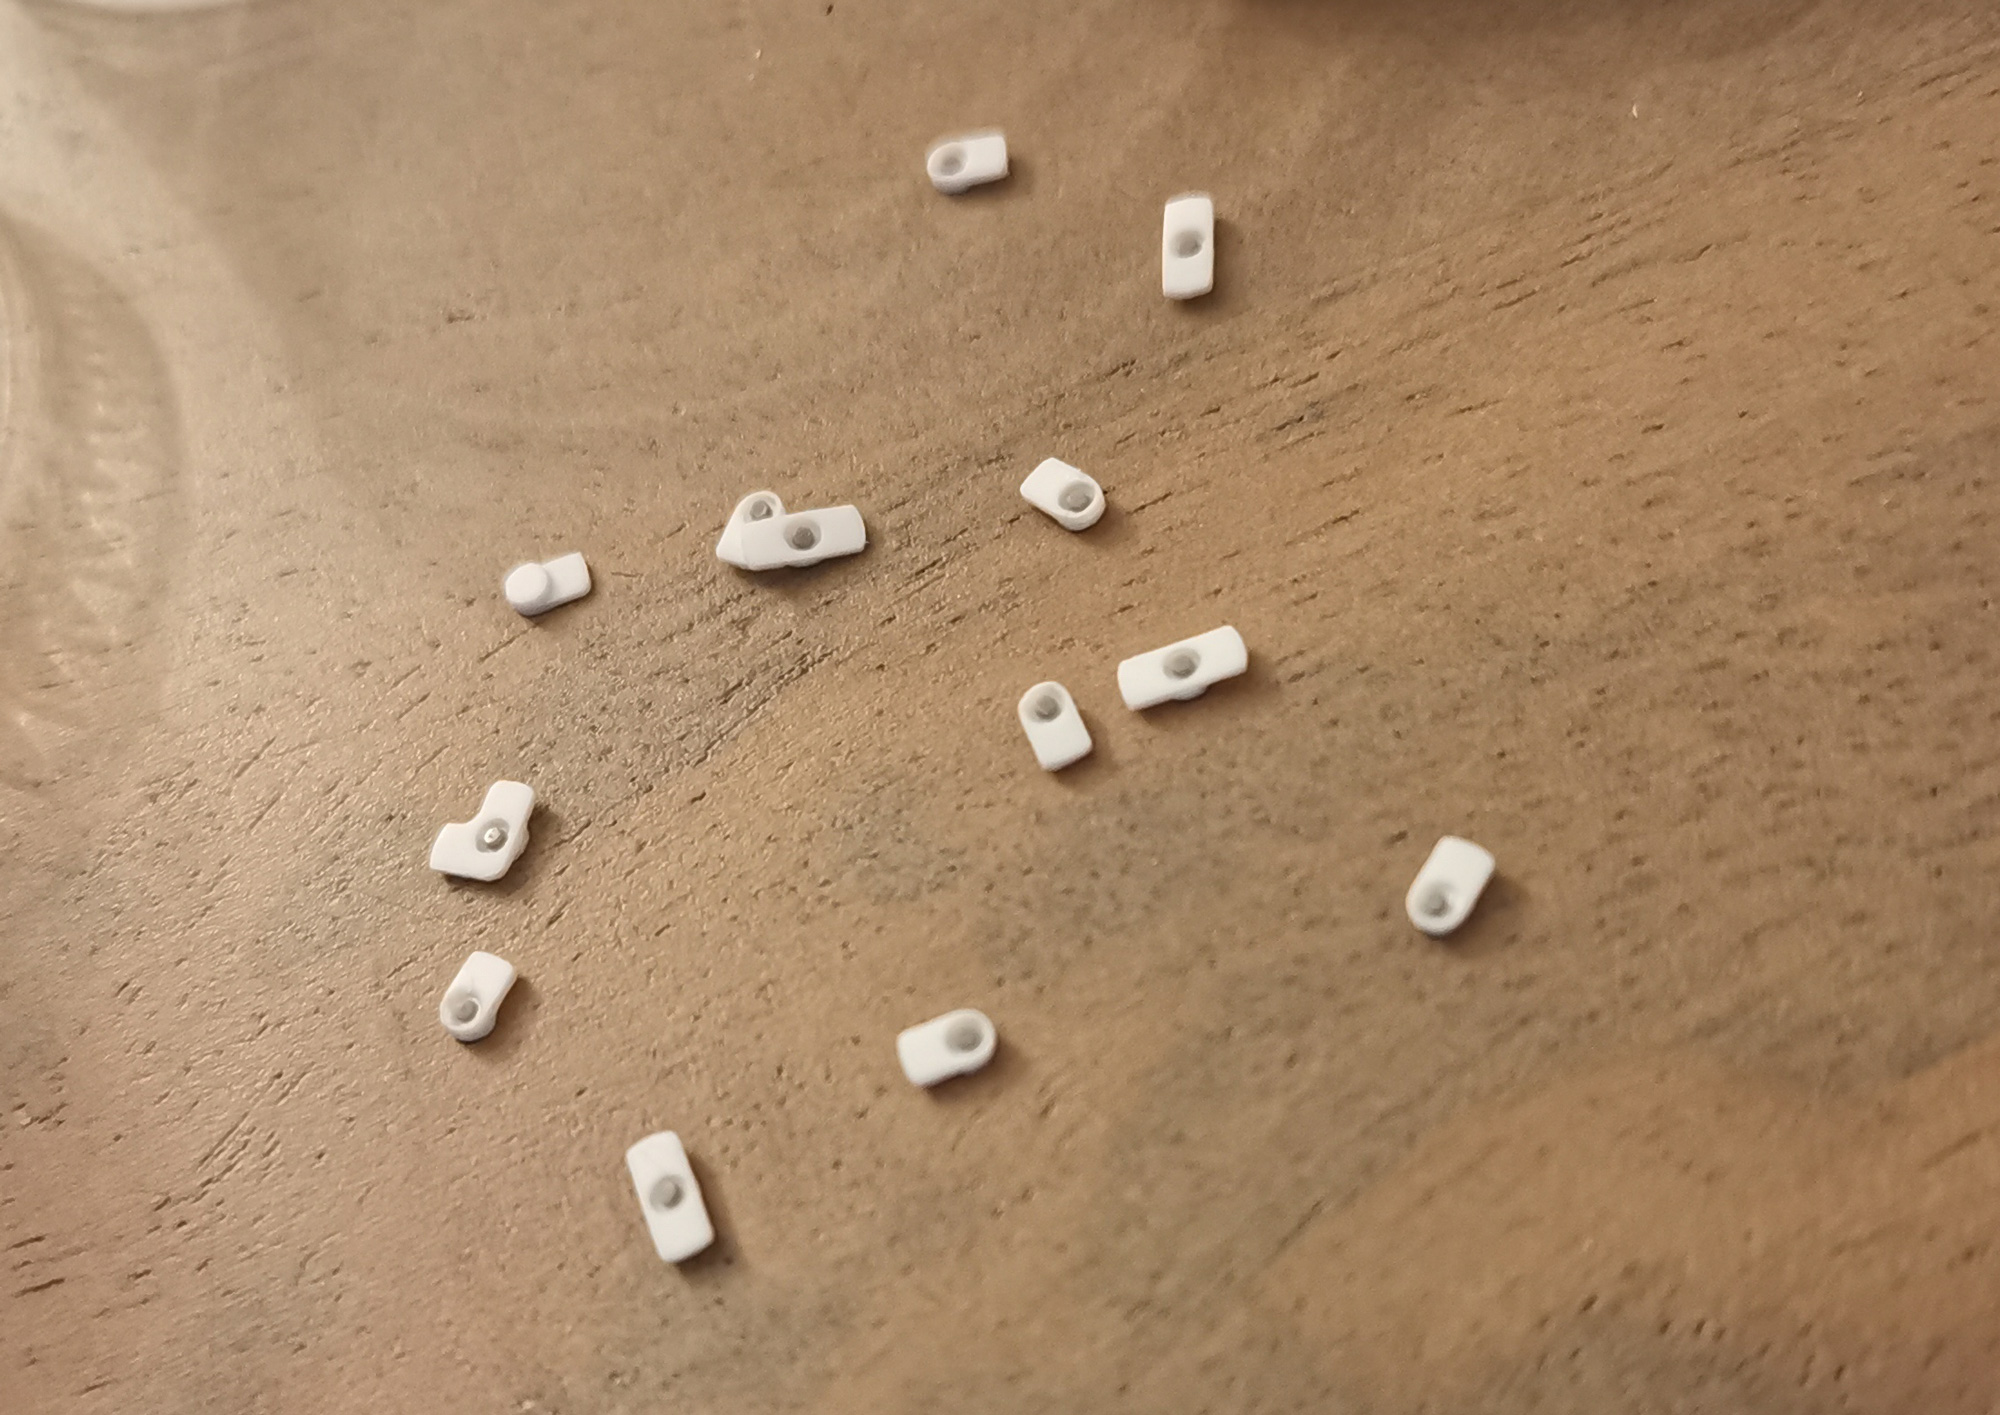
leclerc60.jpg (683.85 KiB) Viewed 759 times
Here are 3D printed fake oleopneumatic suspensions. I did not go crazy with them as they are hidden by the wheel. And I messed up the 3D model, I don't know how it happens but the parts have been mirrored twice in a way that they're not correct for any side of the tank... that's OK for me.
leclerc61.jpg
leclerc61.jpg (799.59 KiB) Viewed 759 times
MonsieurTox
Corporal
Posts: 338
Joined: Thu Nov 04, 2021 4:30 pm
Location: Paris

Re: Scratchbuilt Leclerc

Post by MonsieurTox »

I decided to make new road lights.

This time I 3D printed the master, ready to be mold to make an open mold for the front ligths and a 2 parts mold for the rear lights.

Then I cast the parts with regular polyurethane Smooth-on resin.

I did the same for the rear light, the vertical struts are 0.3mm thin and wide so even if I would have been able to print them, I would have likely destroyer them by removing the supports.

The master pattern and the molds of the front road lights :
leclerc62.jpg
leclerc62.jpg (506.59 KiB) Viewed 756 times
Castings :
leclerc63.jpg
leclerc63.jpg (452.85 KiB) Viewed 756 times
leclerc64.jpg
leclerc64.jpg (497.17 KiB) Viewed 756 times
leclerc65.jpg
leclerc65.jpg (377.9 KiB) Viewed 756 times
Rear lights master pattern and the molds :
leclerc66.jpg
leclerc66.jpg (609.04 KiB) Viewed 756 times
Castings, they are very delicate :
leclerc67.jpg
leclerc67.jpg (510.62 KiB) Viewed 756 times
leclerc68.jpg
leclerc68.jpg (526.28 KiB) Viewed 756 times
And in place, they can be removed to acces the interior (to put the LEDs etc), just like on the 1:1 Leclerc :
leclerc69.jpg
leclerc69.jpg (366.42 KiB) Viewed 756 times
User avatar
Kaczor
Warrant Officer 1st Class
Posts: 1785
Joined: Fri May 18, 2018 9:58 am
Location: Ciechanow, Poland
Contact:

Re: Scratchbuilt Leclerc

Post by Kaczor »

Amazing :) Wonderful set of skills and tools :)
Post Reply

Return to “Modern Builds”