RC 1/16 M-24 Chaffee light tank- Dien Bien Phu 1954 - Build
Re: RC 1/16 M-24 Chaffee light tank- Dien Bien Phu 1954 - Bu
The fiber optic installation is tested. An aluminum tube replaces the barrel inside the sleeve. But it will be permanently installed with the LED later in the build, i do not need these in the way right now. I am still planning to give horizontal movement to the bow machine gun but i am not sure if i will be able to install a push rod that will be connected to a servo between the two gearbox. Space between the glacis and the gearbox under is very tight. I would need to do more gearbox grinding. TBD later.
View of the glacis with the gearbox hatch and Browning M1919 bow machine gun.
Superglue was put on the machine gun ball to mimic a cast effect that will be apparent only when the part is painted.
Mounts for the canvas cover seen on pictures i have of the bow machine gun are not yet installed. I need to do some research to check if they all had this feature.
Close up on the bolts and the guards. The heavy welding was simply reproduced with Testor putty. Superglue will be apply on it when the putty is dry in order to solidify it and avoid cracking.
Overview of the model as it stands today. Next step, the hatches.
Regards, Louis
- Raminator
- Warrant Officer 2nd Class
- Posts: 1267
- Joined: Tue Aug 11, 2015 9:57 am
- Location: Newcastle, Australia
Re: RC 1/16 M-24 Chaffee light tank- Dien Bien Phu 1954 - Bu
Looking better than a bought one, Louis. Excellent work as always!
These are some of the detail parts I printed on my SM4K last night for the SU-152. For reference, the grid lines they're on are 5mm, the latch on the box is only 0.35 mm in diameter!
Resin printing's a bit messy, but I think the results are worth the effort. It'd be a good idea to try your hand at some CAD suites, you can't rely on files being available for things. Given your wealth of experience in creating 3-dimensional objects from photos and stuff, I don't think you'll have much trouble getting the hang of it!
I got into resin printing about six months ago for the same reasons; I wanted to print small, detailed things. I bought a Phrozen Sonic Mini 4K, it's higher-resolution than most other consumer-level printers out there (at 35 µm rather than 50 µm), but doesn't cost anywhere near what the commercial-grade stuff does. When I got it, they were (unbeknownst to me at the time) notorious for having some wobble in the Z-axis, but the manufacturer has since released a kit that fixes it. If you can get a new one that has that upgrade kit installed, I think it'd be worth it.lmcq11 wrote:Fully agree with that. I've been looking for a while but i am getting lost in all the brands, type of material, etc. Do you or someone reading this has an affordable model to recommend ? I am just looking for a small, but very precise printer to create small and fine resin parts. If it makes printed lines that need to be filed, then that's not for me.MonsieurTox wrote:You may buy a small resin printer
These are some of the detail parts I printed on my SM4K last night for the SU-152. For reference, the grid lines they're on are 5mm, the latch on the box is only 0.35 mm in diameter!
Resin printing's a bit messy, but I think the results are worth the effort. It'd be a good idea to try your hand at some CAD suites, you can't rely on files being available for things. Given your wealth of experience in creating 3-dimensional objects from photos and stuff, I don't think you'll have much trouble getting the hang of it!
Re: RC 1/16 M-24 Chaffee light tank- Dien Bien Phu 1954 - Bu
Great, thank you Raminator. This is really helpful. These are really beautiful parts. I'll investigate.Raminator wrote:I got into resin printing about six months ago for the same reasons; I wanted to print small, detailed things. I bought a Phrozen Sonic Mini 4K, it's higher-resolution than most other consumer-level printers out there (at 35 µm rather than 50 µm), but doesn't cost anywhere near what the commercial-grade stuff does.
Continuing with the build with the driver's and assistant hatches.
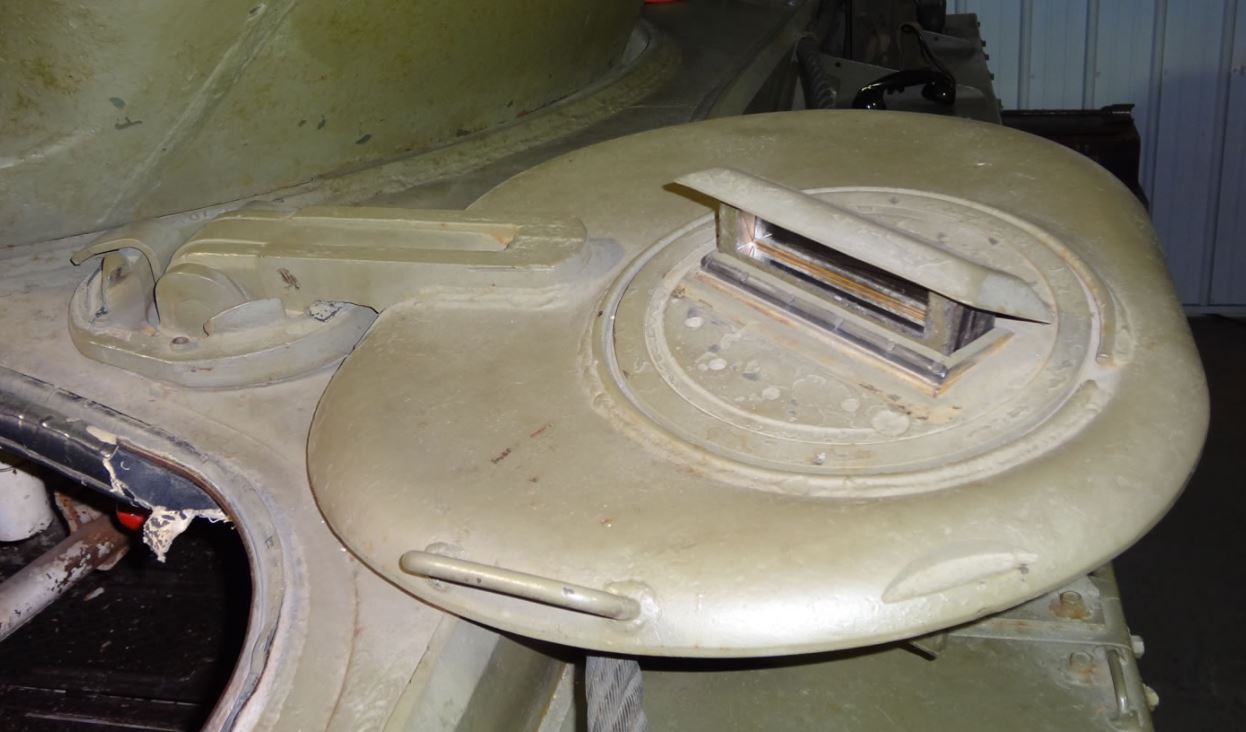
The M24 being new to me, some investigation was required to understand what to do. Below are the oval shaped hatches. What i thought was going to be simple and similar to a Sherman ended up being really different. Notice the hinge mechanism. As i wanted to have operating hatches, it required more time and effort.
To open the hatch, it has to be raised, then swiveled to the side, then lowered on a stand. It can be done while the periscope is still in place.
I had to study the mechanism, and try to get to something close without too much difficulty and time. Some simplifications can be done.
As seen in some remaining vehicles, a metal cover was initially provided and sometimes still present, sometimes not. I suspect it was easily blown off and lost in operation. I decided not to reproduce the cover, i prefer to see the mechanism under.
The core of the hatches are created in plasticard, in two layers. The 1/35 kit provided extrapolated dimensions to 1/16.
The basic hatch can be easily done.
The base and the seal on the hull were done and tested for fit with the hatches that sit of these.
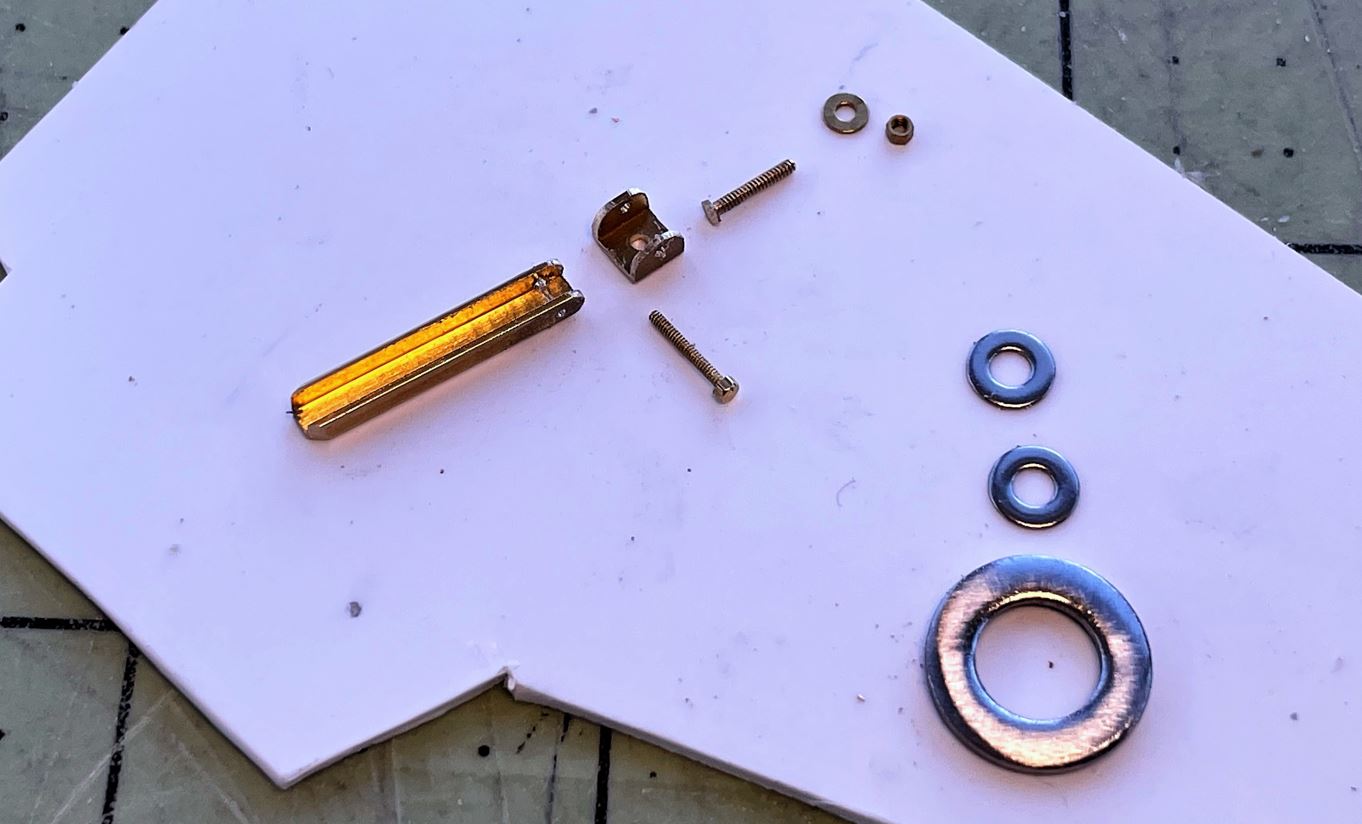
The parts created for the hatch closing mechanism, mainly made of Channel brass strips in two sizes that overlap.
The assembled mechanism.
Continuing on following post
Last edited by lmcq11 on Tue Dec 14, 2021 12:56 pm, edited 1 time in total.
Re: RC 1/16 M-24 Chaffee light tank- Dien Bien Phu 1954 - Bu
Created the base for the opening arm mechanism. Not looking for perfection here, just something that looks ok with available material on hand.
The hatch was detailed with a periscope base and with a periscope that come from the Classy Hobby M5A1 Stuart. The periscope cover was scratch built. The base for the periscope was complicated, has a difficult angle to repro and was done prior to gluing the hatch to the arm. The M1 bolt holding the arm has a washer and nut inside the hull for a realistic and functional opening/closing operation.
The basic mechanism is then further detailed a bit the best i could with the time i was willing to put on these. The hatch is given its locking mechanism and handle.
The two hatches are installed.
Walk around the hatches.
The hatch can be raised like the real thing.
And swiveled to the sides with the periscope still on.
Continuing on following post.
Last edited by lmcq11 on Mon Dec 13, 2021 9:07 pm, edited 1 time in total.
Re: RC 1/16 M-24 Chaffee light tank- Dien Bien Phu 1954 - Bu
Overview with the hatches opened. I did not put the resting pin for the hatches that should be located on the sides. I will wait for the fenders to be installed to detail that area. Present are the lifting hooks on the glacis and the ventilator intake cover between the two hatches.
Continuing the detailing of the upper hull with the fuel tank vents at the rear.
Basic shapes are created in 3mm plasticard.
A thin plasticard layer is added at the bottom to repro the rim i have seen on them in pictures, more evident on some tanks than others. I probably need to trim them further though.
The fuel tank vents are installed, along with a bunch of handles done in 0.8mm brass rods.
Close ups.
Notice that the fuel cap was given a layer of superglue to mimic a cast effect that will be more visible when painted.
The model as it stands today. I would normally do the fenders, but i would like to have the tracks on hand and finished to see the integration before i put on fenders. So, next step is to jump to the next big milestone; the turret.
Regards, Louis
- HERMAN BIX
- Brigadier
- Posts: 10331
- Joined: Sun Jan 12, 2014 12:15 am
- Location: Gold Coast,Australia
Re: RC 1/16 M-24 Chaffee light tank- Dien Bien Phu 1954 - Bu
Those hatches are things of beauty on their own Mr Mcq11!!
And I assume you have an active share portfolio in the brass bolt company featured on all your builds
HL JAGDPANTHER,HL TIGER 1,HL PzIII MUNITIONSCHLEPPER, HL KT OCTOPUS,HL PANTHER ZU-FUSS,HL STuG III,HL T34/85 BEDSPRING,
HL PZIV MALTA,MATORRO JAGDTIGER,HL F05 TIGER,TAMIYA KT,HL PANTHERDOZER,HL EARLY PANTHER G,TAIGEN/RAMINATOR T34/76,
HL AN-BRI-RAM SU-85
HL PZIV MALTA,MATORRO JAGDTIGER,HL F05 TIGER,TAMIYA KT,HL PANTHERDOZER,HL EARLY PANTHER G,TAIGEN/RAMINATOR T34/76,
HL AN-BRI-RAM SU-85
Re: RC 1/16 M-24 Chaffee light tank- Dien Bien Phu 1954 - Bu
Thank you Herman,HERMAN BIX wrote:Those hatches are things of beauty on their own Mr Mcq11!!
And I assume you have an active share portfolio in the brass bolt company featured on all your builds
There is a special satisfaction feeling in screwing brass bolts into an armored plate i just cut. Its a step closer to the real thing. The result is always a notch higher than using plastic bolt heads and nuts. It make the builds more interesting to me. A little bag of 25 bolts cost between 5 and 7 euros.
On every build like this, i make an order of about $100 with Knupfer of Germany, mostly M1, M0.8, M0.6 bolts, nuts, washers, brass strips of various sizes and thickness, channel strips or other special item. I buy brass rods and plasticard in lots from Spruebrothers. Aluminum and brass tubing come mostly from China through eBay. The leftovers go into the reserve for the following build. Brass and aluminum are nice hobby materials, they can easily be cut with basic tools, shaped with a nail file and then polished. I like to use brass bolts on exposed areas, but i use Meng plastic nuts on secondary or partially hidden areas, or where it is not possible to use real screws. These make scratch build solutions possible.
Re: RC 1/16 M-24 Chaffee light tank- Dien Bien Phu 1954 - Bu
Hi,
Starting the turret, it is a big part of the project.
The Bronco 1/35 turret provides a good view of the shapes, dimensions and angles. At first sight, it is not simple and requires custom work. The commander has a M26 type of cupola that i hope to use here, the gunner has a flat hatch.
Bottom view of the round base.
There is a cast section at the front, along with the mantlet. The side armor is rolled steel.
Frontal view
I am going to start with the round bottom base.
In order for the base of the turret to be totally round, flat and uniform, i will build it using roundels stacked together. Four layers are prepared in descending size to help manage the outward angle that needs to be created manually, consisting of two layers of 4mm, one of 2mm and one of 1mm for a total of 11mm.
A simple roundel making tool is use in reverse so that the back of the blade grinds through the thick plasticard. It takes about 3 minutes per cut.
The four layers are ready for gluing together.
Then the side is given a Dremel treatment to grossly reproduce the angle first, then finetuned with a nail file and then polished smooth. The last ring on the top is cut where the frontal cast armor will start.
On this reverse view, you can see the structure of the turret base.
Continuing on following post.
Last edited by lmcq11 on Thu Dec 16, 2021 11:58 pm, edited 1 time in total.
Re: RC 1/16 M-24 Chaffee light tank- Dien Bien Phu 1954 - Bu
The integration is tested with the upper hull, looking good. The round base ensured there is no wobble.
The fit at the back with the engine intake grill module is good.
The fit is also excellent with the outer rounded guard around the turret base. The spacing matches what is seen on the 1/35 kit.
Getting ready for the frontal cast armor. Lots of pre-calculations and planning is required. I also left a good base inside the turret in order to install the elevation and recoil servos. The shape of the hole will be adjusted after the gun elevation system is created.
Angles are taken directly from the Bronco kit. However, i noticed that the two side angles are not the same. I also saw a small issue during the planning phase. I am going to use a Tamiya M-26 Pershing commander's cupola. However, it seems that the 1/16 Tamiya M-26 cupola ring is about 3mm larger than the space that Bronco has given it on its 1/35 kit when extrapolated to 1/16. I do not know if the M-24 cupola was really smaller than the Sherman and M-26 cupola that are both identical, or if Bronco made a mistake. In order to use the Tamiya M-26 cupola, i need to compensate and enlarge the turret top by 3mm compared to the Bronco 1/35 measurements to help the fit for Tamiya cupola. I find it unlikely that the US would have developed a specific cupola size for the M-24 that is 48 millimeters smaller in diameter... I gave the same angle to the two sides of the turret.
The frontal armor piece is made of four layers of 4mm plasticard glued incrementally together, then hand carved with the Dremel and hand files using the 1/35 kit as a model.
After two hours of work, this is the current state of the frontal armor. I am slowly getting there but it is dusty business.
Next step; the mantlet and gun elevation system.
Regards, Louis
- Manu-Military
- Lance Corporal
- Posts: 134
- Joined: Fri Jan 18, 2019 12:42 pm
Re: RC 1/16 M-24 Chaffee light tank- Dien Bien Phu 1954 - Bu
I'd just say : wow!