RC 1/16 Churchill Mk III - Dieppe Raid 1942 - Build
Re: RC 1/16 Churchill Mk III - Dieppe Raid 1942 - Build
That's awesome! I am tempted to put that kit high on my wish list. Just one question tho... with that exhaust...
Are you going to paint it green and call it "Loki"?
Sherman M4A3/Stug III/Panzer III/Panzer IV/Tiger/King Tiger/KV-1/T34-85/Leopard 2A6/Abrams M1A2/Walker Bulldog/Pantiger
Under construction; Sherman Firefly IC - M3 Grant - Sherman BARV
... No, I do not have a problem....
Under construction; Sherman Firefly IC - M3 Grant - Sherman BARV
... No, I do not have a problem....
Re: RC 1/16 Churchill Mk III - Dieppe Raid 1942 - Build
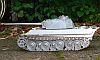
It is actually time to pick a name for the model. Every Churchill tank and vehicle that landed at Dieppe had a name. As each vehicles show a level of variations in features, i am at the point where i have to pick a specific vehicle to accurately model a Churchill at Dieppe. The tanks were intensively photographed by the Germans propaganda after the battle, these records are the only ones i have seen on the Churchill tanks at Dieppe. I have not found a single allied photograph made during the preparations, embarkation, landing and afterwards.Rob1970 wrote:Are you going to paint it green and call it "Loki"?
I have selected Cheetah below. These are two well known photograph of her. After landing, she made it to the promenade, fought against many bunkers and concealed enemy guns for hours, was shot at intensively at the point where the interior paint was melting. It was finally stopped by a Luftwaffe bomb that damage its hydraulic system. The crew survived.
I did some research on the tanks based on photographic evidence. Here is a brief summary of the findings with pictures of some selected tanks to explain. In this picture of Bert below, we can see that this tank has the armored plates at the front on each side of the bow machine gun. It has what seems to be a wood block attached. Cheetah does not have them. This tank also has track guard covers over the air intake at the back, and also some remnants of the cover for the sprocket seen on Cheetah.
Close up of the side armored plate also seen on Beefy. I understand the plates are support remnants for the track guard. Not sure if they provide protection but they surely reduce visibility.
On Bob, i can see small bolts on the top left the turret that used to hold a cylindrical box that seem to have been removed on all tanks prior to the raid. Also seen clearly here are some large conical rivets?? or bolt head on the side of the panniers. There are seven of them on both sides and two at the front. The fifth cone head on the right side is located at the bottom while it is located at the top on the left side, go figure... Their use are unknown to me but they certainly look medieval. Cheetah also has these. Bob does not have the interior side armor plate at the front because we can see through the tracks at the front.
This is Blondie. Notice that she has no conical rivets on the sides. She has no track guards over the air intake. There is the sprocket cover, with spare tracks on them, also seen on Cheetah. I can see a fire extinguisher on the right side of the turret.
View of Blondie under new management, confirming its lack of track guard at all.
View of Cat with no track guard and no spare tracks at the rear.
View of Butterfly with front side panels, no extinguishers on the side of the turret, has track guard over the air intake and sprocket, no conical rivets on the side.
Interesting view of Bluebell, showing its rare or unique configuration at Dieppe, different than others. It has more track guard sections left at the rear than any other tank i have seen on Dieppe. It has spare tracks attached to the track guard over the air intake. It has a fire extinguisher on the turret side and no conical rivets on the sides.
Regards, Louis
Last edited by lmcq11 on Thu Sep 02, 2021 10:45 pm, edited 7 times in total.
- Herr Dr. Professor
- Lieutenant
- Posts: 3642
- Joined: Mon Apr 22, 2019 10:48 pm
- Location: Southern Wisconsin USA
Re: RC 1/16 Churchill Mk III - Dieppe Raid 1942 - Build
I respect the care you have shown to be historically accurate, right down to the name. Over my years in academia, I was impressed by the fine, scholarly work done by hobbyists. Your habits are truly scholarly in their depth, methods, and zeal. A tip of the doctoral tam to you!
Re: RC 1/16 Churchill Mk III - Dieppe Raid 1942 - Build
Thank you Heer Dr. Doing the research prior and during a build of an historical tank is a good part of the pleasure of the hobby.
This post is for the track guard over the air intake. I have not found information as to why the track cover was removed, partially or fully by the crews.
Here are two views of the section that was left on most tanks. Notice how tight the space is between the tracks and the cover.
It is relatively easy to model it. The body is made of 1mm card, with the reinforcement bars consisting of a 1.5mm bar over a thin base. The parts coming with the Ludwig kit were way too thick and not detailed enough.
The finished guards ready for installation on the tank. Pictures and the 1/35 kit parts were used as reference for shape and dimensions.
Overview of the track guards installed.
Earlier calculations were correct... There is very limited space between the tracks and the two sides.
This is a nice addition to the model.
Regards, Louis
Re: RC 1/16 Churchill Mk III - Dieppe Raid 1942 - Build
Picture showing the Calgary tank regiment on review somewhat before the raid. Notice the large cylindrical box on the side of the turret, removed prior to the raid. Also notice the position of the tow cable and the use of the gutter over the side door to hold it in place and the seven conical heads on the armor side, use unknown to me and not every Mk III tank has them. There are no track guards (yet) over the sprocket at the rear.
Close up of those conical rivets or bolt head shown on some Churchill Mk III tanks. Notice that both sides were trimmed, probably to screw with some tool.
What i thought was a gutter above the side doors is actually also a support holder for the tow cables.
A large 7mm plastic rod was used as material to create the conical heads. The gutter is a brass channel that i tried to round the corners with a file.
Gutter and conical heads are installed. There are 7 conical heads on both sides at specific location. Be aware that the location of one of the head is different between the right and left side. I found the gutter to be a bit think, i will need to rework it.
I look for anything that sticks out in reference and then repro the best i can.
Two cone heads are located at the front on each side of the tow hook. They look like some kind of medieval weapon.
Reference show bolt heads where the holder for the cylindrical box used to be on the left side of the turret.
Shown on surviving example and also on Churchill at Dieppe.
View of the model as it stands today.
Next step, the top cover over the sprocket wheel and the spare track holders.
Regards, Louis
Last edited by lmcq11 on Thu Sep 02, 2021 10:48 pm, edited 3 times in total.
Re: RC 1/16 Churchill Mk III - Dieppe Raid 1942 - Build
Louis,
this is supreme master class!
Re: RC 1/16 Churchill Mk III - Dieppe Raid 1942 - Build
Breathtaking work Louis
Re: RC 1/16 Churchill Mk III - Dieppe Raid 1942 - Build
As a fellow hobbyist, I think the word you are looking for is "maniacal". Possibly "insane"...Herr Dr. Professor wrote:... the fine, scholarly work done by hobbyists...
Sherman M4A3/Stug III/Panzer III/Panzer IV/Tiger/King Tiger/KV-1/T34-85/Leopard 2A6/Abrams M1A2/Walker Bulldog/Pantiger
Under construction; Sherman Firefly IC - M3 Grant - Sherman BARV
... No, I do not have a problem....
Under construction; Sherman Firefly IC - M3 Grant - Sherman BARV
... No, I do not have a problem....
- Herr Dr. Professor
- Lieutenant
- Posts: 3642
- Joined: Mon Apr 22, 2019 10:48 pm
- Location: Southern Wisconsin USA
Re: RC 1/16 Churchill Mk III - Dieppe Raid 1942 - Build
In my experience, “scholarly” = “maniacal.”
Re: RC 1/16 Churchill Mk III - Dieppe Raid 1942 - Build
Thank you guys. As i am mainly a builder, the level of details is very important to me, more than for those who are mainly players and appreciate robustness and best electronics above everything.
This post is for the track guard over the sprocket at the rear, spare tracks and tow cable.
Cheetah is definitely a Mk III (turret, air intakes) but it also has Mk II features such as the rounded cover over the sprocket at the rear and also the back plate. In references, these items on a pure breed Mk III are different. My guess is that these Churchills are probably early Mk III that used some Mk II parts during construction. In addition to the single spare track link on the sides, many Churchill at Dieppe had 3 links on each sprocket cover. Thankfully, DKLM provided just enough track links so that i can repro these, only one left.
Also notice the torn canvas sheeting on the turret and elsewhere. This is air balloon material that was used to make the tanks watertight for the Dieppe landing. I will not be reproducing these.
Close up on the sprocket track guard cover. I do not call it a mud guard because it seems installed too high for the purpose. Also notice the spare track holder on the right, here with a early type Churchill track. I had to adapt it to the late type tracks used on this build.
Basic parts are drawn and cut using the 1/35 kit for dimensions and shapes.
The rounded part is done in 0.5mm card and need its support installed first.
Sprocket cover are assembled. Three bolts are loosened on the sprocket side cover in preparation for the spare track holder. I previously installed a rivet at the top and this had to be corrected.
The holder is made of brass.
Spare track installed with its retaining bracket at the top, held by the top bolt. I did not see or found any specific bracket that would hold the 3 links on top of the sprocket cover. They were probably just held in place with a wire or some unseen inside bracket that i do not need to repro.
Overview of the model with its tow cables, sprocket cover and spare tracks installed.
Rear view. These Churchills did not have any central tow hook at the rear.
The tow cables are HL metal Stug III cables modified on a best effort basis to match the cable pattern seen on the Churchill. I'll see how they can be further improved. I repro the bracket i saw on picture, a single pin but not sure yet how it was held in place.
continuing on following post.
Last edited by lmcq11 on Thu Sep 02, 2021 11:47 pm, edited 2 times in total.