Getting main armament and headlight working

Discuss the good old Heng Long electronics here, whether its mods on them or anything else, it goes here!
SimonCornes
Lance Corporal
Posts: 189
Joined: Wed Jan 27, 2021 12:41 pm
Location: Stoke-on-Trent

Re: Getting main armament and headlight working

Post by SimonCornes »

john1970 wrote:If the BB gun has a microswitch attached you plug it into cn6 if it doesnt make a jumper and plug it into cn6 this will give you the gun fire sound instantly but the BB gun will still take time to wind up to get them working as they should you will need to replace the BB gun with 1 that has the microswitch fitted in the back of it
Hi John
Excuse my ignorance but by 'jumper' do you mean I should effectively join the two wires together?
Thanks

Simon
Last edited by SimonCornes on Thu Mar 11, 2021 9:42 pm, edited 1 time in total.
SimonCornes
Lance Corporal
Posts: 189
Joined: Wed Jan 27, 2021 12:41 pm
Location: Stoke-on-Trent

Re: Getting main armament and headlight working

Post by SimonCornes »

Tiger6 wrote:looks like the quickest and easiest way to get the main gun to fire would be to replace the BB unit with a newer one with the microswitch already fitted: https://www.forgebeartanks.com/store/p9 ... _Tank.html

Is this the same unit as fitted to a King Tiger?
Thanks

Simon
SimonCornes
Lance Corporal
Posts: 189
Joined: Wed Jan 27, 2021 12:41 pm
Location: Stoke-on-Trent

Re: Getting main armament and headlight working

Post by SimonCornes »

jarndice wrote:A few points here, LEDs have two wires coming out the back,
One is longer than the other, knowing which is which will tell you which is positive and which is negative,
The Heng Long Version 6.0 control board has a light selector switch so merely plugging in to the correct socket will not work if the switch has not been activated,
Indeed most secondary services on the Heng Long version 6.0 MFU are switch activated so just because everything is plugged in does not mean it will immediately come to life, it has to be switched on.
I'm wondering if it might be a grain of wheat bulb? There are just two very thin wires coming into the hull so you can't tell if its an LED or not as it also shines through a slit so you can't see an anode and cathode either. I'm not sure what voltage it should run on. I might connect it up to a DC power supply unit with a couple of leads and then gradually turn the voltage up. If its an ordinary bulb then it'll start to glow, if its an LED then nothing will happen until I reach the operating voltage - but I don't know what that might be!! And I would then have to reverse the polarity and try again in case I had the anode and cathode swapped! Might be just easier to buy a new headlight!!
Tiger6
Warrant Officer 2nd Class
Posts: 1308
Joined: Fri Mar 09, 2018 10:38 pm

Re: Getting main armament and headlight working

Post by Tiger6 »

Should be a 3mm LED, failing that it might be an SMD LED? - either way be careful as they pop easily
SimonCornes
Lance Corporal
Posts: 189
Joined: Wed Jan 27, 2021 12:41 pm
Location: Stoke-on-Trent

Re: Getting main armament and headlight working

Post by SimonCornes »

Tiger6 wrote:Should be a 3mm LED, failing that it might be an SMD LED? - either way be careful as they pop easily
Seems like they run on 3 volts anyway - 2 x AA's is convenient.
User avatar
Model Builder 4
2nd Lieutenant
Posts: 2329
Joined: Sun Jul 26, 2015 3:46 pm
Location: South Wales valleys
Contact:

Re: Getting main armament and headlight working

Post by Model Builder 4 »

Hi Simon,
Hi John
Excuse my ignorance but by 'jumper' do you mean I should effectively join the two wires together?
Thanks

Simon
What is referred to as a jumper is just a single wire/cable which is looped between the positive and negative outputs of the plug, hope this helps :thumbup:

Cheers,Lee.
Me ? Addicted ? Never !! :crazy:
Tiger6
Warrant Officer 2nd Class
Posts: 1308
Joined: Fri Mar 09, 2018 10:38 pm

Re: Getting main armament and headlight working

Post by Tiger6 »

SimonCornes wrote:
Tiger6 wrote:Should be a 3mm LED, failing that it might be an SMD LED? - either way be careful as they pop easily
Seems like they run on 3 volts anyway - 2 x AA's is convenient.
I used to think that too, until I popped one - the trick is only to touch the contacts momentarily, and not let the magic smoke out by keeping the LED lit for any length of time :S
SimonCornes
Lance Corporal
Posts: 189
Joined: Wed Jan 27, 2021 12:41 pm
Location: Stoke-on-Trent

Re: Getting main armament and headlight working

Post by SimonCornes »

I’m going to try a known working led in the circuit then I’ll know what I’m up against!
I made a ‘jumper’ this morning so I now have a very satisfying ‘kaboom’ !!
I don’t suppose I can do anything similar with a Taigen V3? I have a T34 with a recoil but no sound!!
User avatar
abramsky
Lance Corporal
Posts: 236
Joined: Thu Dec 03, 2020 12:55 am
Location: Poland

Re: Getting main armament and headlight working

Post by abramsky »

Tiger6 wrote:
SimonCornes wrote:
Tiger6 wrote:Should be a 3mm LED, failing that it might be an SMD LED? - either way be careful as they pop easily
Seems like they run on 3 volts anyway - 2 x AA's is convenient.
I used to think that too, until I popped one - the trick is only to touch the contacts momentarily, and not let the magic smoke out by keeping the LED lit for any length of time :S
Jeez Guys
Sorry for thatt, but I just have to write it off before you burn all the LEDs and your MFUs...
...Why don't you just use the cheapest $ 4-5 multimeter ???


Here is how to test the LED's ( and diodes also ):
phpBB [video]


Edit: And you don't have to check the length of the feet in the mounted LEDs. You just do the same with the wires coming out of the LED. The LED supply voltage is 2-4V (3V on average) - depends of LED colour ( see the table below ). And usually this voltage is supplied from the MFU. To be sure, you can connect JST with two free cables and measure the voltage on the LED sockets (but without connecting the LED lights yet). If the voltage is within these limits (2-4V) you connect plus to + and minus to -. That's all. If the supply voltage is too high - solder the resistor using Mr. Ohm's equations. That's all.

WARNING! DO NOT TOUCH / SHORT THE WIRES COMING OUT OF THE MFU. TAKE THE MEASUREMENT ONLY WITH THE MULIMETER CABLES SET AT V DC (by touching each LED wire - one wire from the voltmeter).
LED_FWD_Volts1.png
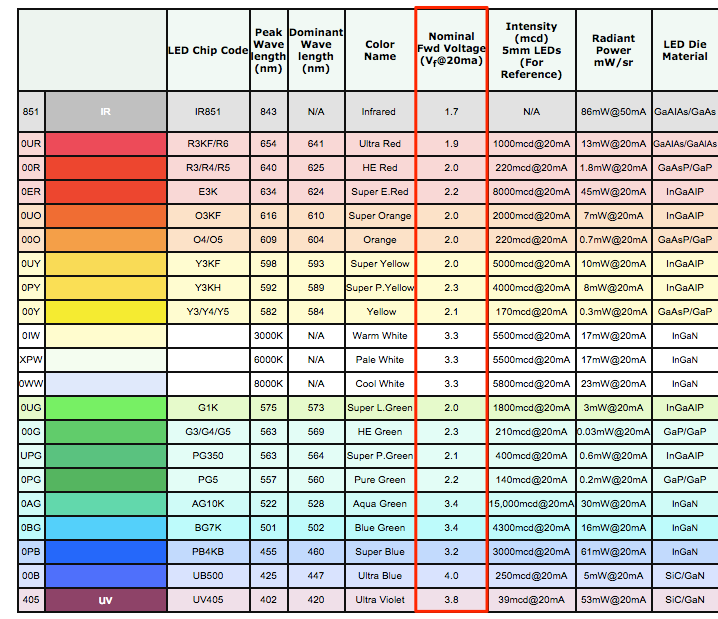
LED_FWD_Volts1.png (86.32 KiB) Viewed 1915 times
Jofaur86
Warrant Officer 1st Class
Posts: 1665
Joined: Tue Dec 25, 2018 11:28 pm
Location: Centre France

Re: Getting main armament and headlight working

Post by Jofaur86 »

:D
an LED (depending on the type and color) operates between 1.5 and 3 volts. It burns only after a voltage that is too high, never on a reverse polarity. Hence the presence of a resistance in series in order to limit the current if supply greater than 3 volts. the ideal for a test is to start with a 1.5 volts battery to make a test, and thus see the level of luminosity. And as indicated above, strongly advise the purchase of a multimeter, essential tool for our passion :thumbup: There are many sites on the internet explaining how to use.
Post Reply

Return to “Heng Long”