RC 1/16 Sd.Kfz. 165 Hummel Late Production - Build
-
FredtheFrench
- Corporal
- Posts: 468
- Joined: Sun Feb 09, 2014 6:13 pm
- Location: Rennes. France
Re: RC 1/16 Sd.Kfz. 165 Hummel Late Production - Build
Very good job. Details are awesome. A futur totm. 

Sorry for my spelling mistakes, I try to do better every day...
-
HERMAN BIX

- Brigadier
- Posts: 10332
- Joined: Sun Jan 12, 2014 12:15 am
- Location: Gold Coast,Australia
Re: RC 1/16 Sd.Kfz. 165 Hummel Late Production - Build
You have not missed a thing Mr Mcq11, it’s exquisite.
Do you think in real life that any early versions recovered from damage may have had the late drivers cabin modification carried out, or strictly a new manufacture upgrade?
Looks like they could have done it if necessary , but who knows.
Do you think in real life that any early versions recovered from damage may have had the late drivers cabin modification carried out, or strictly a new manufacture upgrade?
Looks like they could have done it if necessary , but who knows.
HL JAGDPANTHER,HL TIGER 1,HL PzIII MUNITIONSCHLEPPER, HL KT OCTOPUS,HL PANTHER ZU-FUSS,HL STuG III,HL T34/85 BEDSPRING,
HL PZIV MALTA,MATORRO JAGDTIGER,HL F05 TIGER,TAMIYA KT,HL PANTHERDOZER,HL EARLY PANTHER G,TAIGEN/RAMINATOR T34/76,
HL AN-BRI-RAM SU-85
HL PZIV MALTA,MATORRO JAGDTIGER,HL F05 TIGER,TAMIYA KT,HL PANTHERDOZER,HL EARLY PANTHER G,TAIGEN/RAMINATOR T34/76,
HL AN-BRI-RAM SU-85

Re: RC 1/16 Sd.Kfz. 165 Hummel Late Production - Build
Thank you everyone.
This post is for the back of the Hummel.
View of the rear of the vehicle with panels opened.
Notice the large hooks at the back.
The early production version had a muffler installed, later deleted.
As it is important to feature panels that can be opened and closed, i took the time to create working hinges from metal ones purchased from Dioramaparts on ebay Germany.
The Ludwig panels were used.
The locking mechanism seen in pictures was reproduced but not functional. Its would have been too fragile with the material and tools i have.
Some of the features on the back plate. I still need to do the part in the middle which i earlier thought was a bracket for the muffler but more study seems to suggest it is a step to climb on the vehicle. The curved bars to hold the spare wheels have a different patterns depending on the vehicle. i have decided to reproduced the version seen here.
The bars are reproduced in brass rods.
Overview of the mostly completed rear area. Only the pedal step and the engine exhaust need to be done.
The metal hooks and the tow bar were purchased from eBay Germany seller imperial-modellbau. Looks like these are perfect fit for the Nashorn/Hummel.
Continuing on following post
Technically, the roof of the driver/radio compartment is modular and plugged on top of the glacis, upgrades of older models would have been easy to perform.HERMAN BIX wrote:Do you think in real life that any early versions recovered from damage may have had the late drivers cabin modification carried out, or strictly a new manufacture upgrade?
Looks like they could have done it if necessary , but who knows.
This post is for the back of the Hummel.
View of the rear of the vehicle with panels opened.
- RC 1/16 Sd.Kfz. 165 Hummel Late Production - Build
- RC 1/16 Sd.Kfz. 165 Hummel Late Production - Build
- RC 1/16 Sd.Kfz. 165 Hummel Late Production - Build
- RC 1/16 Sd.Kfz. 165 Hummel Late Production - Build
- RC 1/16 Sd.Kfz. 165 Hummel Late Production - Build
- RC 1/16 Sd.Kfz. 165 Hummel Late Production - Build
- Capture3.JPG (96.39 KiB) Viewed 2145 times
- RC 1/16 Sd.Kfz. 165 Hummel Late Production - Build
- RC 1/16 Sd.Kfz. 165 Hummel Late Production - Build
- RC 1/16 Sd.Kfz. 165 Hummel Late Production - Build
- RC 1/16 Sd.Kfz. 165 Hummel Late Production - Build
Last edited by lmcq11 on Sat Jan 30, 2021 6:36 pm, edited 1 time in total.
Re: RC 1/16 Sd.Kfz. 165 Hummel Late Production - Build
The brass rods go strait inside the vehicle armor for a more solid spare wheel bracket. The wheel are removable.
The tow hook bracket from imperial-modellbau is a nice addition and for the $3.50 that it cost, it is a real bargain compared to the effort required to scratch build it
Overview of the rear as it stands today
Closed panels
Open.
Regards, Louis
- RC 1/16 Sd.Kfz. 165 Hummel Late Production - Build
- RC 1/16 Sd.Kfz. 165 Hummel Late Production - Build
Closed panels
- RC 1/16 Sd.Kfz. 165 Hummel Late Production - Build
- RC 1/16 Sd.Kfz. 165 Hummel Late Production - Build
-
EAO

- Warrant Officer 2nd Class
- Posts: 1162
- Joined: Sun May 10, 2020 5:29 pm
- Location: Central Missouri, U.S. of A.
Re: RC 1/16 Sd.Kfz. 165 Hummel Late Production - Build
Louis,
Your research on this build is most impressive! Stunning attention to detail, how beautiful!
Regards,
Eric.
Your research on this build is most impressive! Stunning attention to detail, how beautiful!
Regards,
Eric.
"You can always tell a German, you just can't tell him much." Anonymous.
German cars, German girls, German beer, German firearms, German Shepherds, German motorcycles... Not necessarily in that order though!
UP THE IRONS!
German cars, German girls, German beer, German firearms, German Shepherds, German motorcycles... Not necessarily in that order though!
UP THE IRONS!
Re: RC 1/16 Sd.Kfz. 165 Hummel Late Production - Build
Thank you Eric, as a builder, the research of available references, the search for parts and the scratch building of others for an accurate model is the biggest component of my passion for this hobby. Every build is an opportunity to learn about the vehicle.EAO wrote:Louis,
Your research on this build is most impressive! Stunning attention to detail, how beautiful!
Regards,
Eric.
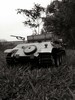
This post is for the rollers and tracks
The Hummel late production is equipped with all metal return rollers. The mount are also positioned very differently than a Panzer IV. Notice the light slope of the track from the top of the sprocket all the way to the top of the idler. Also notice the armored box in front of the side air intakes, something rarely seen in reference pictures.
- RC 1/16 Sd.Kfz. 165 Hummel Late Production - Build
- RC 1/16 Sd.Kfz. 165 Hummel Late Production - Build
- RC 1/16 Sd.Kfz. 165 Hummel Late Production - Build
- RC 1/16 Sd.Kfz. 165 Hummel Late Production - Build
- RC 1/16 Sd.Kfz. 165 Hummel Late Production - Build
- RC 1/16 Sd.Kfz. 165 Hummel Late Production - Build
- RC 1/16 Sd.Kfz. 165 Hummel Late Production - Build
- RC 1/16 Sd.Kfz. 165 Hummel Late Production - Build
- RC 1/16 Sd.Kfz. 165 Hummel Late Production - Build
- RC 1/16 Sd.Kfz. 165 Hummel Late Production - Build
Regards, Louis
Last edited by lmcq11 on Sun Jan 31, 2021 4:12 pm, edited 3 times in total.
-
SCHWEREPANZER
- Sergeant
- Posts: 535
- Joined: Thu Jan 08, 2015 1:40 am
Re: RC 1/16 Sd.Kfz. 165 Hummel Late Production - Build
Just jaw dropping in its modeling beauty. The superlatives to describe this obvious labor of love with its attention to the most minute detail haven't been put into Webster's dictionary yet. Marvelous work.
-
quitcherbitchen

- Private
- Posts: 75
- Joined: Mon Dec 07, 2020 3:14 am
- Location: La Canada, Califorinia
- Contact:
Re: RC 1/16 Sd.Kfz. 165 Hummel Late Production - Build
Do you glue the hubs on?
Heng Long Panzer III
How I learned to love the bomb
How I learned to love the bomb
Re: RC 1/16 Sd.Kfz. 165 Hummel Late Production - Build
No, the road wheel hubs are installed and hold by squeezing them in place with plyers, although some did require a bit more encouragements to go all the way in. They are removable if need be. Its the Asiatam suspension hub caps that gave me some trouble. I had to file a bit the metal lips that goes inside so that they could go in, and even then, i had to hammer them in place.quitcherbitchen wrote:Do you glue the hubs on?
Re: RC 1/16 Sd.Kfz. 165 Hummel Late Production - Build
thank you very much Schewepanzer for your touching encouragements. It makes me want to do a better job.SCHWEREPANZER wrote:Marvelous work.
Hi,
Here are the front fenders at the Saumur Hummel. The tip has a nice curve downwards and a mudflap. The treadplate seen here is the dotted pattern, difficult to find.
- RC 1/16 Sd.Kfz. 165 Hummel Late Production - Build
- RC 1/16 Sd.Kfz. 165 Hummel Late Production - Build
- RC 1/16 Sd.Kfz. 165 Hummel Late Production - Build
- RC 1/16 Sd.Kfz. 165 Hummel Late Production - Build
- RC 1/16 Sd.Kfz. 165 Hummel Late Production - Build
- RC 1/16 Sd.Kfz. 165 Hummel Late Production - Build
- RC 1/16 Sd.Kfz. 165 Hummel Late Production - Build
- RC 1/16 Sd.Kfz. 165 Hummel Late Production - Build
- RC 1/16 Sd.Kfz. 165 Hummel Late Production - Build
- RC 1/16 Sd.Kfz. 165 Hummel Late Production - Build
Last edited by lmcq11 on Wed Feb 03, 2021 4:01 am, edited 2 times in total.
