Custom Switch Bridge

All things 3D printing. Printers, design, CAD, hints and tips, models built.
User avatar
Jarlath
Corporal
Posts: 403
Joined: Mon Jun 27, 2016 2:45 pm
Location: Ontario, Canada
Contact:

Custom Switch Bridge

Post by Jarlath »

If you've seen my upgrading for my tanks you know that I like organized wiring and a semblance of neatness internally on my tanks.
However, sometimes I need a break from fixing up my own tanks and I get requests from some of my good friends/tankers who want some custom designed items for their tanks.

So when dgsselkirk asks me to rebuild the internal electronics for his wife's Sherman tank, I say yes!
Dean's Sherman's always have their front hatches open for access to switches, except they are mounted in the upper hull which makes for a PITA when removing the upper hull.
And Dean is a modeller and an artist. His tanks look fabulous and can be perfectly period accurate. He is not borderline obsessive on organizational routing like I am. Enter my fun zone.

Designing and building... Huzzah!

Image
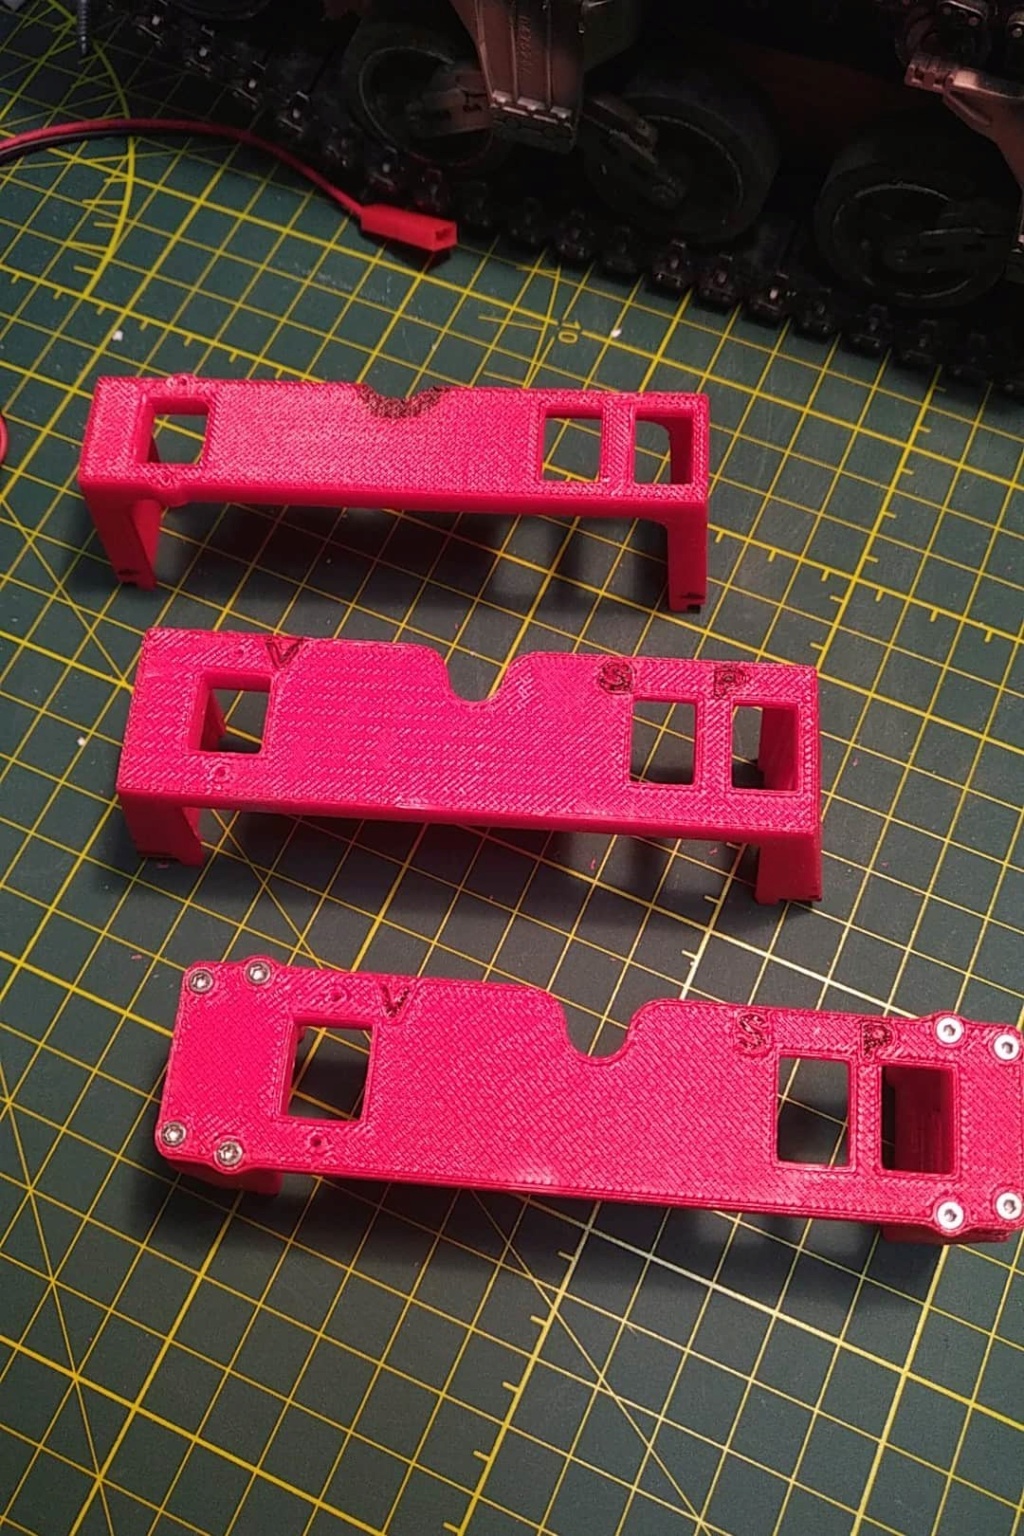
Three design iterations for a Switch Bridge for his Mato Sherman... Top is initial concept, bottom is final design. Note the addition of screws for an assembly.
And to many they may ask why make it complicated by making it an assembly? Answer to follow.

Image
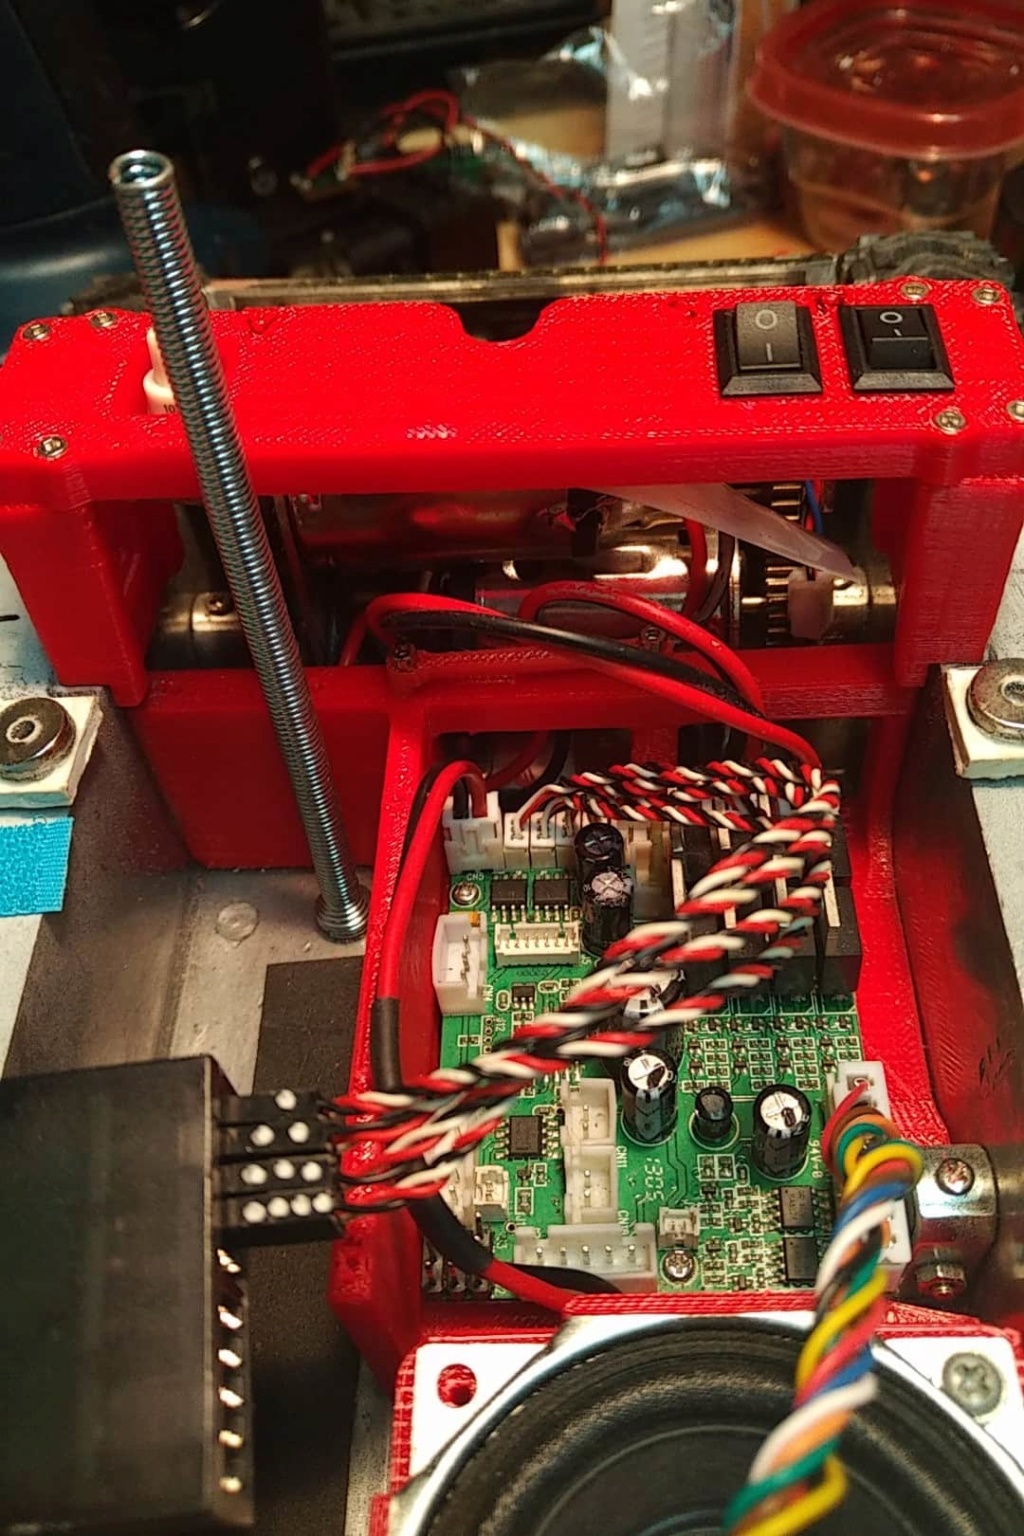
Trial fit. Showing the epoxied in-place Mato specific Clark TK-2x/40 tray 3D printed (Provisions for mounting dual 25mm fans, but since this is using a TK-20, no real need).
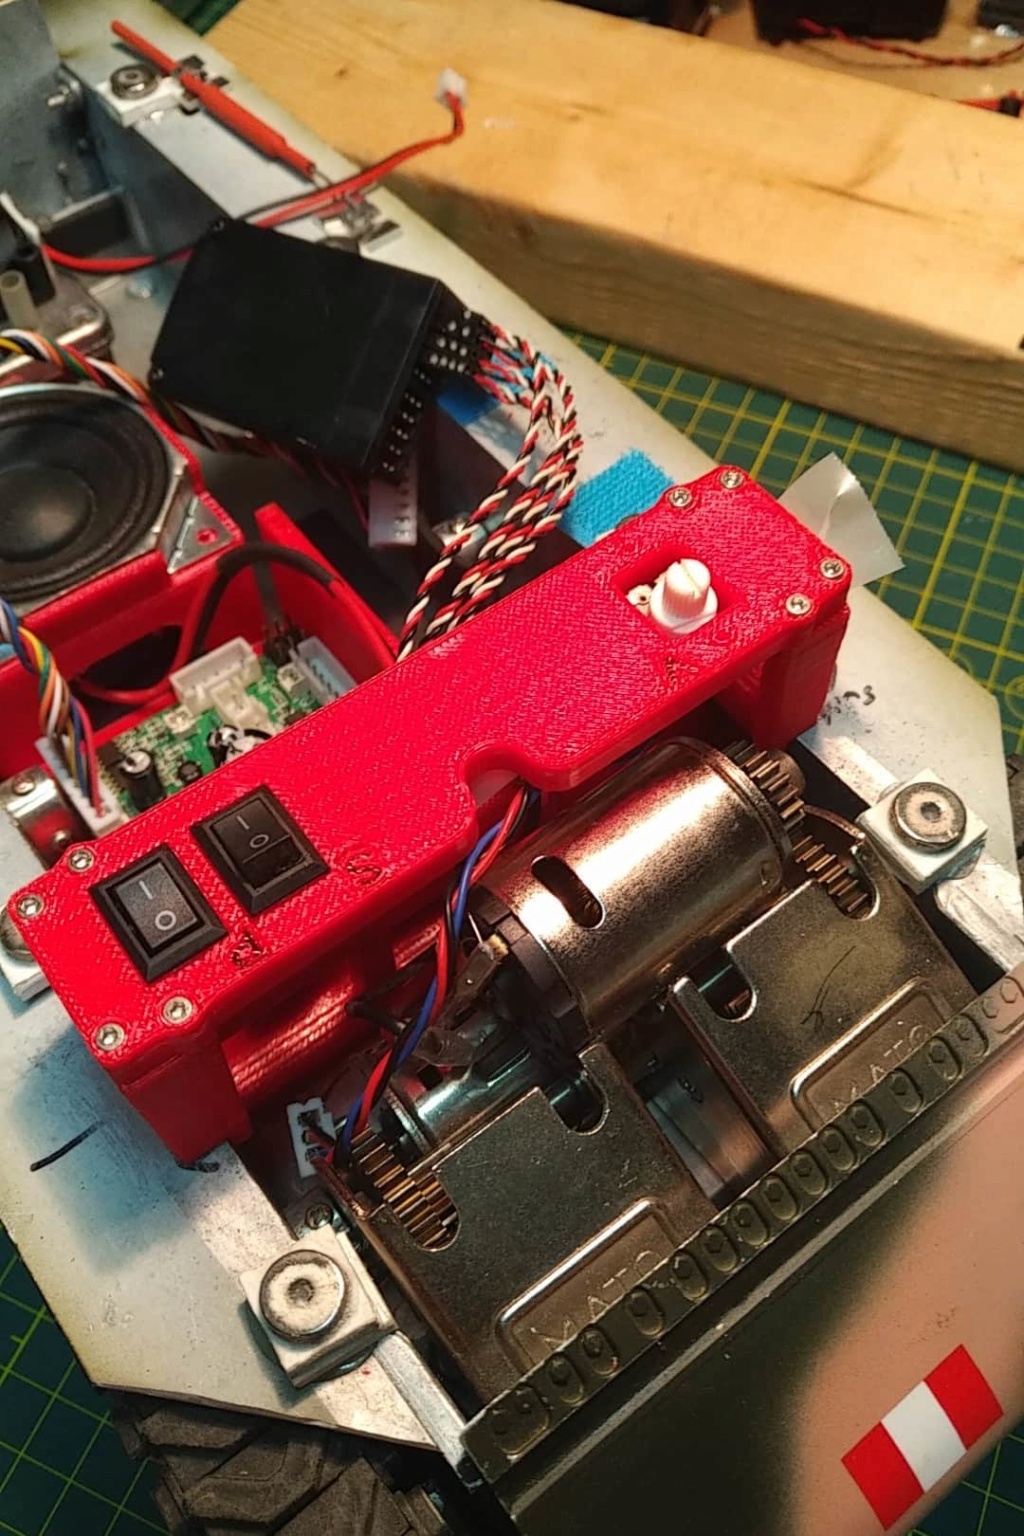
Cheapo tube bender for showing the height of the switch bridge above the sponson floor (top of lower hull).
Also a 3D printed Speaker box just behind that. Volume control, Smoker toggle, and main power toggle switches on the bridge.

Image
From this angle it is a bit easier to see why the final iteration of the switch bridge is an assembly. When the vertical parts are epoxied in place, the top can be removed if you need to service switches, or replace the drive motors. Glad I thought of that before epoxying the 2nd iteration into place.

Image
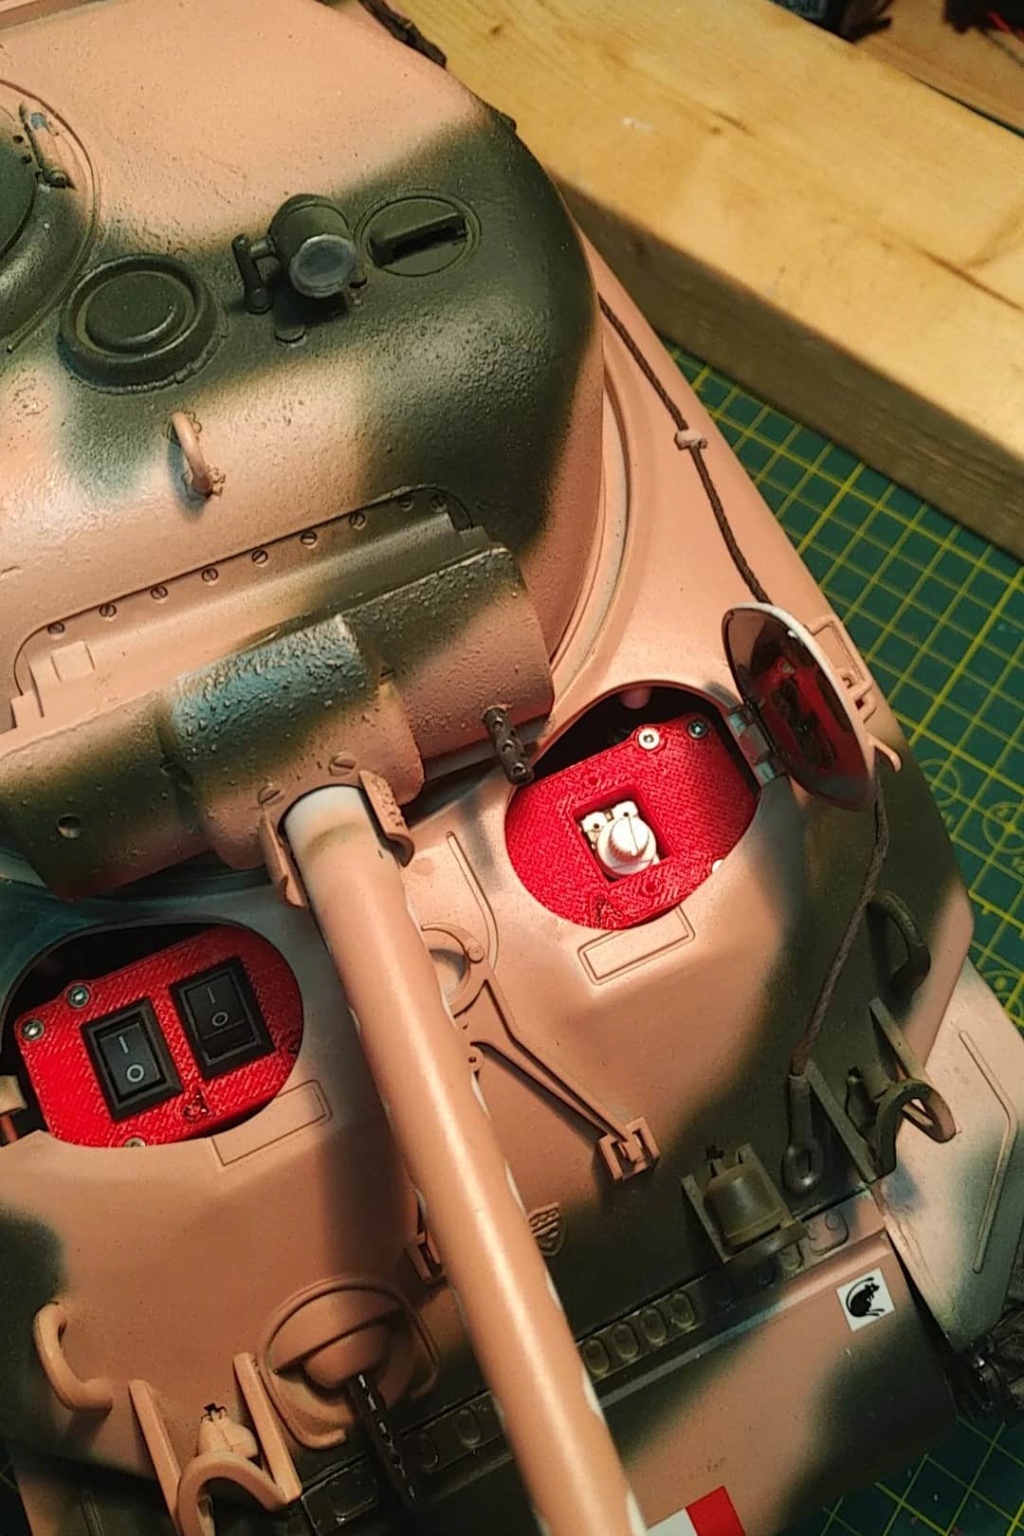
When the upper hull is in place, the switches and volume potentiometer are just at your fingertips.
Once the complete lower is done I'll post more images of it.
User avatar
jarndice
Colonel
Posts: 8025
Joined: Mon Sep 03, 2012 11:27 am
Location: the mountains of hertfordshire

Re: Custom Switch Bridge

Post by jarndice »

What brilliant work :thumbup:
Until I saw this I did not know anyone made these on a semi-industrial basis.
I am involved in Panzer4 builds and have always made my own cross body switch bridges each being a one off but I would gladly spend money on someone else's more professional efforts.
Certainly there is a future for a standard design of a switch bridge suitably modified for different Tanks just as there is for a standard design for the equipping of a Tank with a magnetic security system.
These two modifications certainly place us hobbyists ahead of the game and could be more useful if they were standardised.
I think I am about to upset someone :haha:
User avatar
43rdRecceReg
Major
Posts: 6294
Joined: Fri Jul 31, 2015 11:38 am
Location: North West Highlands, Scotland

Re: Custom Switch Bridge

Post by 43rdRecceReg »

jarndice wrote:What brilliant work :thumbup:
Until I saw this I did not know anyone made these on a semi-industrial basis.
I am involved in Panzer4 builds and have always made my own cross body switch bridges each being a one off but I would gladly spend money on someone else's more professional efforts.
Certainly there is a future for a standard design of a switch bridge suitably modified for different Tanks just as there is for a standard design for the equipping of a Tank with a magnetic security system.
These two modifications certainly place us hobbyists ahead of the game and could be more useful if they were standardised.
It's almost worth having switches, Shaun, to be able to show off the tomato red (-ish) internal mounts. HL has done away with the smoker switch, and the pan-pot vol control. :) in recent years, and such fixings are not needed on HL models. Custom holders for MFU, Speakers, and other internal accessories definitely require this expertise.
Brilliant restructuring, though! :clap:
"Get your facts first, and then you can distort them as much as you please"- Mark Twain.
User avatar
Jarlath
Corporal
Posts: 403
Joined: Mon Jun 27, 2016 2:45 pm
Location: Ontario, Canada
Contact:

Re: Custom Switch Bridge

Post by Jarlath »

jarndice wrote:What brilliant work :thumbup:
Thanks, but people like BarryC do brilliant work. Mine is trial and error, and a bit of insanity.

I've though about asking for a list of 1/16 factory tanks which have existing opening hatches in the lower hull to accommodate such switches.
(aka, not those that saw and cut their own hatches.)
User avatar
Jarlath
Corporal
Posts: 403
Joined: Mon Jun 27, 2016 2:45 pm
Location: Ontario, Canada
Contact:

Re: Custom Switch Bridge

Post by Jarlath »

43rdRecceReg wrote: It's almost worth having switches, Shaun, to be able to show off the tomato red (-ish) internal mounts. HL has done away with the smoker switch, and the pan-pot vol control. :) in recent years, and such fixings are not needed on HL models. Custom holders for MFU, Speakers, and other internal accessories definitely require this expertise.
Brilliant restructuring, though! :clap:
Thanks.

The problem is that MANY of us who have been in this for any length of time have several, if not dozens of older tanks that do not have the newest electronics by HL/Taigen, etc...
Heck. I have currently have 20ish tanks myself (I have sold a dozen or so) and I bet only 5 of started with their original 2.4ghz MFU's, all pre HL 6.0. At least 2 had RX13's (a Stug III & a PK-IV).

As for the red monuts, I have kilos and kilos of red ABS :)
User avatar
jarndice
Colonel
Posts: 8025
Joined: Mon Sep 03, 2012 11:27 am
Location: the mountains of hertfordshire

Re: Custom Switch Bridge

Post by jarndice »

I've though about asking for a list of 1/16 factory tanks which have existing opening hatches in the lower hull to accommodate such switches.
(aka, not those that saw and cut their own hatches.)[/quote]

I cannot help wonder why you exclude non factory hatch removal
Just about every Tank body that I buy needs the hatches cutting out, (Along with Fenders and Engine bay doors in a PZ4)
It is not difficult and it saves me money and with the matching of a Heng Long Tiger 1 body to a Taigen metal hull the radio operators hatch has to be cut out to gain access to the power switch on the hull uppers preformed mount.
I think I am about to upset someone :haha:
User avatar
Jarlath
Corporal
Posts: 403
Joined: Mon Jun 27, 2016 2:45 pm
Location: Ontario, Canada
Contact:

Re: Custom Switch Bridge

Post by Jarlath »

jarndice wrote:I cannot help wonder why you exclude non factory hatch removal
Just about every Tank body that I buy needs the hatches cutting out, (Along with Fenders and Engine bay doors in a PZ4)
It is not difficult and it saves me money and with the matching of a Heng Long Tiger 1 body to a Taigen metal hull the radio operators hatch has to be cut out to gain access to the power switch on the hull uppers preformed mount.
Currently it is purely from a simplicity POV. Not everyone can have the patience and hand-eye co-ordination to remove "molded hatches" neatly. I've seen some pretty spectacular butcher jobs in my time (heck, I've done it a couple times as well myself).

The main issue is the sheer number game of hulls, both lowers and uppers. lower hull widths, upper hull clearance heights, mounting surfaces, placement of motors/hull supports/rotating units, etc...
Will I do them all? Gonna give it a try but there are ALOT of hulls and f
User avatar
43rdRecceReg
Major
Posts: 6294
Joined: Fri Jul 31, 2015 11:38 am
Location: North West Highlands, Scotland

Re: Custom Switch Bridge

Post by 43rdRecceReg »

There's always a way to make better use of the available internal real estate in 1/16 models, I think. Most RTR models don't exhibit the optimum use of space, either for access to components, or simple aesthetics...although the Torro JS- 2 (below) came close, I think, with its unique lever-action opening mechanism, and well-positioned electronic units.

Image
In other words, there's always a market for neat, and practical, placement solutions. Chris Ludwig is a good example. Not only does he produce first-rate kits, but also shell liners, or 'inlays'- mostly of styrene- to rationalise internal spaces.
https://www.ludwigs-hobby-seite.de/Schw ... ungen.html
3-D printing can offer even more exotic solutions. Anyway, keep up the groundbreaking work :thumbup:
Last edited by 43rdRecceReg on Wed Jul 22, 2020 9:05 pm, edited 1 time in total.
"Get your facts first, and then you can distort them as much as you please"- Mark Twain.
User avatar
jarndice
Colonel
Posts: 8025
Joined: Mon Sep 03, 2012 11:27 am
Location: the mountains of hertfordshire

Re: Custom Switch Bridge

Post by jarndice »

I always strip out any Tank I buy and lay a sheet of Velcro on the hull floor and sides then i line the base of the smoker, receiver, mfu, and the battery with Velcro,
The battery goes onto the side of the hull out of the way everything else going where it is best suited and it will stay there until I decide to move it,
Any bundles of cables get small cable ties wrapped around them,
Single wires running loose in the body get dabs of PVA glue to restrain them against the Body along their control run, The twin wires from the Turret rotation motor to the daughter board get that treatment in particular.
If I buy an mfu and it does not have its own container then it is the matter of a moment to make one with a bit of 2mm plasti-card offcut,
With everything locked down it reduces the chance of damage through any rough handling and using Velcro makes moving/removing anything in the hull much easier.
I think I am about to upset someone :haha:
User avatar
MITCH
Lance Corporal
Posts: 135
Joined: Thu May 30, 2019 10:24 am

Re: Custom Switch Bridge

Post by MITCH »

43rdRecceReg wrote:There's always a way to make better use of the available internal real estate in 1/16 models, I think. Most RTR models don't exhibit the optimum use of space, either for access to components, or simple aesthetics...although the Torro KV- 2 (below) came close, I think, with its unique lever-action opening mechanism, and well-positioned electronic units.

Image
In other words, there's always a market for neat, and practical, placement solutions. Chris Ludwig is a good example. Not only does he produce first-rate kits, but also shell liners, or 'inlays'- mostly of styrene- to rationalise internal spaces.
https://www.ludwigs-hobby-seite.de/Schw ... ungen.html
3-D printing can offer even more exotic solutions. Anyway, keep up the groundbreaking work :thumbup:

KV2??? ;)
Post Reply

Return to “3D Printing”