Page 1 of 2

PLEASE HELP -installing Clark CH-2 elevation & recoil Kit

Posted: Tue Feb 18, 2020 6:52 pm
by Sabre27
Hi Tankers,

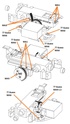
I need some help please with installing this servo elevation and recoil kit for a Challenger 2.

http://clark-model.com/eng/kit_116_HL_CH2/index.htm

This is my first RC tank so I have no experience with this type of install or 3d printed plastic parts.

This comes with no instructions whatsoever which is very damn poor given what's in this kit. The kit is not cheap price wise but the 3 d printed plastic used certainly is, being very soft and no doubt the screws will strip out the holes easily if overtightened or reinserted several times during the build process or the wrong screw is used in the wrong hole.

The above page lists all the screws but does ANYONE have any idea or clue as to which screw type/size is supposed to go into which holes to put this thing together correctly??
The holes all look very similar in size, the difference between a1.6 and 2mm hole not being easy to determine.

I will no doubt have a few other Q with issues when I start but not going to get far If I can’t get help with this issue first.
Any help and tips greatly appreciated, Thank you. :thumbup:

Re: PLEASE HELP -installing Clark CH-2 elevation & recoil Ki

Posted: Tue Feb 18, 2020 7:23 pm
by maxmekker
I made a video when doing the Leo 2 kit. they are somewhat same in parts and how they go together

phpBB [video]


take your time and sand sand and sand some more untill all slides smooth

Re: PLEASE HELP -installing Clark CH-2 elevation & recoil Ki

Posted: Tue Feb 18, 2020 7:44 pm
by Jofaur86
Hello :D
http://www.clark-model.com/eng/index_e.html
If I can help,on the " Ckark " site left column 1/16 conversion/ upgrade kit,many explanations and photos :thumbup:

Re: PLEASE HELP -installing Clark CH-2 elevation & recoil Ki

Posted: Tue Feb 18, 2020 8:04 pm
by maxmekker

Re: PLEASE HELP -installing Clark CH-2 elevation & recoil Ki

Posted: Tue Feb 18, 2020 9:59 pm
by Jarlath
Sigh.. The OP knows about those links... He is stating that the instructions are very lacklustre...

OK...

MA1 - 2mm *6 PB Tapping screw (qty 7)

MA3 - 2*6mm KB Tapping screw (qty 2)

MA4 - 2*8*5mm PWB Tapping screw (qty 2)

MA5 - 2mm *4 PB Tapping screw (qty 4)

MA6 - 3mm *8 PB Tapping screw (qty 6)

MA9 - 2*6*5mm PWB Tapping screw (qty 2)

This is my best guess from looking at other recoil units by Clark....

Image

Re: PLEASE HELP -installing Clark CH-2 elevation & recoil Ki

Posted: Wed Feb 19, 2020 6:45 am
by Sabre27
Thanks guys,

Maxmekker I will look at video again when I get to this part of rebuild.

The clark site I had already looked over. No help there.

Jarlath, THANK YOU for your diagram!!
That should be very helpful. :clap: :clap:

That is what Clark should be putting in the damn kits along with some written instructions!!
Those kits are not cheap and they have NO INSTRUCTIONS WHATSOEVER, that is the problem.

If anyone else can assist in any anyway or add to Jarlath's diagram with more info that would be greatly appreciated. Thank you :thumbup: :clap:

Re: PLEASE HELP -installing Clark CH-2 elevation & recoil Ki

Posted: Wed Feb 26, 2020 7:28 pm
by maxmekker
how's your progress ?

Re: PLEASE HELP -installing Clark CH-2 elevation & recoil Ki

Posted: Wed Feb 26, 2020 7:36 pm
by Black Knight
As maxmekker already said - take PLENTY of time to thoroughly smooth out all the parts that interface to ensure a good, smooth operation. I fitted mine but then got a fret on about the durability of the printed parts and bought a metal setup from DKLM instead.

Re: PLEASE HELP -installing Clark CH-2 elevation & recoil Ki

Posted: Wed Feb 26, 2020 9:11 pm
by maxmekker
I've done the leo2 kit ,kv1,kv2, and several 'universal' recoil kits , and they do need a bit of prepping, specially on the 'slider' part. once thats well taken care of they work wery well

phpBB [video]


phpBB [video]


phpBB [video]

Re: PLEASE HELP -installing Clark CH-2 elevation & recoil Ki

Posted: Wed Feb 26, 2020 11:14 pm
by Jimster
I will say this: the Clark website photos are more than enough to enable the average modeler to install the kit. Once you get started it will all fall into place. As far as the screws go it is hard to to mess it up. Give it a go. The material used in the Clark kits is good and strong. You will not strip out any holes unless you use a pneumatic impact wrench to install them.
Simply get your tank out and set the parts aside. Open the Clark website and follow their photo tutorial for the install. You will be successful and happy with the results. If I can do it, anybody can do it.