Page 1 of 4
CF Tiger 1.
Posted: Sun Jan 07, 2018 6:11 pm
by Debs17
in order to fabricate a tank, using CF, figured on laying up sheets on laminated surface, then cutting into sections, jigging with laminated flooring, and then re inforcing with extra layers, so, looking at five maybe six layers when complete.
The hatch, used some CF sock, making a pattern first.
As this is one off, made mold for turret.
Re: CF Tiger 1.
Posted: Mon Jan 08, 2018 10:13 am
by Debs17
The three layers of sock was secured using thread while curing, then used grinder, added a ring at top, added more resin, trying to ease the "release angle".
Also placed a CF polo round a plastic cylinder, added single threads to help form a seal, for top hatch.
Found a old tax cover, which used as pattern for top hatch, which for some reason just had to shape......
Oh ....and this is a 1/8th scale crate.
Re: CF Tiger 1.
Posted: Mon Jan 08, 2018 1:36 pm
by Debs17
Turret- added new section.
Made easy mold for rear box panel, using wood, eazi sand auto filler, bit of spray, waxed, layed up CF tape, for outer surface.
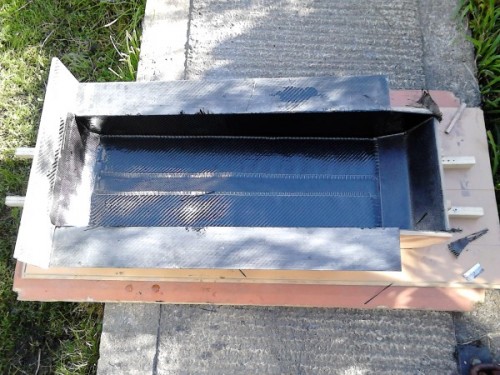
Floor panel jig- used join for centre line, cut two reliefs at front, to drop side sections. should be non stick, but waxed with couple of coats.Fixed sections to kitchen surface/laminated chipboard.
CF tape, also used for turret curve.
Re: CF Tiger 1.
Posted: Mon Jan 08, 2018 2:11 pm
by Debs17

- Jig, lower hull, guards.
Lower hull- Blocked together, two pieces of flooring at right angles, thern laid up CF to form track guards. Tried to save some CF by using one complete section of cloth to start, then single strips of cloth, biased to one side (Join to hull) then finished with one complete layer. Had already joined lower panels, with cloth, sanded, then added guards, adding more cloth. Left trench in middle, to remove excess resin, joined at rear, and added another layer there.
Turret- Added cloth to strengthen side joints. Covered rear in masking tape, cellotape, then laid up some cloth for rear box.
Rear box- Added lower section, sides, but had some distortion, so sanded placed in jig, added.
Re: CF Tiger 1.
Posted: Mon Jan 08, 2018 3:34 pm
by 43rdRecceReg
Fascinating

If there are other examples of scratch building using CF and vinyl flooring sheets on the Forum, I've not seen them....yet, anyway. Contributors
have used CF for reinforcement and moulding ersatz parts. I believe even Tamiya now make certain parts in CF (alternate springs for Pz IV for example?); but making a Tiger 1 this way has to be fairly unique!. What are you using for plans, dimensions and shapes- a set of blueprints ? Following along with curiosity.

Re: CF Tiger 1.
Posted: Tue Jan 09, 2018 9:56 am
by Debs17
Hi...how about Kevlar? Is it accurate that a builder uses fibreglass? In the range of options , theres a kev/cf mix which considered using for inner finishing. I believe auto pagani had a special cloth ordered, with titanium threads. Do make plugs, and molds, but have to improvise alittle .....was given a 1/16 Tiger (Heng Long) along with some prints of sections, I believe from net, neighbour has two 1/16's, which Im determined to do battle with

After pulling hull from jig, cut front panel to start forming lid. Cut "n" for bumper area, used filler and screws to create angled mold,waxed, used to lay up cloth, eight layers , inner, four upper.
Used ginder to remove four layers from inner join, expoxied, and added cloth to secure.
Set angled panel to front area, left this panel deep, to help set before adding epoxy, and single strands, to outer join.
Added strip CF, to hold assembly under bumper.
Added masking tape to lower guard surface, to creating excess, in/on upper side panels to guards.
Taped upper side panels, to front section, fixed.
Re: CF Tiger 1.
Posted: Tue Jan 09, 2018 10:26 am
by Debs17
After upper side panels were secured, created beam section for rear,used parcel tape to release, laying up cloth, adding off cut, added more cloth,so around eight layers in all.
The front panel had drops either side, had cut to incorparate, used grinder to cut two reliefs, droped, epoxied.
Then added inner strips (used cellotape on upper guards for release) to help seal to guards. Added front strip, to help sit lid.
Cut lid with excess, used this area to join to side panels , with single strands.
Re: CF Tiger 1.
Posted: Tue Jan 09, 2018 11:38 am
by Debs17
Pulled top assembly, sanded, added a layer of cloth to inner surfaces. While curing took time to press into corners with plastic card alittle please note tenon like join at front (Below second photo "154" ) Set to hull.
Used the wood/filler/sprayed mold to create curve edge for lwer front turret. Seven layers wax, four layers of cloth.
Running out of epoxy, used most of container shown, used two containers of fast cure, with some slow in pot.
Also pictured, rollers, essential for laying up flat sheets plus.
Re: CF Tiger 1.
Posted: Tue Jan 09, 2018 1:05 pm
by Ad Lav
Very impressive!
Re: CF Tiger 1.
Posted: Tue Jan 09, 2018 4:56 pm
by 43rdRecceReg

Kevlar?? Are you expecting someone to be firing real bullets at the Tiger?

One thing is clear, you've certainly obtained a degree of mastery with the medium. Following the S.W.A.T.iger 1
with increased curiosity.....