Tamiya Königstiger- a blitz build

This section is for you to give a commentary / build log of your Tamiya tank. Remember - lots of pictures please!
Forum rules
This section is for posting a build log of your Tamiya tank.
Questions relating to issues you are having with your tank(s) should be posted in the General Questions forum here: viewforum.php?f=14
User avatar
Rad_Schuhart
Warrant Officer 1st Class
Posts: 1989
Joined: Tue Jan 19, 2016 9:22 am
Location: Spanish living in Graz, Austria. Heart in UK.
Contact:

Re: Tamiya Königstiger- a blitz build

Post by Rad_Schuhart »

PainlessWolf wrote:Good morning,
I believe that the reason the plastic is so 'flexible' is that Tamiya may have been shooting for scale armor thickness of the components on this kit. T
Painless
Im afraid you are wrong. The reason to have the plastic so flexible, is because is very thin, and it is like that for reducing costs. Sad but true... In the KT all the hull thickness is exactly the same (ultra thin)

If you want to have some scale armor thicknes, you could buy one of the armotek beast, or one of the 1:35 takom kits

Image

But not a tamiya kit. At least not the Sherman or the King Tiger, which are the ones I have.
My RC tanks website, loads of free info for everybody:
https://radindustries.wordpress.com/
User avatar
43rdRecceReg
Major
Posts: 6294
Joined: Fri Jul 31, 2015 11:38 am
Location: North West Highlands, Scotland

Re: Tamiya Königstiger- a blitz build

Post by 43rdRecceReg »

Rad_Schuhart wrote:I think you put the flash unit wrong. Once insfalled propperly, it wont move anywere. If I remember correctly the wire goes trough a side, and not through the back.
I'm afraid your memory has let you down a wee bit here Rad. :problem: The flash can only be inserted into the breech (a bit like a suppository :haha: ). There's no provision for side entry. Look at this illustration:
Inserting flash unit into barrel..
What may have confused you is that in my pic the whole barrel assembly is upside down. I had it orientated that way to make it easier to fit that fiddly wee white plastic elevation lever- you know, the one you said was apt to break. :)
I've since managed to test it and it works without hindrance, and that's what really counts. :thumbup:
Last edited by 43rdRecceReg on Mon Aug 14, 2017 5:51 pm, edited 1 time in total.
"Get your facts first, and then you can distort them as much as you please"- Mark Twain.
User avatar
43rdRecceReg
Major
Posts: 6294
Joined: Fri Jul 31, 2015 11:38 am
Location: North West Highlands, Scotland

Re: Tamiya Königstiger- a blitz build

Post by 43rdRecceReg »

PainlessWolf wrote:Good morning,
Everything is coming together very nicely, my friend. I believe that the reason the plastic is so 'flexible' is that Tamiya may have been shooting for scale armor thickness of the components on this kit. They corrected that with the Tiger 1 kit ( and even with that tank you can see that the plastic parts are thinner and more finely molded than HL or Taigen offerings ). Please don't forget to use a metal elevation arm since you opted for the excellent aluminum barrel for the main gun. Also, here is a link to an inexpensive and simple detail upgrade that will add miles to the appearance of your build: https://www.shapeways.com/product/Q5DFV ... d=62805317 Following along,
regards,
Painless
Yes, many thanks for the advice, Painless. I just want to get it up and running for the moment, and thus complete my brief to myself of building it quickly, whilst following Tamiya's assembly plan to the letter. That way, I'll form my own opinion about the kit, even though I respect (and bow to) those who have gone down the Tamiya road before me. As soon as it's complete, I'll begin 'improving it' :D It's great to learn from the mistakes of others, and a major benefit of Forums like RCTW. Sometimes, though, you simply have to make your own mistakes for the lessons to be learned properly :thumbup:

re: scale armour thickness, this is what Chris Ludwig tried to achieve in partnership with Birger when producing this improvement kit for the Tiger 1:
http://www.ludwigs-hobby-seite.de/Tiger%20H.html..and the objective:
.(The Typos are from Chris's website) " ..This Tiger conversion kit or up-grade kit was written by Birger Streppel.
The conversion kit is made for a standard Heng Long Tiger that exists in hundreds on shelves and cellars of Tankmodelers. Since industry has been played foul with this creatures, we have decided to give these vehicles a second chance. So we have planned this conversion kit. The reasons for this kit are to eliminate most of the known HL-errors and to simulate the original hull with true scale armor thicknesses.
The kit consists of about 180 pieces. The thickness of these pieces varies from 1mm to 10mm and by assembling them a very solid hull accures wich can be compared with a standard metal hull.

If you have any Question plese feel free to contact me....." It would be interesting to see what they could come up with for the Tiger 2 :)
Last edited by 43rdRecceReg on Mon Aug 14, 2017 5:50 pm, edited 1 time in total.
"Get your facts first, and then you can distort them as much as you please"- Mark Twain.
User avatar
Rad_Schuhart
Warrant Officer 1st Class
Posts: 1989
Joined: Tue Jan 19, 2016 9:22 am
Location: Spanish living in Graz, Austria. Heart in UK.
Contact:

Re: Tamiya Königstiger- a blitz build

Post by Rad_Schuhart »

43rdRecceReg wrote:
Rad_Schuhart wrote:I think you put the flash unit wrong. Once insfalled propperly, it wont move anywere. If I remember correctly the wire goes trough a side, and not through the back.
I'm afraid your memory has let you down a wee bit here Rad. :problem: The flash can only be inserted into the breech (a bit like a suppository :haha: ). There's no provision for side entry. Look at this illustration:
The attachment Tamiya KT flash fitting 1.jpeg is no longer available
What may have confused you is that in my pic the whole barrel assembly is upside down. I had it orientated that way to make it easier to fit that fiddly wee white plastic elevation lever- you know, the one you said was apt to break. :)
I've since managed to test it and it works without hindrance.
Nope, I think I am right.

I mean the flash wire, at the end of the barrel, it does not go through the bottom end. It goes through a hole in the side, between the two halves on the plastic. Doing that way the flash unit stays always on place.

And the part that breaks is this one:

Image
Attachments
Tamiya Blitz-recoil unit pic 19.jpeg
My RC tanks website, loads of free info for everybody:
https://radindustries.wordpress.com/
User avatar
silversurfer1947
Lieutenant
Posts: 3338
Joined: Tue Oct 27, 2015 9:54 pm
Location: Bristol, UK

Re: Tamiya Königstiger- a blitz build

Post by silversurfer1947 »

I think Rad is right. If you look at the instructions, the cable goes up through the top of K3/K4.
Richard
Tamiya Tiger 1, Taigen FlakPanzer IV,Torro M16 half-track, Tamiya Panther,WSN/Torro T34,Taigen M41 Bulldog,H/l/Taigen Sherman M4A3,H/L T90, Haya M3 Grant, Metal Origins 234/2 Puma, Nashorn by Alwyn. I was only going to have one tank - honest! :D
User avatar
43rdRecceReg
Major
Posts: 6294
Joined: Fri Jul 31, 2015 11:38 am
Location: North West Highlands, Scotland

Re: Tamiya Königstiger- a blitz build

Post by 43rdRecceReg »

I'm beginning to feel a Fawlty Towers moment coming on...thoughts of Basil and Manuel. Right, well, as I say Rad, the recoil works flawlessly, and the flash unit is firmly fixed in place with double sided tape. I don't suppose a positional difference of 15mm or so is likely to be critical. When I've finished the entire project, and encouraged dear old Tom to find a flavoursome hat :haha: :haha: ..I'll go back over everything and double check that everything is as it was intended.
As for the arm that's likely to break, it'll have to break before I replace it. After all, would you replace tracks just because they're likely to wear out some day? :problem: Just a thought. Maybe Tamiya have secretly toughened the wayward
link as result of complaints. Que sera, sera :haha:
Barrel assembly bonded into turret..
and now the Elevation unit. Like most parts, fitting it requires a little manual dexterity (here the white plastic elevation adjuster is a tad tricky for older hands), but in the main it's fairly easy. As I said earlier, these Tamiya tanks really do fit together
with the sort of precision and exacting standards demanded by rivet counters, and OCD types.. :lolno:
Elevation motor fitted with guest appearance of the Sun
"Get your facts first, and then you can distort them as much as you please"- Mark Twain.
User avatar
PainlessWolf
Lieutenant-Colonel
Posts: 7407
Joined: Sun Feb 26, 2012 9:09 pm
Location: Southern Colorado Rocky Mountains

Re: Tamiya Königstiger- a blitz build

Post by PainlessWolf »

43rdR@R,
You're making good progress and I will quit tempting you with extra detail bits. *chuckles* Rad, I may be wrong but then again, it may be you. At any rate, on this issue, we will have to agree to disagree. Let us give 43rd some piece and quiet to enjoy his build.
Regards,
Painless
Last edited by PainlessWolf on Tue Aug 15, 2017 2:50 pm, edited 1 time in total.
...Here for the Dawn...
User avatar
43rdRecceReg
Major
Posts: 6294
Joined: Fri Jul 31, 2015 11:38 am
Location: North West Highlands, Scotland

Re: Tamiya Königstiger- a blitz build

Post by 43rdRecceReg »

PainlessWolf wrote:43rdR@R,
You're making good progress and I will quit tempting you with extra detail bits. *chuckles* Rad, I may be wrong but then again, it may be you. At any rate, on this issue, we will have agree to disagree. Let us give 43rd some piece and quiet to enjoy his build.
Regards,
Painless
:D :thumbup:
You can tempt me later, Painless! I'm already aware of niggling deficiencies in the model. The thing is, at school (and University too) I never had to look over anyone's shoulder in order to complete my exams or 'homework', although I smile at the memory of the 'circle of wagons' some kids built with their arms around their precious exam sheets. :lolno: :haha: and the nervous looks over the shoulder :D
I really wanted to see what a first time Tamiya 'virgin' would make of the Full-Option King Tiger kit, as this is the only means of producing a fair and subjective review of the product. Ok, I'm not the 'newbie' I was now, and have looked over many shoulders since joining the Forum (as we all do..); and this build is as basic as building with Lego, where the Cromwell is more like assembling a clock. Nonetheless, it still requires a lot of patience, and attention to detail. We'll come to the latter later!
"Get your facts first, and then you can distort them as much as you please"- Mark Twain.
User avatar
43rdRecceReg
Major
Posts: 6294
Joined: Fri Jul 31, 2015 11:38 am
Location: North West Highlands, Scotland

Re: Tamiya Königstiger- a blitz build

Post by 43rdRecceReg »

I mentioned 'attention to detail'. Well, as good as Tamiya's illustrations are, my eyes are not the 20/20 ratio they used to be, and it's been quite some years ( :{ ) since I last gawped and guessed at a 'Snellen' (Optometrist's) eye chart.
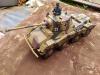
Fitting counterweight to Turret floor plate
It took several doubles takes for me to realise- and no doubt the eagle-eyed amongst you will have noticed- that the turret ring should be on the other side of the turret floor :{ :haha: I was having a topsy-turvy moment comparing the
illustration with it's 3-D realisation, before I twigged my error. By then I'd already taken a pic, and could nae be ar**d to take another. :haha: My chief concern had been to get the Counterweight in the optimal position and secure it there
with two-part epoxy. The epoxy took around 5 mins to begin to grip properly, and in the meantime, the weight began to wander :O So...i had to tape the errant part in place with parcel tape until the following morning.
Incidentally, these pics I'm posting are a couple of days behind the actual build state. Still, I reckon it will take not much more than two weeks from Box to the paint finish, if i keep chugging away, and the Sun then intermittent showers weather pattern gives way to lasting Summer Sun.. :problem:
This is what Tamiya instruct you to do:
Counterweight location
Last edited by 43rdRecceReg on Tue Aug 15, 2017 1:53 pm, edited 2 times in total.
"Get your facts first, and then you can distort them as much as you please"- Mark Twain.
User avatar
43rdRecceReg
Major
Posts: 6294
Joined: Fri Jul 31, 2015 11:38 am
Location: North West Highlands, Scotland

Re: Tamiya Königstiger- a blitz build

Post by 43rdRecceReg »

Do please click on the pics to enlarge them, in the unlikely event that you didn't know you should. Newbies might be unaware of the need. :)
"Get your facts first, and then you can distort them as much as you please"- Mark Twain.
Post Reply

Return to “Tamiya Builds”