Page 1 of 3
Scratchbuild reinforcement..
Posted: Thu Feb 16, 2017 12:40 pm
by 43rdRecceReg
Afternoon, gents. Having just begun my Cromwell build (I'm a scratch build virgin...


) I just wanted to check with the likes of Alwyn, and other talented scratch modellers, how much they reinforce their models in the construction process? I'm using E.M.A. 'Plastic Weld', and it appears to be making excellent joins. I particularly like the capillary route it takes upon application..a sort of adhesive osmosis; but while I've learned to be sparing with it (also wearing a mask for it's knockout fumes

)..I'm not sure how much punishment it will take when the model's coping with Highland surfaces. Chris supplied a packet of what looks like white beading and angle beading. I wonder whether you would use this at the outset to strengthen the joints I've already made... see below? (I will use putty later for cosmetic purposes..). I'll do a proper build thread later. In the meantime, I've just spotted an excellent one by Macman on the Ludwig Cromwell. Take a peek:
viewtopic.php?f=23&t=14802 
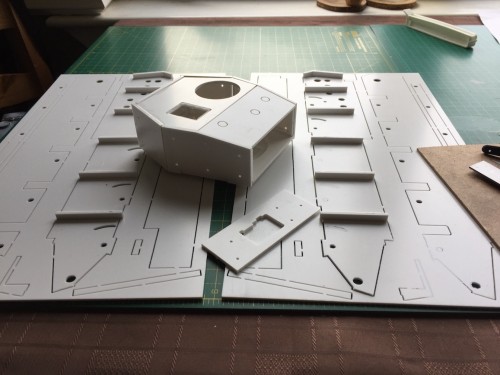
and here's why I am. Just wonder of the Turret could do with reinforcement, and the side panel track dividers (they'll hold the suspension arms, and take a lot of stick!):

- Early days..
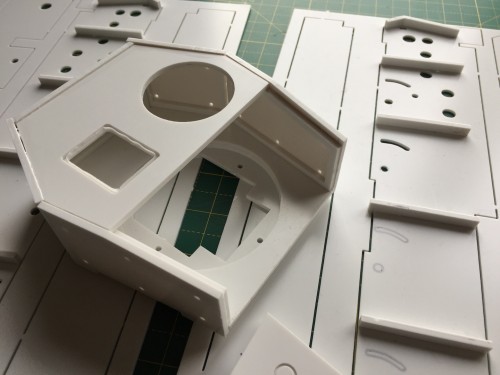
and inside the turret..

- Turret syndrome..
Any advice warmly welcomed. By the way, if you're considering getting the Kit, it seems to go together pretty well, although the only niggle for me (minor one) is that Chris' PDF instructions could do with higher resolution photos..
Re: Scratchbuild reinforcement..
Posted: Thu Feb 16, 2017 1:00 pm
by MichaelC
On the inside joint I usually spread a bead of 2 part epoxy to reinforce it. If it is hull and large structure I would use pieces of styrene for support and the 2 part epoxy over that.
Re: Scratchbuild reinforcement..
Posted: Thu Feb 16, 2017 1:04 pm
by tomhugill
Great to see you've started to put her together! Really looking forward to seeing what you do with it. Mines almost ready for paint, just a couple of details left.
Re: Scratchbuild reinforcement..
Posted: Thu Feb 16, 2017 1:42 pm
by AlwynTurner
Hi 43rd, the kit looks really exciting and when you start a thread I will be following with great interest. What I do when scratch building is to identify any joints which are likely to be stressed and reinforce provided that they are not visible. Even if visible sometimes the actual construction would have had reinforcement, so I try and identify these situations and emulate the real thing. EMA is the real deal when it comes to scratch building as it partially melts both surfaces and results in a truly bonded surface almost instantly. As you have identified it's pretty strong and I suspect that there's more than a smidgeon of acetone in the 'glue' which would account for the melting/bonding, so beware the fumes.

Incidentally a suggestion with PCweld,
DON'T keep a full bottle open on your worktop, I once did and knocked it over with pretty disastrous consequences for everything in the area. What I do is take a small bottle such as a tamiya paint bottle and put a SMALL quantity of glue in that. It is quite squat and harder to knock over, and if you do then there will be much less damage done, Presumably you are using a small paintbrush to apply the glue which is what I use.
I use small square section offcuts of styrene to reinforce, or if visible then styrene angle simulates in many instances what would have been used. In extreme situations (e.g. when reinforcing/strengthening a chassis, I use square tube styrene which is readily available in a variety of sizes. You will have seen my C8 quad build where I used Square section extensively.
Good luck with the build and I'll be following on with great interest.
Alwyn


Re: Scratchbuild reinforcement..
Posted: Thu Feb 16, 2017 4:57 pm
by 43rdRecceReg
MichaelC wrote:On the inside joint I usually spread a bead of 2 part epoxy to reinforce it. If it is hull and large structure I would use pieces of styrene for support and the 2 part epoxy over that.
That makes good sense, Michael.

I have some two-part epoxy; and I even have fibre glass sheeting to go with it (intended for car repairs mainly, but can be used for jobs)..but that might be a little over the top.
Re: Scratchbuild reinforcement..
Posted: Thu Feb 16, 2017 5:05 pm
by 43rdRecceReg
tomhugill wrote:Great to see you've started to put her together! Really looking forward to seeing what you do with it. Mines almost ready for paint, just a couple of details left.
Yep, finally bitten the bullet ( 7.92 mm Besa

, of course). Your model is largely to blame for this latest twist in the addiction, as I've said before!!...but,looking forward to filching a few ideas from your finished Cromwell, when it finally clanks out of the spray booth (aka ' The Kitchen table'..?


)
Re: Scratchbuild reinforcement..
Posted: Thu Feb 16, 2017 5:14 pm
by PainlessWolf
Good morning,
The construction looks solid, good reinforcing with double widths at the contact points. Following along with great interest!
regards.
Painless
Re: Scratchbuild reinforcement..
Posted: Thu Feb 16, 2017 5:20 pm
by 43rdRecceReg
AlwynTurner wrote:Hi 43rd, the kit looks really exciting and when you start a thread I will be following with great interest. What I do when scratch building is to identify any joints which are likely to be stressed and reinforce provided that they are not visible. Even if visible sometimes the actual construction would have had reinforcement, so I try and identify these situations and emulate the real thing. EMA is the real deal when it comes to scratch building as it partially melts both surfaces and results in a truly bonded surface almost instantly. As you have identified it's pretty strong and I suspect that there's more than a smidgeon of acetone in the 'glue' which would account for the melting/bonding, so beware the fumes.

Incidentally a suggestion with PCweld,
DON'T keep a full bottle open on your worktop, I once did and knocked it over with pretty disastrous consequences for everything in the area. What I do is take a small bottle such as a tamiya paint bottle and put a SMALL quantity of glue in that. It is quite squat and harder to knock over, and if you do then there will be much less damage done, Presumably you are using a small paintbrush to apply the glue which is what I use.
I use small square section offcuts of styrene to reinforce, or if visible then styrene angle simulates in many instances what would have been used. In extreme situations (e.g. when reinforcing/strengthening a chassis, I use square tube styrene which is readily available in a variety of sizes. You will have seen my C8 quad build where I used Square section extensively.
Good luck with the build and I'll be following on with great interest.
Alwyn


Thanks again for the sterling advice, Maestro (a modest at that ..). yes, I nearly knocked the damned bottle over, when the top was off. Only my lightning reflexes saved the day...(


)..More like a desperate lunge...
Since then, the bottle has been secured in a weighty receptacle (a bit like inkwells used to be, in the days when we-I- wrote with quills!) and I try to put the top back as soon as I've loaded the brush. I think that Ausf once mentioned that products like Plastic Weld can evaporate fairly quickly, if the 'Genie' isn't corked tightly in the bottle. Given the instant wooziness form even the briefest of whiffs, I'm treating this product with the greatest of respect.
Taking the tip about square styrene, I'll order some now before I get down the the lower hull assembly. In fact, If I can, I'd like to bond some sheet aluminium to the chassis floor to give it the rigidity of a Taigen or Tamiya
shell.
Cheers.

Re: Scratchbuild reinforcement..
Posted: Thu Feb 16, 2017 5:55 pm
by BarryC
Hi guys,
Question what is E.M.A. 'Plastic Weld'? I understand it is a chemical weld glue but not familiar with E.M.A. Plastic Weld.
Thanks,
Barry
Re: Scratchbuild reinforcement..
Posted: Thu Feb 16, 2017 6:45 pm
by AlwynTurner
Hi Barry, it's this stuff
http://www.ebay.co.uk/itm/EMA-PLASTIC-W ... Swqu9U4N-S
It will stick virtually any plastic items together but I mainly use it on styrene and ABS. The harder the plastic then the more PC weld you have to keep applying until the plastic softens, then place the pieces to be joined together and the melted layers combine under firm pressure and presto - a weld. With softer plastics like styrene it is often only necessary to place them together and run some pc weld along the join and it migrates into the joint and works its magic.
Cheers
Alwyn
Alwyn

 ) I just wanted to check with the likes of Alwyn, and other talented scratch modellers, how much they reinforce their models in the construction process? I'm using E.M.A. 'Plastic Weld', and it appears to be making excellent joins. I particularly like the capillary route it takes upon application..a sort of adhesive osmosis; but while I've learned to be sparing with it (also wearing a mask for it's knockout fumes
  )..I'm not sure how much punishment it will take when the model's coping with Highland surfaces. Chris supplied a packet of what looks like white beading and angle beading. I wonder whether you would use this at the outset to strengthen the joints I've already made... see below? (I will use putty later for cosmetic purposes..). I'll do a proper build thread later. In the meantime, I've just spotted an excellent one by Macman on the Ludwig Cromwell. Take a peek: