Taigen Early Tiger 1

This section is for builds that are not strictly Tamiya or Heng Long. For instance, replacing the electronics from a WSN or Matorro, or even a scratch-build.
User avatar
jarndice
Colonel
Posts: 8023
Joined: Mon Sep 03, 2012 11:27 am
Location: the mountains of hertfordshire

Re: Taigen Early Tiger 1

Post by jarndice »

Pete Hi, The rectangular Exhaust Shrouds don't apply to your Tiger as they were not fitted to Tanks with the one piece Feifal Air Cleaners, but if at some time in the future you want to build one of the first Tunisian Tigers then a good source of reference is--
"Wolfgang Schneiders Tigers in Combat volume 1" Page 52 top.
The fitting of the one piece air cleaners also saves you having to find, Build and PAY for the earlier side pods :lolno: Page 17 of the same book carries a picture of Turret number "813" which shows the Rectangular Exhaust Shrouds in good detail and that the Turret has the later "Rommel" Turret stowage box and not the early side pods,
If you cut a 7mm length of ordinary metal coat hanger and superglue a small length of chain to the upper side of it you will have a "Tow Hook" pintle pin for the Tiger,
I also slide and glue a small steel washer down the pintle pin a couple of mms to stop it falling straight through the tow hook and it will sit square in place :lolno:
Shaun.
I think I am about to upset someone :haha:
User avatar
SgtMalarky
Lance Corporal
Posts: 121
Joined: Fri Dec 30, 2016 4:41 pm
Location: Sunny Gloucestershire

Re: Taigen Early Tiger 1

Post by SgtMalarky »

Great idea with coat hanger and chain. I will definitely do this.
I am already planning my next vehicle in my mind. It was going to be T34 but I been looking at a Tunisian Tiger. Next will then be a Normandy version. This project has really focussed my mind on Tigers.
Your help has been great, really appreciate you taking time to read my posts and feed back info.

Regards
Pete
Question: "how many tanks does one person need?"
Answer: "one more than they already have"
User avatar
SgtMalarky
Lance Corporal
Posts: 121
Joined: Fri Dec 30, 2016 4:41 pm
Location: Sunny Gloucestershire

Re: Taigen Early Tiger 1

Post by SgtMalarky »

Thanks Herman
It will be a challenge matching the upper to the work on the lower, but loving every minute of the project.
Question: "how many tanks does one person need?"
Answer: "one more than they already have"
User avatar
SgtMalarky
Lance Corporal
Posts: 121
Joined: Fri Dec 30, 2016 4:41 pm
Location: Sunny Gloucestershire

Re: Taigen Early Tiger 1

Post by SgtMalarky »

Here we are, brass shrouds ready for damage, rust, soot and paint! Need to thicken the flanges and add bolt pads. For the strengthening bead i am using 1mm half round plastruct.
Attachments
Home made shrouds ready for damage
IMG_0313.JPG (33.91 KiB) Viewed 1713 times
Last edited by SgtMalarky on Wed Mar 22, 2017 7:57 am, edited 1 time in total.
Question: "how many tanks does one person need?"
Answer: "one more than they already have"
User avatar
jarndice
Colonel
Posts: 8023
Joined: Mon Sep 03, 2012 11:27 am
Location: the mountains of hertfordshire

Re: Taigen Early Tiger 1

Post by jarndice »

Time for me to give a warning about the Back plate,
I have managed to break the locating tabs on three of them, My fix was a bit drastic,
I get MATO Metal Back plates from Forgebear,
They are NOT a good fit because they are not supposed to fit a Heng Long/Taigen or Torro. But they come complete,
The work to get the plate to fit is extensive but at least I know I wont be breaking another one any time soon and once the work is done it looks just right.
Whenever I am working on the Back plate I always take it out of the Hull, It is just two screws and it slides out,
What I am doing here is letting you know that if you do break a locating tab you can of course get another plastic one or you could spend a little more on a Permanent metal fix,
Shaun.
I think I am about to upset someone :haha:
User avatar
SgtMalarky
Lance Corporal
Posts: 121
Joined: Fri Dec 30, 2016 4:41 pm
Location: Sunny Gloucestershire

Re: Taigen Early Tiger 1

Post by SgtMalarky »

Hello Shaun
I was lucky enough to pick up a spare back plate from Steve at WDM for a fiver. All it had missing was one air pipe and it was for a Taigen Tiger 1 as mine. This has allowed me to 'trial' my ideas and so far so good. One problem I just encountered was i fitted the jack handle to the back plate, now i come to fit the shrouds it is in the way so i am going to have to take it off and refit. To get it to fit in a realistic position i need to modify it by 1.5 to 2mm.
My advice to anyone else, start from the middle of the backplate and work outwards.
Pete
Question: "how many tanks does one person need?"
Answer: "one more than they already have"
User avatar
jarndice
Colonel
Posts: 8023
Joined: Mon Sep 03, 2012 11:27 am
Location: the mountains of hertfordshire

Re: Taigen Early Tiger 1

Post by jarndice »

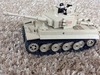
I am surprised the Jack Handle is interfering with the exhaust shroud but shortening the length of the handle should certainly sort that out,
I have to say that my advice is --- Always, NO EXCEPTIONS!!! do a dry run first, and in the case of a Back Plate where multiples of fits have to be made then lay out the backplate and place all the planned fittings in position, then using a marker mark the exact place where everything goes, That way you wont get caught out later,
This also is worth considering when fitting tools etc on the Tank body.
I would have suggested you move the jack body a little further to the right but in your photograph it looks good. So as I say I am a bit puzzled,
UNLESS, Call me a fool but you do have the exhaust shrouds on the correct side don't you?
I ask because Even I, yes your hero, has made that mistake, :O fortunately before holes were drilled and glue applied I discovered the error, and that is one of the reasons I always do a dry run on any fit.
By the way while you are working on the backplate will you be fitting a starting handle along the base of the plate? There is a proper way as per the real thing where the handgrip is actually swinging below the level of the back plate and a modelling way that saves the handle getting damaged. This is a part that does need to be included in a dry run because it is a tight fit getting it between other items,
Shaun.
I think I am about to upset someone :haha:
User avatar
Soeren
Warrant Officer 2nd Class
Posts: 1356
Joined: Sat Oct 22, 2016 3:27 pm

Re: Taigen Early Tiger 1

Post by Soeren »

This is a nice build report. That made me think to also start on my Taigen Tiger I late. I plan to do a repaint for most of the time and just ordered a AFV club 1:35 scale Tiger late. On the Taigen Tigers unforrunately all the tools are cast on the upper hull. Do you plan to change this as well?
User avatar
jarndice
Colonel
Posts: 8023
Joined: Mon Sep 03, 2012 11:27 am
Location: the mountains of hertfordshire

Re: Taigen Early Tiger 1

Post by jarndice »

Hallo, Moulded on tools are the bane of modellers, at least with 1/16 there is a chance of cutting and abrading the Tank clear of them but I would not like to try that with 1/35, in a case like this as you are going to be concentrating on painting the Model then I would leave the tools until last then using masking tape and small brushes and a lot of patience I would pay great attention to the detail on the tools this will help to "Lift" them from the Tank,
Shaun.
I think I am about to upset someone :haha:
User avatar
Soeren
Warrant Officer 2nd Class
Posts: 1356
Joined: Sat Oct 22, 2016 3:27 pm

Re: Taigen Early Tiger 1

Post by Soeren »

Yes, that would be an idea. Hmm, maybe, another option would be to take the tools from the recent Taigen Panther sprue. I would check how close they get to the Tiger pieces. These are separat with moulded on clamps. After doing the ABER clamps for both Panthers, I am not sure if I want to do this again.
Post Reply

Return to “Other Builds”