That looks like the Airsoft microswitch connector. It's responsible for triggering the cannon sound effect, as well as the shot itself.lifeofbrian wrote:Can someone tell me what should be wired to the terminal in this picture.
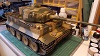
Second hand Taigen Panzer IV F2
-
43rdRecceReg

- Major
- Posts: 6294
- Joined: Fri Jul 31, 2015 11:38 am
- Location: North West Highlands, Scotland
Re: Second hand Taigen Panzer IV F2

"Get your facts first, and then you can distort them as much as you please"- Mark Twain.
-
lifeofbrian
- Lance Corporal
- Posts: 113
- Joined: Sat Dec 24, 2016 8:09 pm
- Location: Surrey, UK
Re: Second hand Taigen Panzer IV F2
I've ordered all the missing parts and a few spares from Aliexpress and a new firing unit from Forgebear, so I should have the gun working long before the parts get here from China, Gives me plenty of time to strip it down and start painting. I'm thinking Tamiya German Grey, and markings of the 1st SS Panzer Division Leibstandarte SS Adolf Hitler. Then we'll see if I want to upgrade the electrics. I think a radio first, the standard one is so bad.
Taigen Panver IV F2 // Taigen Pantiger
-
lifeofbrian
- Lance Corporal
- Posts: 113
- Joined: Sat Dec 24, 2016 8:09 pm
- Location: Surrey, UK
Re: Second hand Taigen Panzer IV F2
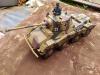
Got the new BB firing unit. The wires are different from the one that was in before, (plus it had wires missing). Can someone look at these pics and see if I'm right and answer what the other connector is for, cheers.
Pic 1.

Pic 2.

Pic 1.
Pic 2.
Taigen Panver IV F2 // Taigen Pantiger
-
silversurfer1947
- Lieutenant
- Posts: 3338
- Joined: Tue Oct 27, 2015 9:54 pm
- Location: Bristol, UK
Re: Second hand Taigen Panzer IV F2
Are the black and red wires marked 5 attached in parallel to the motor that fires the BB? If so I think they should go to the warning LED that lights up when you start the firing sequence.
Richard
Tamiya Tiger 1, Taigen FlakPanzer IV,Torro M16 half-track, Tamiya Panther,WSN/Torro T34,Taigen M41 Bulldog,H/l/Taigen Sherman M4A3,H/L T90, Haya M3 Grant, Metal Origins 234/2 Puma, Nashorn by Alwyn. I was only going to have one tank - honest!
Tamiya Tiger 1, Taigen FlakPanzer IV,Torro M16 half-track, Tamiya Panther,WSN/Torro T34,Taigen M41 Bulldog,H/l/Taigen Sherman M4A3,H/L T90, Haya M3 Grant, Metal Origins 234/2 Puma, Nashorn by Alwyn. I was only going to have one tank - honest!
-
lifeofbrian
- Lance Corporal
- Posts: 113
- Joined: Sat Dec 24, 2016 8:09 pm
- Location: Surrey, UK
Re: Second hand Taigen Panzer IV F2
They're attached to NO 4. connector which also has the black motor wire. I will not be using the LED so if that's what they're for that'll save me a job. Is all the other wiring correct? Out of curiosity do you know what the connector is supposed to go?
silversurfer1947 wrote:Are the black and red wires marked 5 attached in parallel to the motor that fires the BB? If so I think they should go to the warning LED that lights up when you start the firing sequence.
Taigen Panver IV F2 // Taigen Pantiger
-
lifeofbrian
- Lance Corporal
- Posts: 113
- Joined: Sat Dec 24, 2016 8:09 pm
- Location: Surrey, UK
Re: Second hand Taigen Panzer IV F2
I think I was right. The difference to the Taigen diagram is mine doesn't have a terminal for connector (no 4.) My upper hull connector is hard wired, and they're already attached, so I can remove the two extra wires (no 5.).

Taigen Panver IV F2 // Taigen Pantiger
Re: Second hand Taigen Panzer IV F2
Looks like you're having a good go at this one. Another site for some goodies: http://www.tank-modellbau.de/keng5/Trac ... pfwagen-IV. Do check out the PzIII section, since some of the parts are interchangeable.
RE: the cupola, I've done the metal cupola and the plastic (PzIII and PzIV). I would save the cash and stay with the plastic. The metal doesn't correct any of the errors of the plastic and the plastic is easier to work with.
As far as what parts are missing and where they go, take a look at my build (already referenced earlier). I've made a lot of the mods you're making and tried to provide a lot of detail to make it easy to replicate what I did. For example, the grab handle I redid with brass wire and gave the wire diameter. Rather than trying to read it all, just skim to find pictures of what you're working on and read that section. I also tried to list my parts sources (vendors) as I used them.
For the wiring, Taigen and HL like to use the positive as the common line.
1) this controls the track recoil and cannon sound. I don't use it because I hate the track recoil. Gun will fire without it.
2) switch...you're correct
3) don't see a #3
4) powers the gun, elevation, and red warning light. Mine didn't use a plug. It was a set of wires that connected the 8-pin plug to the gun and the elevation motor. Maybe the newer elevation motors have a "jumper" plug in them.
5) Goes to either the elevation motor or to the red warning LED. If the LED, there should be a red wire from the LED to the switch to complete the circuit.
BTW, if you install a working coax machine gun, you'll need to add wires from the 8-pin plug to the coax gun. It will be the same connection points as the hull MG.
RE: paint and cupola gun, the Schumo cupola MG 34 was designed for the ring mount on the Tiger and Panther tanks. The PzIII and PzIV didn't have ring mounts. They mounted in a hard bracket facing forward. Mato has a crude one, but it is better suited and more accurate for these tanks than the Schumo gun. www.modellbaugasse.de makes a very detailed cupola MG 34 with mount for the PzIII and PzIV. I have it, but didn't use it. It's very detailed, but delicate. It would work well for a shelf queen, but not a tank I drive through the front bushes.
Also, if you're doing a 1st SS PzDiv PzIV Ausf F2, you might want to check the photos. As I recall that division was on the Eastern Front and they generally did mount the MGs on the cupola on the Eastern Front. That was done to counter the air threat. The Soviets didn't present much of an air threat. Most of those cupola mounts were found on the Western Front where one of the primary means of defeating German armor was with air power.
As for the antenna, the antenna will work but the base is wrong for a PzIV F2. It would work for the Ausf H or J when it was moved to the back corner of the tank. That said, you could drill a small hole into the plastic base on the side of the tank and mount a shortened version of the wire antenna that came with the tank. That would be more accurate.
Sorry I'm late jumping in this one...just saw the thread.
-
lifeofbrian
- Lance Corporal
- Posts: 113
- Joined: Sat Dec 24, 2016 8:09 pm
- Location: Surrey, UK
Re: Second hand Taigen Panzer IV F2
Cheers for the great info Phil, I'll try and digest it over the weekend. I've never seen that modellbau site before, some good stuff there. Been working on the PIV today, had a go at re sizing the stowage bin. What glue do you use for these, just ordinary super glue?

philipat wrote:Looks like you're having a good go at this one.
Taigen Panver IV F2 // Taigen Pantiger
Re: Second hand Taigen Panzer IV F2
I haven't had much luck with the superglues you find in the stores. Glues I generally use:
JB Weld: metal to plastic for most strength...usually a functional part
5-min epoxy (Tamiya or other hobby): metal to plastic, or plastic to plastic (strong, but not functional...mostly decorative but easily broken off)
CA glue: plastic to plastic...mostly decorative (usually gap-filling)
PlastiWeld: styrene to styrene...sometimes styrene to ABS...need to sand off the paint from the tank first, though
Here's a couple of discussions for you:
viewtopic.php?f=195&t=18746&p=166941&hi ... es#p166941
viewtopic.php?f=195&t=20870&p=188896&hi ... es#p188896
I'd have to check my build thread, but I think I used epoxy (maybe JB Weld) to do what you're doing. Mostly, it was because of the natural tension that would come from the plastic trying to regain its original shape. I'm pretty sure I used JB Weld to correct the rear deck's angle. JB Weld needs to be clamped for about 24 hours. 5-min epoxy really needs a few hours of clamping.
Re: Second hand Taigen Panzer IV F2
Oh, and I think you can get a metal signal hatch (small one on top of the turret) at Mato. I think that is where I got mine.
