Operation Tamy T1 face lift

This section is for you to give a commentary / build log of your Tamiya tank. Remember - lots of pictures please!
Forum rules
This section is for posting a build log of your Tamiya tank.
Questions relating to issues you are having with your tank(s) should be posted in the General Questions forum here: viewforum.php?f=14
User avatar
Burger_Patrol1
Lance Corporal
Posts: 197
Joined: Sun Dec 25, 2016 7:21 pm
Location: Brea, CA. USA

Re: Operation Tamy T1 face lift

Post by Burger_Patrol1 »

Late Model Tiger 1 Metal Road Wheels Conversion Kit....
Hello Tankers... :wave: Last year I had posted a question on how to assemble this Metal road wheel conversion set I had purchased. I figured out how to assemble them but an unexpected answer i got back was what i had purchased was a "Bad Copy of HennTec road wheels" :headbang: . With this new found knowledge I did not want to install them, so I researched to see if I could find a remedy. The only thing i could find would be 3D printing of which I have no knowledge and also I did not want to spend that much money just to detail my road wheels, So i went old school and detailed them by hand. They didn't come out perfect, but I think the end result is much better than the start.

Heres what i was starting with...
START
START
P1010002.JPG (92.83 KiB) Viewed 177 times
When looking at the cart picture It does look bad...
I figured the first step would be to remove bad details...
FILED HUB FACE
FILED HUB FACE
P1010005.JPG (91.99 KiB) Viewed 177 times
Next step was to invade my local ACE Hardware store to find some small washers, screws, & a nut for the center of the hub.
I used JB Weld for the entire process. Installing first washers for outer hub.
SIZING UP OUTER HUBS
P1010017.JPG (84.08 KiB) Viewed 177 times
JB WELD
JB WELD
P1010018.JPG (88.51 KiB) Viewed 177 times
Next is the inner hub step up with small washer...
INNER HUB
INNER HUB
P1010024.JPG (91.31 KiB) Viewed 177 times
JB WELD
JB WELD
P1010026.JPG (92.85 KiB) Viewed 177 times
Next is the center hub nut...
CENTER HUB NUT
CENTER HUB NUT
P1010027.JPG (91.35 KiB) Viewed 177 times
Next i installed the outer hub plate
OUTER HUB PLATE
OUTER HUB PLATE
P1010030.JPG (90.82 KiB) Viewed 177 times
I was not able to find small enough bolts at ACE Hardware for the outer plate fasteners so I broke ou the
RP Toolz Hexagonal Punch and made some from a thin piece of copper.
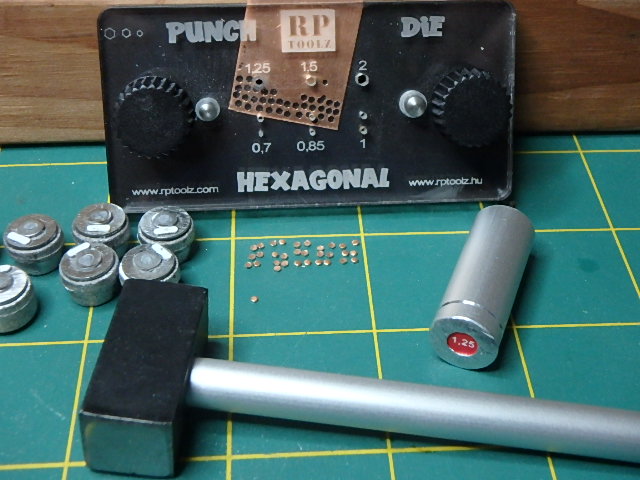
RP TOOLZ HEXAGONAL PUNCH
P1010033.JPG (92.21 KiB) Viewed 177 times
HEX HEADS
HEX HEADS
P1010034.JPG (90.03 KiB) Viewed 177 times
Heres what i ended up with...
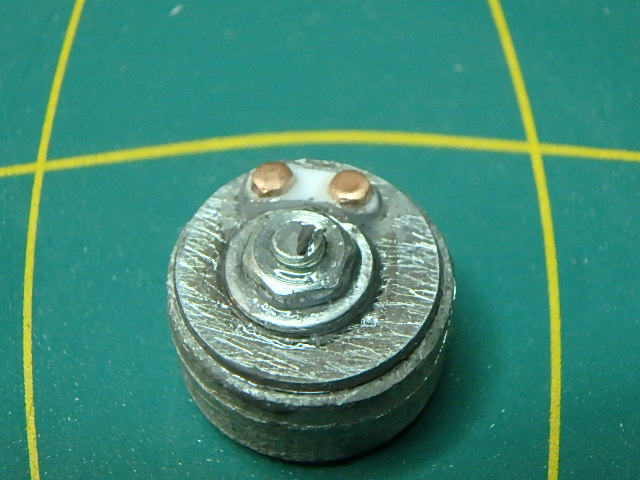
END RESULT
END RESULT
P1010039.JPG (88.77 KiB) Viewed 177 times
P1010038.JPG
P1010038.JPG (89.03 KiB) Viewed 177 times
Once I was happy with the hub details I started to assemble the road wheels...
P1010001.JPG
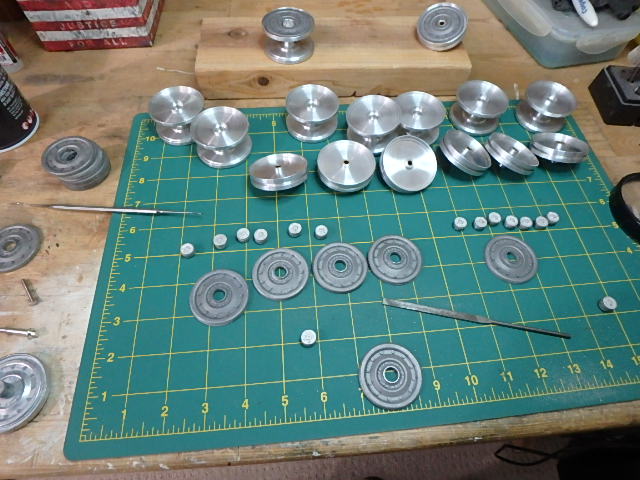
P1010001.JPG (91.91 KiB) Viewed 177 times
ABRADED MATING SURFACES
P1010019.JPG (88.01 KiB) Viewed 177 times
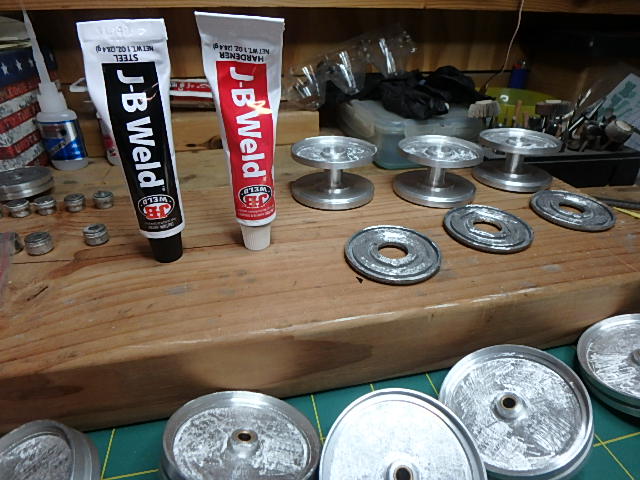
JB WELD
JB WELD
P1010022.JPG (88.38 KiB) Viewed 177 times
Tanks a lot,
Burger_Patrol1
Brea, CA. USA ;D
Tamy T1
Tamy Sand Scorcher
Tamy BlackFoot
Tamy Clodbuster
Static Dio's
User avatar
Burger_Patrol1
Lance Corporal
Posts: 197
Joined: Sun Dec 25, 2016 7:21 pm
Location: Brea, CA. USA

Re: Operation Tamy T1 face lift

Post by Burger_Patrol1 »

Had to modify Tamiya axles to fit properly...
MODIFIED TAMIYA AXLES
P1010035.JPG (84.63 KiB) Viewed 176 times
AXLE & HUB  INTALL
AXLE & HUB INTALL
P1010042.JPG (91.74 KiB) Viewed 176 times
P1010043.JPG
P1010043.JPG (93.11 KiB) Viewed 176 times
P1010044.JPG
P1010044.JPG (94.28 KiB) Viewed 176 times
P1010037.JPG
P1010037.JPG (91 KiB) Viewed 176 times
Much happier with the new results... :D
Tanks a lot,
Burger_Patrol1
Brea, CA. USA ;D
Tamy T1
Tamy Sand Scorcher
Tamy BlackFoot
Tamy Clodbuster
Static Dio's
User avatar
tankme
Warrant Officer 1st Class
Posts: 1987
Joined: Tue Oct 31, 2017 3:51 pm
Location: Elgin, TX
Contact:

Re: Operation Tamy T1 face lift

Post by tankme »

Definitely way better. I have one of those RP tools punch tools and I think it's great. I mostly use it with styrene. I guess I never even considered it could punch thin brass too.
Derek
Too many project builds to list...
User avatar
MrChef
Warrant Officer 2nd Class
Posts: 1212
Joined: Sat Jan 28, 2023 2:58 am
Location: York of New

Re: Operation Tamy T1 face lift

Post by MrChef »

Oh WOW this is AWESOME, You're BACK! I'm soo happy to see you at it again Burger Patrol!!! I have used this thread as reference for more than just my Tiger I. I hope all is well and I hope you continue to do your great work and get that old cat back in action.
"Charlie don't surf"- Lt. Col. Bill Kilgore
User avatar
Burger_Patrol1
Lance Corporal
Posts: 197
Joined: Sun Dec 25, 2016 7:21 pm
Location: Brea, CA. USA

Re: Operation Tamy T1 face lift

Post by Burger_Patrol1 »

tankme wrote: Sun Mar 03, 2024 11:45 pm Definitely way better. I have one of those RP tools punch tools and I think it's great. I mostly use it with styrene. I guess I never even considered it could punch thin brass too.
Thanks Derek, yea this punch has gotten me out of pinch many times :D Ive used it with Styrene, brass & copper. Seems to work well on all mediums.
Tanks a lot,
Burger_Patrol1
Brea, CA. USA ;D
Tamy T1
Tamy Sand Scorcher
Tamy BlackFoot
Tamy Clodbuster
Static Dio's
User avatar
Burger_Patrol1
Lance Corporal
Posts: 197
Joined: Sun Dec 25, 2016 7:21 pm
Location: Brea, CA. USA

Re: Operation Tamy T1 face lift

Post by Burger_Patrol1 »

MrChef wrote: Mon Mar 04, 2024 1:24 am Oh WOW this is AWESOME, You're BACK! I'm soo happy to see you at it again Burger Patrol!!! I have used this thread as reference for more than just my Tiger I. I hope all is well and I hope you continue to do your great work and get that old cat back in action.
Thanks MrChef, It has been awhile :crazy: I was looking at my account, and my last post was this month last year...Crazy how life swooshes by so fast the older i get.
I'm glad your able to use some ideas from my build. That was always one of my big hopes that my posts would help some builders with ideas and solutions
to common build problems. I know I'm am always learning as well from other builders and for me that's half the fun!!
Hope your doing well my friend and I'm praying that i can finish this Tiger up soon. One concern I've started having that i did not think about, is adding all this metal weight to the kit. I'm thinking this will cut my battery run time way down. :( Live and learn i guess... :haha:
Tanks a lot,
Burger_Patrol1
Brea, CA. USA ;D
Tamy T1
Tamy Sand Scorcher
Tamy BlackFoot
Tamy Clodbuster
Static Dio's
User avatar
Ecam
Warrant Officer 2nd Class
Posts: 1422
Joined: Sun Jul 13, 2014 6:30 pm
Location: Lake of the Ozarks, USA

Re: Operation Tamy T1 face lift

Post by Ecam »

Burger_Patrol1 wrote: Sun Mar 03, 2024 11:39 pm
RP Toolz Hexagonal Punch and made some from a thin piece of copper.
P1010033.JPG
Great tool. In picture P1010033 it looks like you worked on a gentle curved profile to the bolt heads. Or is that how the Brass cuts when punched? The mods look great. I'm going to have to get one of those hex punches.

Tankme, does the styrene cut in a similar fashion?
"Don't believe everything you see on the internet" - George S. Patton

Eric
User avatar
tankme
Warrant Officer 1st Class
Posts: 1987
Joined: Tue Oct 31, 2017 3:51 pm
Location: Elgin, TX
Contact:

Re: Operation Tamy T1 face lift

Post by tankme »

Ecam wrote: Mon Mar 04, 2024 1:48 am
Burger_Patrol1 wrote: Sun Mar 03, 2024 11:39 pm
RP Toolz Hexagonal Punch and made some from a thin piece of copper.
P1010033.JPG
Great tool. In picture P1010033 it looks like you worked on a gentle curved profile to the bolt heads. Or is that how the Brass cuts when punched? The mods look great. I'm going to have to get one of those hex punches.

Tankme, does the styrene cut in a similar fashion?
Styrene ends up being a bit flatter.
Derek
Too many project builds to list...
User avatar
Burger_Patrol1
Lance Corporal
Posts: 197
Joined: Sun Dec 25, 2016 7:21 pm
Location: Brea, CA. USA

Re: Operation Tamy T1 face lift

Post by Burger_Patrol1 »

Ecam wrote: Mon Mar 04, 2024 1:48 am
Burger_Patrol1 wrote: Sun Mar 03, 2024 11:39 pm
RP Toolz Hexagonal Punch and made some from a thin piece of copper.
P1010033.JPG
Great tool. In picture P1010033 it looks like you worked on a gentle curved profile to the bolt heads. Or is that how the Brass cuts when punched? The mods look great. I'm going to have to get one of those hex punches.

Tankme, does the styrene cut in a similar fashion?
Hey Eric :wave: , yea i've noticed with brass and copper the punch will leave one side of the cutting rounded and if you flip the cutting over it will have more of a sharp edge. Ive found the the styrene as a rule will not have as sharp of an edge depending on how thick the styrene is or how sharp the punch cutter still is. Either way most times it comes out with a nice looking bolt head or a nut. I wish i was more of a techy, I'd invest in 3d printing. Maybe when i retire :haha:
Tanks a lot,
Burger_Patrol1
Brea, CA. USA ;D
Tamy T1
Tamy Sand Scorcher
Tamy BlackFoot
Tamy Clodbuster
Static Dio's
User avatar
tankme
Warrant Officer 1st Class
Posts: 1987
Joined: Tue Oct 31, 2017 3:51 pm
Location: Elgin, TX
Contact:

Re: Operation Tamy T1 face lift

Post by tankme »

3D printing small nuts and bolts is helpful, but it's much easier to just punch them out. If I had a bunch just printed, that would be one thing, but you never have on hand the size you need. Then going over to the resin printer, I have to load the file on the USB (no wireless on my resin printer), walk it to the garage, load the resin up, let it print, wash the resin print, let it dry, cure it, remove it from the supports, then in stall it.
Derek
Too many project builds to list...
Post Reply

Return to “Tamiya Builds”