Page 1 of 7
T34/85 Conversion, reloaded pictures
Posted: Sun Jul 24, 2016 5:19 pm
by capt midnight
I'm not sure if this belongs here, or should be in the Modern Tanks thread. If it should be moved, I'm sure the Mod will move it. Well, on with the show.
I haven't seen too many T34 builds and Herman's beautiful bed spring build made me want to really get this project under way. Here's the unboxing of the T34...
Ordered from Intnova in Canada off of ebay. Here's the box as it arrived at the door. Really quick shipping, by the way.
Here's the inner foam packing. This one came with the Li-ion battery...
After removing the top foam packing. 2.4 Gig radio...
And right out of the box...
Here's everything that was in the box. The tow cables and a couple of small antennas are in the bag with the instructions...
Here's the under the hood shot. Came with metal gearboxes...
A shot of the smoker working during the test drive...
More to come...
Bill
Re: T34/85 Conversion
Posted: Sun Jul 24, 2016 5:29 pm
by capt midnight
Here's what the end product is supposed to be...
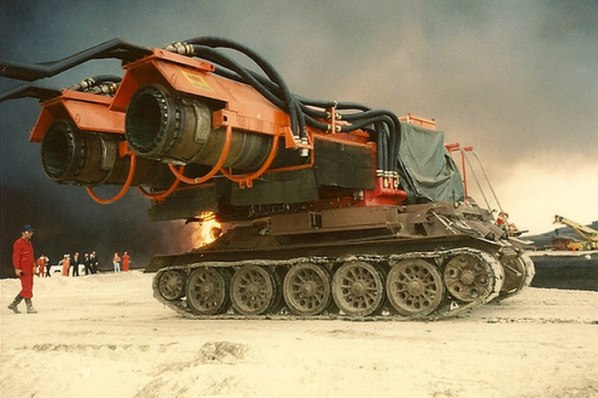
- 84903523.jpg (54.86 KiB) Viewed 5442 times
And a video of Big Wind in action...
https://www.youtube.com/watch?v=GOlq6RRh3sg
The plan is as follows...
Rotation of the jet engines.
Elevation of the engines.
I'm planning on using a couple r/c plane ducted fan engines to provide the "exhaust" for the engines.
And working water to the spray headers.
Now we just have to see how it goes!
Bill
Re: T34/85 Conversion
Posted: Sun Jul 24, 2016 6:03 pm
by spongehoobtank82
That's awesome!
Re: T34/85 Conversion
Posted: Sun Jul 24, 2016 9:08 pm
by HERMAN BIX
Holy crap I wasn't expecting that!!!!
Award for different tank of the year goes to...........
Re: T34/85 Conversion
Posted: Mon Jul 25, 2016 8:19 am
by RobW
That's bonkers - I like it!
Might be worth emailing Wild Well (based in Houston) as they may have pics of them in action that aren't normally available.
Re: T34/85 Conversion
Posted: Mon Jul 25, 2016 11:51 am
by Raminator
Bill, you're an absolute madman. I love it.
Re: T34/85 Conversion
Posted: Tue Jul 26, 2016 5:29 pm
by capt midnight
Here's where I'm at, so far. I started on the easy stuff first. Stripped down, modded, and repainted the lower hull. Here's the new paint. I measured and cut a hole in a couple of paper plates and used them as a mask to keep paint off of the "rubber" tires. While I had the suspension arms off, I noticed that there were two holes for the springs to mount into on the hull. Looks like you can increase the tension on the springs, if needed. Might need this after I get all the goodies on the upper hull. The treads are a little tight, but as soon as there is some weight on the suspension, they loosen up a bit. Should have some slight sag to them once all is said and done.
 Viewed 5442 times")
Here's the inner hull. I sealed the battery door and cut out the box. Installed rare earth magnets to mount the upper hull to, and painted the inside white. Since this is going to be a "clean" build, I kind of thought it appropriate to have the interior bright white. Kind of looks that way in the pictures I could find with the hatch open. I'm going to move the on/off switch to just under the hatch.
Here's the upper hull, so far. I had the turret left over from my Pantiger to Jadgpanter build and it was the same size base as the T34. I cut up the bottom plat to make the base for the upper works. Looks like I'll be able to mount the elevation motor to it as well. I cut off the M/G mount, but have yet to fill it in. I'm planning on using some Sculpy putty to fill in and texture it. Should also work on filling in the rest of the unused mounting holes. Removed and cut open the rear vents, and installed screen. I'm going to install a couple of baffle plates under the screens.
I started to move the hatch to the other side, but I came across some pictures that show it on this side. I think I'll just leave it where it's at and save some hassle. I have noticed that there are several different vehicles, so I'm not really going to pick out one individual machine, but just try and capture the overall effect. Most of them appear to have the same overall design of the upper works.
Any feedback is greatly appreciated!
Bill
Re: T34/85 Conversion
Posted: Tue Jul 26, 2016 5:54 pm
by fury
Absolutely crazy looking but I like it a lot. Different but awesome.

Re: T34/85 Conversion
Posted: Wed Jul 27, 2016 9:50 am
by Raminator
Off to a solid start Bill, looking forward to seeing where you go with it.
With regards to your track tension and running gear, the road wheels are sitting too low with the default H/L suspension. The tops of the idlers, road wheels and sprockets should all be more or less level.
If you get some spacers underneath the suspension arms to lift them up and limit their travel, you'll have a little more slack in the tracks and the wheels will be sitting in more of a straight line.
Re: T34/85 Conversion
Posted: Wed Jul 27, 2016 11:27 am
by HERMAN BIX
Agree with Mr Ram, the idler on mine was/is still set on what would be the tightest setting.
This can be removed & rotated so the idler is roughly flush with the top of the roadwheels, but the wheels need to have at least 3mm probably as much as a 1/4" added into the travel slots to bring them to a good height.
Plastic tracks wont sag naturally like metal ones do, so to get the look you are going for the roadwheel travel needs doing.