The paint prep continues! Masked off the engine grills still got to mask where I don't want the anti slip, also epoxied the driveshaft supports on the inside of the hull as did not want to grind the outer hull, tried making a mount to bolt them in but not enough room between hull/ gearbox.
03004996.jpg (53.25 KiB) Viewed 4504 times
03004997.jpg (39.24 KiB) Viewed 4504 times
03004998.jpg (35.57 KiB) Viewed 4504 times
Sponghoobtank82-panzerIII, panther V, tiger VI early and late and another early tiger,leopard 2a6, panzer IV F2,challenger 2
Finished making the hull and turret tonight ready for the anti slip, then primed the wheels lower hull and back plate, then put base coat on those, also installed the charging port and on/off switch in fuel drums.
030049d0.jpg (43.7 KiB) Viewed 4481 times
030049dc.jpg (41.73 KiB) Viewed 4481 times
030049da.jpg (47.89 KiB) Viewed 4481 times
030049d9.jpg (51.76 KiB) Viewed 4481 times
030049d8.jpg (51.51 KiB) Viewed 4481 times
Hopefully get anti slip in post tomorrow and should be painting/ camoing the upper hull and turret by the weekend!
Sponghoobtank82-panzerIII, panther V, tiger VI early and late and another early tiger,leopard 2a6, panzer IV F2,challenger 2
Well its been a busy day! First of my anti slip arrived so set to work on that, watered it down as it comes as a thick paste and brushed/ stippled it onto the hull.
Tidied up with a cotton bud then let dry.
Once it was dry moved on to primer, 2 light coats
More the fun bit! Several thin layers of my chosen base colour Tamiya olive drab let this dry then airbrush on the camo in Tamiya NATO black, was abit worried the edges would be to blurry but I don't think it looks to bad.
Tomorrow if I get time I will apply a filter to tie it together then onto washed and weathering also need to detail some of the accessories and attach the rear light clusters I have made.
Attachments
03004a12.jpg (33.83 KiB) Viewed 4434 times
03004a13.jpg (38.1 KiB) Viewed 4434 times
03004a15.jpg (36.8 KiB) Viewed 4434 times
03004a17.jpg (50.66 KiB) Viewed 4434 times
03004a19.jpg (49.43 KiB) Viewed 4434 times
03004a1a.jpg (24.54 KiB) Viewed 4434 times
03004a1b.jpg (30.41 KiB) Viewed 4434 times
03004a1e.jpg (43.92 KiB) Viewed 4434 times
03004a1e.jpg (43.92 KiB) Viewed 4434 times
Last edited by spongehoobtank82 on Fri Dec 18, 2015 5:39 am, edited 2 times in total.
Sponghoobtank82-panzerIII, panther V, tiger VI early and late and another early tiger,leopard 2a6, panzer IV F2,challenger 2
scalawag wrote:Thats looking great mate. Can't wait to get the paint on mine now, but still some detailing to go. Waiting on parts now
How did you find the anti slip, it looks good
Paul
Cheers Paul, it was great stuff, really easy to use so thanks for putting the tip on! Still asking way to go with the paint but am looking the look of it, would of preferred a slightly lighter shade of green but I can live with it, wont be long till you start painting dude! Guess yours is going to be plain green?
Sponghoobtank82-panzerIII, panther V, tiger VI early and late and another early tiger,leopard 2a6, panzer IV F2,challenger 2
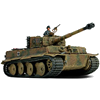
Busy afternoon/ evening! Was not happy with the shade of the camo stripes they were to light so over sprayed them with a thin coat of flat black
03004a43.jpg (39.15 KiB) Viewed 4576 times
03004a44.jpg (38.15 KiB) Viewed 4576 times
Much happier with them now.
Added the decals and rear light cluster
03004a42.jpg (32.82 KiB) Viewed 4576 times
Next sprayed a filter of Tamiya dark yellow, linoleum deck brown and NATO green then once that was dry highlighted all the panel edges with flat black and painted the fume extractor and muzzle with all with my airbrush. Then followed the lot with Tamiya clear coat
03004a41.jpg (41.87 KiB) Viewed 4576 times
03004a40.jpg (33.41 KiB) Viewed 4576 times
03004a3f.jpg (35.83 KiB) Viewed 4576 times
03004a3e.jpg (39.32 KiB) Viewed 4576 times
Just got to wait for this to dry and then the real weathering can begin!
Sponghoobtank82-panzerIII, panther V, tiger VI early and late and another early tiger,leopard 2a6, panzer IV F2,challenger 2