ABE'S EARLY TIGER 1 BUILD

This section is to 'show and tell' about any customizing or re-modeling you have done (or are doing) to a Heng Long tank.
Forum rules
This section is for posting a build log of your Heng Long tank.
Questions relating to issues you are having with your tank(s) should be posted in the General Questions forum here: viewforum.php?f=14
Abe Froman
Lance Corporal
Posts: 153
Joined: Wed Feb 11, 2015 10:00 am

Re: ABE'S EARLY TIGER 1 BUILD

Post by Abe Froman »

Shaun, I first saw star wars on first release with my dad and to my amazement, the cinema went crazy, standing and applauding the opening scenes..so un british :haha: Was amazing to witness.

SOOOOO

What else are you guys modelling apart from RC at the moment?
Abe Froman
Lance Corporal
Posts: 153
Joined: Wed Feb 11, 2015 10:00 am

Re: ABE'S EARLY TIGER 1 BUILD

Post by Abe Froman »

Finished the cuppola.

Added the sun screen rods, brackets and bolts, the drain holes, the hatch retainer clip and a thin wire spring along the hatch hinge arm

Image

Image

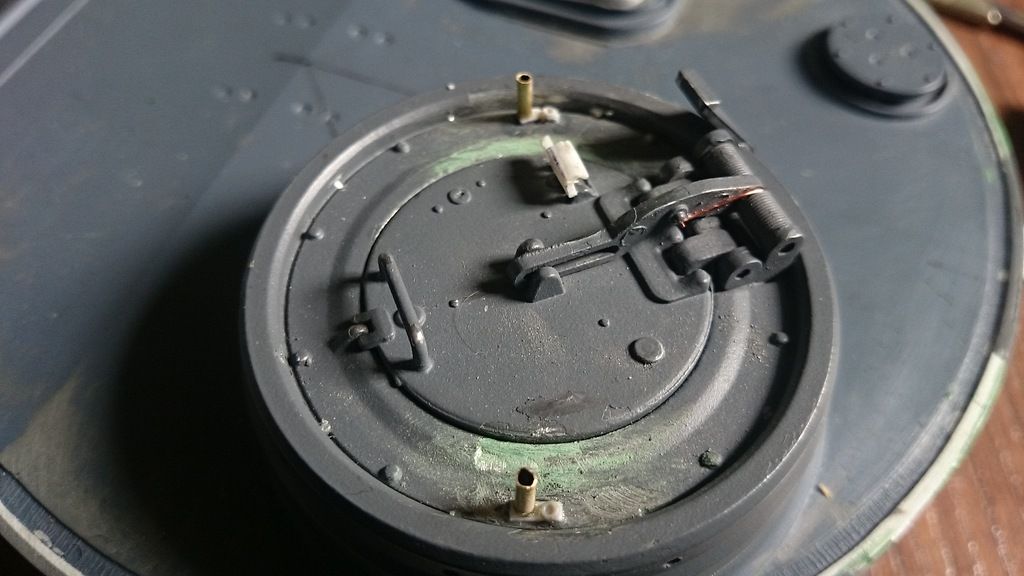
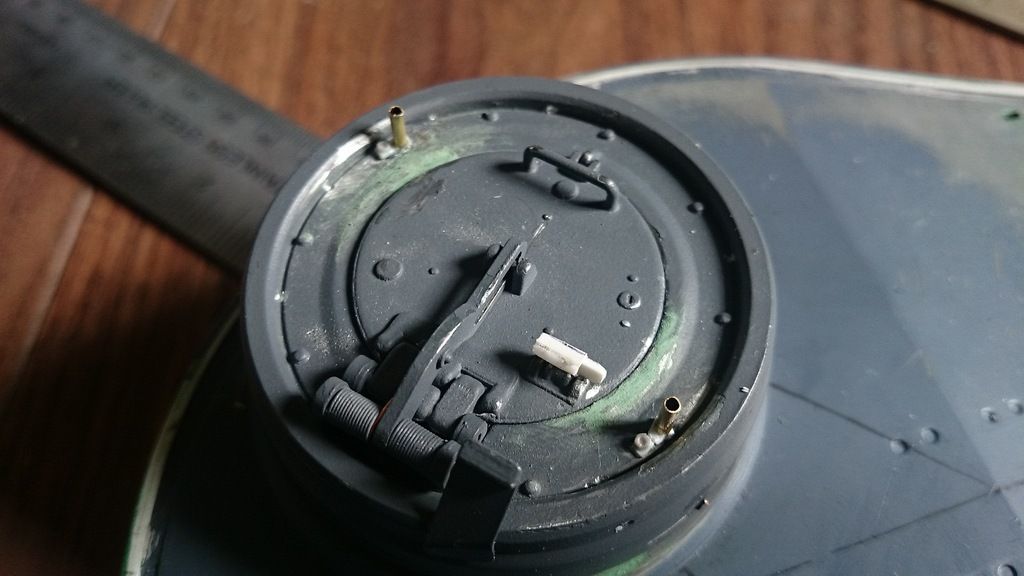
Have cleaned up the nearest brass rod which was a bit rough post cutting

Moved onto the Feifel system

Cut the top section off the HL cleaners and added a 10 though styrene sheet to create the top. Next up was to create the top canisters. Using 17mm Aluminium tube ( ebay ) which is just about spot on dimension wise, the next thing was to cut it to about 8.5mm height and ensure that the top and bottom horizontal cuts were straight. Normally when I cut something it tends to be well off square so I needed to come up with a solution to cut each section the same height and with square tops and bottoms.

My solution was to use a brass tube cutter I had. Using this I scored a line around the tube. The aluminium was too thick to use the cutter all the way though. So Once I had the line grooved into the aluminium, I took my trusty ( rusty ) hacksaw and working in sections, rotating the tube as I cut into it, I first created a deeper groove that the hacksaw blade could then use as a guide to cut deeper and eventually all the way through.

And amazingly they 4 canisters all ended up exactly the same height and square top and bottom...RESULT :clap:

Image

Image

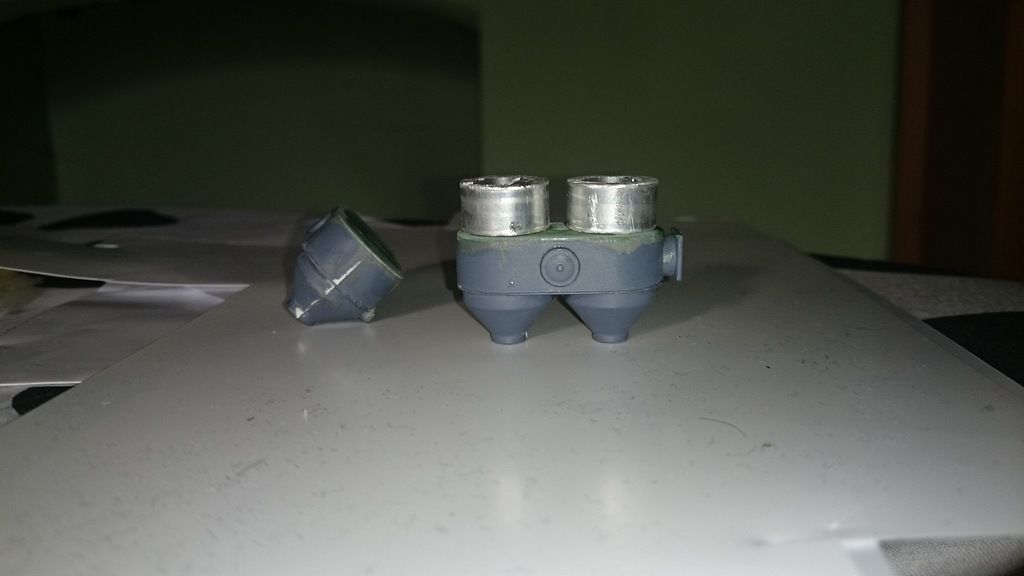
The interconnecting pipe is a 7.8mm styrene rod ( again about spot on ) from my styrene spares box. Cut into 4mm rings, they will be slotted between the canisters.

I was worried by the Feifel canisters but they are coming along far easier than I had expected.

More pics soon dudes.
Abe Froman
Lance Corporal
Posts: 153
Joined: Wed Feb 11, 2015 10:00 am

Re: ABE'S EARLY TIGER 1 BUILD

Post by Abe Froman »

As I still have a styrene lid to place on the top of the cannisters, I thought they were a mm too high, so I have just spend two hours sanding the aluminium down. Using 120 grit sheets, I sanded the two assemblies in figure of eights on the paper. The figure of 8 is a technique from fibre optic experience..by using a figure of 8 the pressure forces are spread all over the shape rather than repeating sanding in one direction.

Using the 8 pattern means you are more likely to be flat and square at the end. That's why it took 2 hours :thumbdown: but the result is a :thumbup:

Image

As you can see, I have had to apply some green stuff where the plastic joining pipe cracked under the strain of sanding. Once dry I will tidy it up.

Still to do this weekend:

Drill the tiny holes in the gun barrel, fir the muzzle attachment bracket and bolt. Fit the loaders hatch swing arm and make a internal joining bracket for the arm. Once that's done I can finally fit the gun and seal up the turret which will be a milestone for me.

Really need to tidy up the kitchen and the bathroom where it appears someone crept into the house at night and set off grenades in each room..either that or the kids trashed the place :haha:

Catch you all next week
Abe Froman
Lance Corporal
Posts: 153
Joined: Wed Feb 11, 2015 10:00 am

Re: ABE'S EARLY TIGER 1 BUILD

Post by Abe Froman »

Finished the Fiefel cannisters/filters including considerable damage

Image

And with some primer

Image

Image

Happy with the way they have turned out. Its been a lot of work but I guess you should treat each item as an individual model in its own right.
Abe Froman
Lance Corporal
Posts: 153
Joined: Wed Feb 11, 2015 10:00 am

Re: ABE'S EARLY TIGER 1 BUILD

Post by Abe Froman »

Added the missing lid rim in electrical tape, cut very thin...waffer thin

Image
User avatar
HERMAN BIX
Brigadier
Posts: 10338
Joined: Sun Jan 12, 2014 12:15 am
Location: Gold Coast,Australia

Re: ABE'S EARLY TIGER 1 BUILD

Post by HERMAN BIX »

Those would have to be THE best representations of early filter housings I have seen so far Mr Froman :clap:
You suuuuuure you cant make this thing move ?? :eh:
HL JAGDPANTHER,HL TIGER 1,HL PzIII MUNITIONSCHLEPPER, HL KT OCTOPUS,HL PANTHER ZU-FUSS,HL STuG III,HL T34/85 BEDSPRING,
HL PZIV MALTA,MATORRO JAGDTIGER,HL F05 TIGER,TAMIYA KT,HL PANTHERDOZER,HL EARLY PANTHER G,TAIGEN/RAMINATOR T34/76,
HL AN-BRI-RAM SU-85
Abe Froman
Lance Corporal
Posts: 153
Joined: Wed Feb 11, 2015 10:00 am

Re: ABE'S EARLY TIGER 1 BUILD

Post by Abe Froman »

HERMAN BIX wrote:Those would have to be THE best representations of early filter housings I have seen so far Mr Froman :clap:
You suuuuuure you cant make this thing move ?? :eh:
H, It will move in the way that all my Thunderbirds toys did when I was a kid.....you pushed them

And thanks for the kind words Herman, especially from such a talented builder.

Still thinking on those hoses!!
User avatar
DavidByrden
Corporal
Posts: 300
Joined: Wed Sep 08, 2010 6:13 pm
Contact:

Re: ABE'S EARLY TIGER 1 BUILD

Post by DavidByrden »

Abe Froman wrote:Finished the cuppola.
Are you sure? Look where this one is pointing;

Image
Abe Froman
Lance Corporal
Posts: 153
Joined: Wed Feb 11, 2015 10:00 am

Re: ABE'S EARLY TIGER 1 BUILD

Post by Abe Froman »

David, have no fears...its pointing in the right way duder
Abe Froman
Lance Corporal
Posts: 153
Joined: Wed Feb 11, 2015 10:00 am

Re: ABE'S EARLY TIGER 1 BUILD

Post by Abe Froman »

David, see what you mean looking back at the photos, but I had just dumped it on and not glued it, not orientated it to how it should be.

D
Post Reply

Return to “Heng Long Builds”