Zmader22 wrote:Just bought a king tiger and right out of the box the gun will not fire the bb's tried everything and can't fined a diagram to take it apart I can c all the screws just alittle worried about taken it apart so the ? Is is there any diagrams for taken it apart to solve the problem any any suggestions
Looks long and intensive it's not...the act is less wordy. Once you do it you'll feel better about running your tank.
1) 8 screws (Phillips/cross heads) holding the upper hull to lower, 6 are in recessed holes, 2 are at the rear of the sponsons just forward of the rear mud flaps.
2) Lift upper hull a few inches and unplug the 2 cables from the mfu side.
3) Flip upper hull/turret assy. over, unplug the plug that has 3 wires from the hull I/O board, you should have 3 cables that are lose now.
4) Remove the 5 screws holding the white turret ring gear and remove ring gear.
The turret now can be dissembled.
5) Remove the 8 recessed screws. Set the turret "floor" aside.
6)Remove the 2 screws that are holding the front face of the turret and mantel. One is under the fire warning LED and the other is on the opposite side.
note: there is an elevation spring under the shooting unit.
7) Slide the complete gun assy. forward. The unit will pop up from the elevation spring as soon as the "tang" clears the elevation cam.
7a) This doesn't have to be performed but gives you more work freedom...
-remove the screw on the shooting unit that holds a cover that hold the wires and motor in place. From the other side push the motor out, use a pusher (Phillips screw driver) that has a smaller diameter then the brass gear on the motor shaft. This will keep from damaging the plastic gears.
-reinstalling: press motor in while watching gear end, making sure gears align, I use dikes/side cutters on the shaft that sticks out on the bell end too turn the shaft.
8 ) Remove the two screws on the shooting unit holder -front of the unit, it's green.
9) Pull the shooting unit off the barrel, can take some effort. step 7a helps here.
9a) HL KT specific. Checking the barrel location in its mounting.
a. check tightness of the barrel set screw, can be seen from bottom between unit holder and turret face.
b. loosen set screw.
c. push barrel back as far it will go...visualize it going deeper into the shooting unit.
d. while holding step c pressure tighten set crew...not much torque needed here.
Following is what has always worked for me...
10) Put a "little" teflon tape on the barrel end. Degrease barrel outer surface first.
11*) Reinsert barrel into the shooting unit, try not to twist, trying to use very smooth force.
12) Reverse step 8.
Test firing.
13) Rig upper hull so you can attach all wires normally this mean upper hull upside down laying on lower hull, rags in-between so no scratches occur.
14) Manual feed single BB's.
15) Works fine, reassemble. Don't use German torque** -coarse steel screws into plastic, they may have felt very tight when removed, that's because the screws self tapped and the cut material bits work as a locking mechanism.
16) If not working to spec.
a. cycle unit till the breach is open, done by moving the joy sick for short durations.
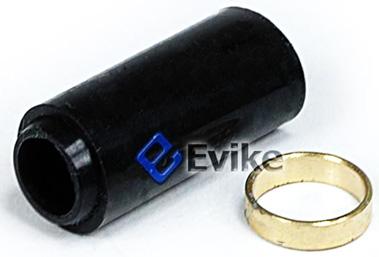
b. from the front of the shooting unit, use tweezers to pull the seal too the edge of the shoot unit, making sure its squared up in the tube.
c. re-due step 10, now put a little "pure silicone lube" (no petroleum) on the barrel face that contacts the seal.
d. step 11...step 15.
*If you do upgrade to a Taigen shooting unit and don't solder, do step 7a and reuse the original motor, the Taigen needs two wires solder -one to the LED and one to the switch. Using the original motor and wiring is still going to be a upgrade.
While you have your tank open check the lube on the gears, had a T-34 with no lube.
**German torque: "good and tight" said with heavy German accent "gude-n-tight".