Page 1 of 1

Technology conversion of a Panzer III

Posted: Wed Jun 26, 2013 6:58 pm
by Edwin
hi,

Today I have begun to transform the art of a Panzer III.

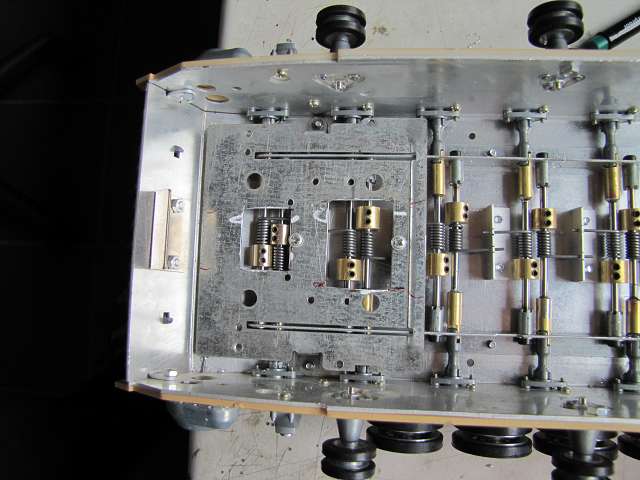
The Bassist is a metal tub of Asiatam where I retrofits the first the suspension and the chain tensioner. Then it is still getting a brushless motor with real inertia as far as this takes place.

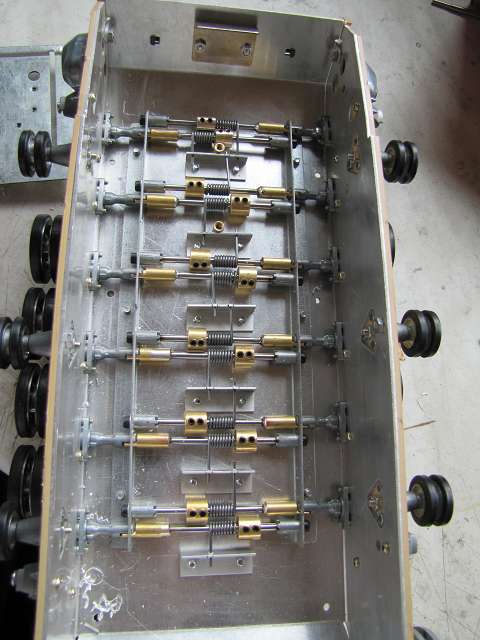
But today was the first suspension of the series.
I built in my known construction.

http://up.picr.de/14980423yi.jpg

http://up.picr.de/14980424pz.jpg

To screw the mounting plate of the gear in the tub two larger holes were necessary in this.

http://up.picr.de/14980425pg.jpg

The springs in the shock absorbers are not necessary and would only negatively affect, so I removed it the driving behavior. Thus, the shock but I had not snarled stick a piece of brass tubing for the springs.

http://up.picr.de/14980426xm.jpg

http://up.picr.de/14980427sp.jpg

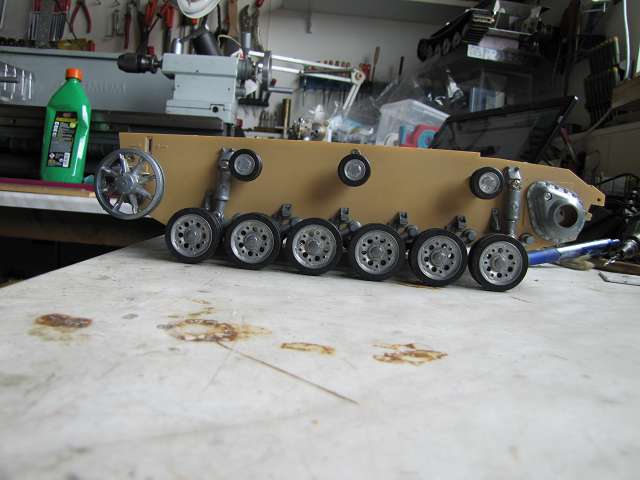
Thus, the shock absorbers are now running into each other perfectly and the suspension works.

http://up.picr.de/14980428jk.jpg

Re: Technology conversion of a Panzer III

Posted: Wed Jun 26, 2013 11:39 pm
by Red Devils
Looks great Edwin, I'll be tracking this one...

Derek

Re: Technology conversion of a Panzer III

Posted: Thu Jun 27, 2013 6:15 pm
by Edwin
After the suspension was now finished first in the chain tensioner on the series. In principle, this would be quite good, but he has a relevane vulnerability. He has no stable connection to the aluminum tank and just sits on two plastic mushroom a plastic cover and this is only on the aluminum tank on. In addition, the aluminum tray at the rear is not exactly a paragon of rigidity.

So I am building a rod passing through the trough both a chain tensioner connects and reinforces the tub.
For this purpose, I first cut me a piece of 10mm aluminum.
k-IMG_3635.JPG
k-IMG_3635.JPG (34.65 KiB) Viewed 2526 times
I have provided at the ends, each with a M3 thread and it turned on so that the chain tensioner sit well on it.
On the tub I had to drill a 10mm hole instead of each of the two plastic mushrooms.
k-IMG_3636.JPG
k-IMG_3636.JPG (29.44 KiB) Viewed 2526 times
So now I was able to push through the connecting rod and stick to the pan.
k-IMG_3637.JPG
k-IMG_3637.JPG (25.67 KiB) Viewed 2526 times
k-IMG_3638.JPG
k-IMG_3638.JPG (29.45 KiB) Viewed 2526 times
But the tub is so not ready. I still need shoring axis of the drive axles.

I mount this gear in the tub and put a ball bearing on each axis.
k-IMG_3639.JPG
k-IMG_3639.JPG (23.16 KiB) Viewed 2526 times
To the ball bearing I put a bead kneading epoxy.
k-IMG_3640.JPG
k-IMG_3640.JPG (29.98 KiB) Viewed 2526 times
Then I press the countershaft cover and screw him. The inside and outside overflowing epoxy I push a screwdriver between the bearing and the inside cover.
k-IMG_3641.JPG
k-IMG_3641.JPG (30.41 KiB) Viewed 2526 times
So I get a very simple and effective axle support which holds great.
k-IMG_3642.JPG
k-IMG_3642.JPG (31.26 KiB) Viewed 2527 times

Re: Technology conversion of a Panzer III

Posted: Fri Jun 28, 2013 7:34 pm
by Edwin
Since I'm at the Experts' in Mainz at the weekend I wanted to get the tank ready to drive yet still somehow and with a few small settings I'll probably be able to make the first test drive as well.

Today I got out the flywheels made ??to the engines and for that I had to let something new come ir since the transmission does not allow rings around the engines. So I simply flanged to the engine.

But first I had to cut two pieces of 40mm steel rod.
k-IMG_3643.JPG
k-IMG_3643.JPG (32.86 KiB) Viewed 2506 times
This I then turned down according to my experiences and.
k-IMG_3644.JPG
k-IMG_3644.JPG (35.68 KiB) Viewed 2506 times
k-IMG_3645.JPG
k-IMG_3645.JPG (28.97 KiB) Viewed 2506 times
The attachment I'm doing this time with four M2 screws on the back of the engine bells. I have to install next to the central centering still 4 holes 12mm bolt circle in the flywheels.
k-IMG_3646.JPG
k-IMG_3646.JPG (41.04 KiB) Viewed 2506 times
So I can then screw the motors.
k-IMG_3647.JPG
k-IMG_3647.JPG (28.92 KiB) Viewed 2506 times
Then I had to install only the gear, tilted slightly in the pan, but also a simple solution occurred to me.
k-IMG_3648.JPG
k-IMG_3648.JPG (55.22 KiB) Viewed 2506 times
The coming of the chains was only a formality, since the chain gauge agreed right away. Now I have tomorrow only program the controller and poke my test board and a test drive, nothing stands in the way.
k-IMG_3649.JPG
k-IMG_3649.JPG (39.28 KiB) Viewed 2506 times
This time, I'm particularly excited because I had to deviate from my usual design standards for the flywheels.

Re: Technology conversion of a Panzer III

Posted: Sun Jun 30, 2013 5:55 pm
by Edwin
This weekend, Michel could now test drive his new Panzer III tank thoroughly and we could see how strong the inertia affect the driving behavior ... :D :thumbup:

Simply put, perfect. The drive is not retracted yet, but it runs about 2.5 to 3 vehicle lengths and the handling is very good for a lighter armored prefer old movies when I was growing as a comparison. As a small side benefit is also reduced significantly the minimum speed because the engines overcome the inertia dead centers of the winding at slow speeds significantly easier and run more slowly so clean. The typical start twitching of brushless Brushless is hardly available.

But of course here also a little video to the tub.

http://www.youtube.com/watch?v=xuANIkhI ... e=youtu.be