Page 10 of 12
HAYA Centurion Mk3. TAMIYA Deep Bronze Green?
Posted: Sat Oct 12, 2024 9:05 am
by zooma
Unfortunately we don't have a local model shop any more, so I don't get the chance to go in and browse the paint racks to see what shade of Tamiya paints would be the closest match to DEEP BRONZE GREEN.
I have some areas of Kermit Green plastic to cover on my RTR HAYA Centurion, so I would like to get as close as possible to the original paint colour as I can, but I am also happy to over-spray the complete model in Deep Bronze Green (may not be a bad idea) - especially if Tamiya have a "rattle can" colour that is close enough as I will end-up shading and weathering the model afterwards in any case.
I'm aware the Humbrol have a Deep Bronze Green spray - but I would like to find a similar colour in the Tamiya paint range - if possible?
Re: HAYA Centurion Mk3. First Impressions.
Posted: Sat Oct 12, 2024 11:22 am
by jarndice
DEEP Bronze Green.
Re: HAYA Centurion Mk3. First Impressions.
Posted: Sat Oct 12, 2024 3:08 pm
by zooma
jarndice wrote: ↑Sat Oct 12, 2024 11:22 am
DEEP Bronze Green.
Corrected - thanks !
Bob.
Re: HAYA Centurion Mk3. First Impressions.
Posted: Sun Oct 13, 2024 10:30 pm
by Herr Dr. Professor
HAYA Centurion Mk3. Deep Bronze Green.
Posted: Tue Oct 15, 2024 1:56 pm
by zooma
Thanks for that Prof.
One suggestion is to use Tamiya XF-11. IJN Green
Another suggests a mix of Tamiya paints:-
x1 parts XF81.
x2 parts XF8.
x1 part XF5.
From a different source a mix of Olive Drab and NATO Green has been suggested.
I am guessing that if the model is to be "weathered", then the actual shade does not have to be perfect - as long as it is "close enough"....?
HAYA Centurion Mk3. Turet Boxes.
Posted: Thu Oct 24, 2024 3:17 pm
by zooma
I have temporally fixed the turret boxes onto the side of the Centurion turret and I think it may be difficult to get the top section of the turret off once they are glued into place?
Some tests on this will have to be done before gluing them on as it may be necessary to remove the top section if the gun mechanism should any repairs be needed in the future.
I am not sure if these side boxes can "stay put" in use if they are only press-fitted into position.
The lids have been glued onto these three box mouldings, so when the glue is fully set I will experiment to see what option will work the best.
I would prefer to glue them on if I can.
Re: HAYA Centurion Mk3. Loose wires!
Posted: Sat Nov 09, 2024 10:57 am
by zooma

- This is the supplementary board used with the barrel smoking unit - note the frayed cables above and below.
- 7726F411-DAC1-4B29-91F5-8D0AC1DB1EE0.jpeg (688.93 KiB) Viewed 1775 times
I lifted the deck on my RTR HAYA Centurion (like I would do to change a battery) in the hope that I could see where all the plugs were fitted to help me wire up the Clark board in my Centurion KIT.
It was then that I saw the small supplementary board that was there to support the barrel smoke function that comes with the RTR Cent .....and noticed that the four main red and black wires attached to it were loose and frayed - and one of the frayed black wires was no longer attached.
I could see where the wires belonged (location and length of wire etc) so I twisted the frayed ends of each wire together and let some solder flow into them to tidy them up before re-fitting them and making sure that the screws that held them were fully tightened!
Small cable ties were added to the pair of back wires and the pair of red wires to help keep them in place.........but I have a hot melt glue gun now (!) so maybe I will take another look at this when everything is nice and tidy and maybe add some glue to all the small cable plugs to stop them pulling-out as they do come under a lot of strain every time the top deck is removed to change the battery!
Fortunately for me, when I switched the power on again everything worked!
Due to the poor (low power) performance of this RTR tank (and building the HAYA Centurion KIT) I have probably only driven it 2 or 3 times from new, so I was surprised to see the loose and frayed wires. This may be something for other RTR HAYA Centurion tank owners to check as it is easy to fix and may save future problems.
Re: HAYA Centurion Mk3. First Impressions.
Posted: Sun Nov 10, 2024 12:50 am
by tankme
Having worked as an electrician and trained in electronic repair, I have to say using stranded wire in this application is a bad idea. Common practice in electrical work is to use solid wire when you are attaching them around screws like that. You would wind the solid wire around the screw so that when the screw is tightened, the wire tightens around the screw. Since this is stranded wire, that method is not recommended as the tightening in this case cuts the strands of wire off making the wire smaller and weaker. What I would do to connect these wires to the board using the existing stranded wire? Ring or fork connectors crimped or soldered to the stranded wire. That will eliminate the issue of the wires pulling off those terminals. Of course the make them with insulation, but I prefer to insulate them with shrink tubing after soldering them on. JMHO...

Flux is your friend when soldering.
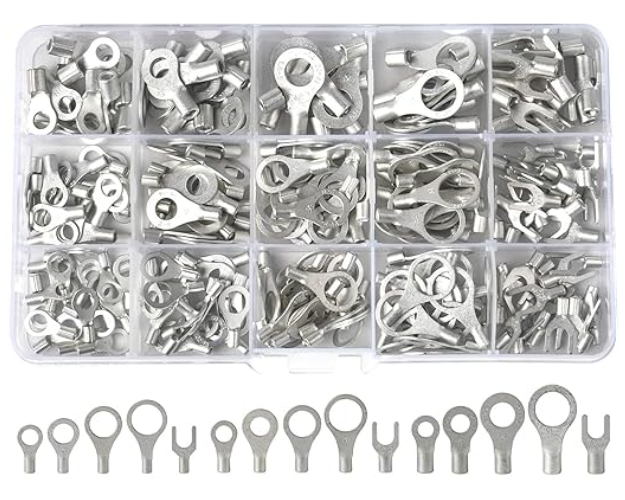
- ring terminals.PNG (518.3 KiB) Viewed 1759 times
Re: HAYA Centurion Mk3. First Impressions.
Posted: Sun Nov 10, 2024 1:00 am
by Ecam
tankme wrote: ↑Sun Nov 10, 2024 12:50 am
Having worked as an electrician
So what happens when you touch both wires with your fingers?
Re: HAYA Centurion Mk3. First Impressions.
Posted: Sun Nov 10, 2024 2:13 am
by tankme
Ecam wrote: ↑Sun Nov 10, 2024 1:00 am
tankme wrote: ↑Sun Nov 10, 2024 12:50 am
Having worked as an electrician
So what happens when you touch both wires with your fingers?
Now that depends on which wires and which fingers...