Page 9 of 41
Re: HL Panther G customization diary
Posted: Sat May 12, 2012 8:13 am
by jeff1101
Updates cont'd.
Next up I decided to detail the tool brackets themselves. Just adding stuff like the straps that was originally molded to the tools themselves. Since I plan to paint the tools separately I have to find a way of attaching the straps and having it so that the tools can be mounted/dismounted for painting.
I started with the tool rack that holds the spare hammer. I was particularly scared of ruining the model at this point since I don't even know If my idea will be structurally sound or even if the CA glue was up to the task.

First I shaved off the molded on strap on the hammer.

Before

After

Then using the metal sheet from the baking container, I cut some more metal strips to size and began to fashion the straps for the hammer.
Here are the progression picks. I decided to glue only one end of the strap so that I can still dismount the hammer for painting.


And attached to the tank.

Re: HL Panther G customization diary
Posted: Sat May 12, 2012 8:23 am
by jeff1101
Re: HL Panther G customization diary
Posted: Sat May 12, 2012 8:35 am
by jeff1101
Updates cont'd Fitting it all together

I also added the metal strip used as an end stop at the end of the shovel handle.

And the shovel mounted

Here is the blade guard for the axe attached to the bracket. I removed the fire extinguisher so it can be seen better.

And here's how it looks with the axe attached
Re: HL Panther G customization diary
Posted: Sat May 12, 2012 8:49 am
by jeff1101
Updates cont'd
The trickiest part was the bolt cutter handle guides.

I have to make the curves larger and the ends opened quite a bit so I can still remove the bolt cutter.

Attached to the tool bracket

With bolt cutter attached
Re: HL Panther G customization diary
Posted: Sat May 12, 2012 9:07 am
by jeff1101
Updates cont'd
Took a break from the tool brackets and decided to detail the commander's cupola.
I have been wanting to try the technique for texturing certain parts of the tank (to simulate cast metal) using plastic cement. I got my tamiya plastic cement and started stipling the cement on the surface of the commander's hatch using a brush. Not too heavy as I wanted the effect to be subtle.

Before

After.
I just hope though that the texture stay visible after the tank is painted.
I also took the time to finally attach the cupola reference sight using metal sheet. (Same material I used for the tool bracket)


Re: HL Panther G customization diary
Posted: Sat May 12, 2012 9:24 am
by jeff1101
Paint plans
I know I'm still a long ways off from completing detailing the tank but I already have plans for the camo paint scheme. Guys please chime in and tell me what you think, but I am planning a western front (again) scheme from the ardennes campaign period.
Also from this forum I think I found what I liked.
http://www.rctankregiment.com/rctankfor ... e54c37e567
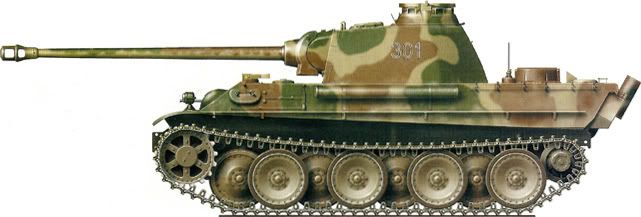
Its got everything that I currently have - Its a panther G, chin mantlet, flammenvernichter exhaust etc. I would have liked it to have at least a balkan cross on it but since this is a side view It may have the balkan cross on the stowage boxes.

The tank is from the Fuhrer Grenadier Brigade, a motorized infrantry rather than a panzer brigade(division?) attached to GrossDuestchland. It is a Heer unit (Regular Army) and not Waffen SS. However it is still considered an elite unit.
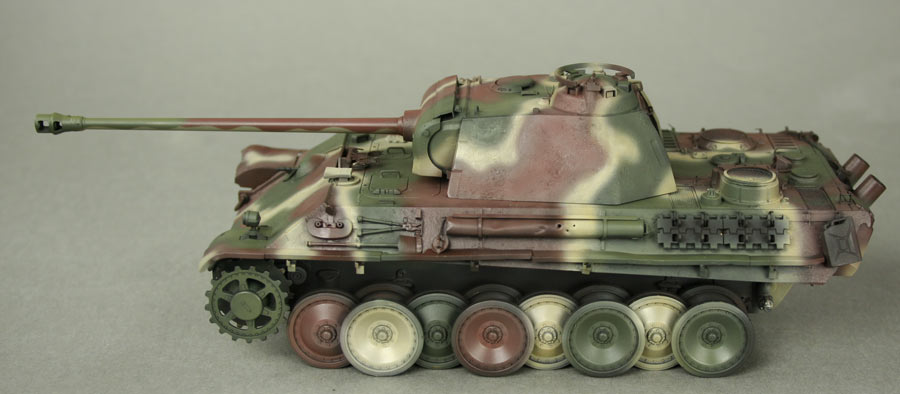
As for the tri-color shade, Im leaning to what Jason Boulter painted on his tank (darker shade). It looks like he was also looking at the same drawings as the camo pattern on his tank matches the illustration very well.
http://www.network54.com/Forum/527528/t ... +base+camo
Re: HL Panther G customization diary
Posted: Mon May 28, 2012 4:43 pm
by jeff1101
Updates 05/28/2012
Made a lot of progress today. Here are the pics so far.
I wanted to detail the turret mantlet by adding the gun depression stop. Since it was fairly easy to do, I decided to add the detail anyway. The stops are for looks only and are non functional. (Although the original tank had them)

first I marked where I will put the stop with pencil.


I then cut plastic strips into sections and the proper shape.

Since the strips were too thin, I cut a couple and pasted them together.

And here it is attached to the tank. By the way I made 2 of these for both sides of the mantlet.
Re: HL Panther G customization diary
Posted: Mon May 28, 2012 4:54 pm
by jeff1101
Updates cont'd
Next, I decided to add the stop for the hatch cover of the commander's cupola. In the original tank, this prevented this hatch cover from swinging too far to the side of the tank.

I first made a cut on the curved section of the hatch lid hinge cover so that I can have a flat section to attach the stop to.

I also filed it to flatten it further.

I then made the stop using plastic strip and accompanying cross piece.

And here it is attached to the cupola hinge cover.
Re: HL Panther G customization diary
Posted: Mon May 28, 2012 5:14 pm
by jeff1101
Updates cont'd
I also continued adding small details around the tank.


The MG ball mount really bothered me since it showed how thin the front plastic of HL tanks really were so I added depth to it using putty.


I also added the weld beads for the rear tow cable holders.
Re: HL Panther G customization diary
Posted: Wed May 30, 2012 3:33 pm
by jeff1101
Updates May 30, 2012

Detailed the jack block some more by adding the braces that hold the jack block to the tank sides. This was not included in the original molded part.

Here I began adding the braces using plastic strips.

And here it is re-attached to the tank. This is a dry fit as I plan to remove the block for hand painting it when the rest of the tank is painted.


