Page 9 of 25
Thanks jarndice
Posted: Fri Oct 04, 2024 11:38 am
by zooma
jarndice wrote: ↑Wed Oct 02, 2024 10:53 am
Happy anniversary Bob,

We celebrated our 51st on the 19th of last month (September),
I don't know about you but it was the best decision I have ever made.
Thank you jarndice - and the same here

Best decision I ever made too!
Stay safe,
Bob.
HAYA Centurion KIT. Missing Parts "sorted"
Posted: Sun Oct 06, 2024 3:33 pm
by zooma
As I opened the door on my return home his afternoon I spotted a very small but very welcome padded envelope from HAYA.
Inside it are the small parts I needed to complete all the areas of the build (prior to the turret assembly).
A rubber tyre to fit to the "naked" drive wheel, and a bazooka plate support to replace the fractured one - (still don't know how this happened - but with Andrew acting as the "rear gunner" it doesn't matter as his support has been unfailing).
I was able to fit the tyre onto the drive wheel without removing the track as it was easy to turn the wheel as I fed the tyre onto the rim, and the bazooka plate support strut was only a "push-fit" in any case so both of these parts were fitted within a minute or so.
The exhaust heat shield (that was the third item shown in the small parts that I received today) may have confused some followers of this build, but the reason why it was sent to me by Andrew (at HAYA) was because I had two right hand covers in my kit (but no left hand cover), and the staggered spacing of the mounting pillars make it impossible to fit them on the wrong side!
Both exhaust heat shields are now safely fitted into place using 2.6 x 6 STS. The reason why these covers are screw fitted (rather than glued) is to allow the flexible exhaust smoke tubes to be fitted and replaced as needed. I have chosen not to fit these flexible "smoke tubes" at this stage as I am not sure if I want to fit the supplied exhaust smoking unit or not.
I do like to see the smoke coming from the exhaust pipes (I never did grow-up!) - but not enough to go through the fiddly hassle of re-fitting the two flexi-tubes in the small available opening between the hull and partly fitted top deck every time I change the battery!
I will take a good look at the Tongde Centurion to see how they fit the smoke unit to the underside of the top deck, and if I can find a way to do this on my HAYA Centurion it will mean that the smoke tubes can stay fitted when the "top deck" is lifted (for any reason) so I can still enjoy my childish fascination of seeng smoke coming from the exhaust pipes without the annoyance of trying to fit the floppy smoke tubes - which is a bit like trying to tie your shoelaces through a letter box ( I would image!).
Now I need to raid my small machine screws stock to see what I can find to fit the main gun barrel support brackets onto the front of the turret with..................

HAYA Centurion KIT. Barrel Mounting 'sorted !
Posted: Sun Oct 06, 2024 5:15 pm
by zooma
A few days away can make all the difference when returning to a kit build with a "fresh pair of eyes!
Fitting the main gun barrel retaining brackets (trunnions?) was a bit of a problem because the four moulded posts that push through the front of the central turret moulding (to hold these on with) are wider that the screw heads that could hold them in place!
The head of the most used 2.6 x 6 STS is actually smaller than the width of these mounting posts!
The flanged head of the 2.6 x 6 flanged STS is more or less the same size (marginally bigger?) than the diameter of these mounting posts and this is the screw type that is thought to be the intended fixing supplied in the kit to use for this task ?
Using this 2.6 x 6 flanged head STS could (probably) hold the barrel mounting bracket in place - BUT ONLY JUST!
It would not take too much effort to pull the complete barrel assembly away from the turret - compete with these flanged head screws still attached!
I decided that I would like to improve the strength of this joint - even though the likelihood of the barrel assembly being pulled hard enough to cause it to be detached must be very "low risk", I prefer to make this a good solid attachment.
This part of the kit assembly is not as clear as it could be, but it can be improved with very little cost or effort.
When digging through my model engineering screw boxes I found some M3 washers with wider than usual heads. These washers are sometime known as "repair washers" or "wide rimmed" or "large head" washers (they probably have other names too!), but basically they have a wider rim than a standard M3 washer would normally have and will give much more cover over the ends of the mounting pillars.
These washers have a 3mm hole in the middle of them that gives a loose fit for the 2.6 x 6 STS.......but by using the flanged head STS to hold the washers onto the inside back of the turret mounding it makes a very strong and secure fixing.
The washers that I used are stainless steel and so they are very strong but not too thick.
It would be possible to use similar sized plastic washers, but these would be thicker and would leave less threaded screw shaft embedded in the plastic gun mounting brackets - and I prefer to have this part of the assembly to be as strong as possible.
HAYA Centurion KIT. Upgrade RTR Gun Mount too!
Posted: Sun Oct 06, 2024 5:42 pm
by zooma
Now that I have seen how the HAYA Centurion main gun mounting is fixed, I will be upgrading my own HAYA RTR Centurion by fitting four wide M3 "repair washers" (as shown above).
One major advantage of building a KIT of an RTR model that I already own is that it has given me the opportunity to see exactly how the model is put together.
This will help me to understand how to service and repair my RTR model much better - and in this particular instance - it as also revealed what I consider to be a weakness in the construction that I can easily improve at no great expense.
Readers of this Amateur Build may also find it a helpful resource to refer to when making a repair or fitting replacement damaged or worn parts to their own RTR model - without having to buy a KIT to find out how it all fits together!
........having said that - I would strongly recommend buying this HAYA KIT (if funds permit) - just because it is a very enjoyable and educational kit to put together !
HAYA Centurion KIT. Fit the Gun !
Posted: Sun Oct 06, 2024 6:20 pm
by zooma
At this stage the assembled main gun unit can be sprung in-between the two mounting brackets (trunnions?) as the central section of the turret is fairly flexible and easy to pull apart enough to slip the unit into place.
When the (very nicely fitting) top and bottom parts of the turret are fitted to this middle section it will become a nice strong "box" assembly.
I think the turret top would be the first part to screw onto this middle section, but as I do not have a "board" to fit yet I am not able to centralise the servo arm that will operate the recoil action, so I have chosen to fit the bottom half of the turret as it leaves this servo "exposed" so I can fit the arm in the correct position when I know where it will rest when the radio is switched-on for the first time.
The servo arm and its retaining screw will need to be removed before the radio is fitted so it is free to find its own stop position before being connected to the operating rod.
When everything is connected and tested, the lower part of the turret will probably have to be removed again to allow access to the screws that have to be inserted through the lugs in the middle turret part to secure the turret top.
HAYA Centurion KIT. Mk 5 Conversion
Posted: Mon Oct 07, 2024 11:51 am
by zooma
The replacement Mk 5 conversion includes a new turret top that fits perfectly - exactly as it should, but the new opening hatches need to be fitted carefully as they can easily be fitted upside-down!
HAYA Centurion KIT. Mk 5 Conversion - No Fitting Instructions
Posted: Mon Oct 07, 2024 12:05 pm
by zooma
Like the HAYA Centurion KIT, the Mk 5 conversion comes with no instructions to refer to.
It is easy to work out where the revised turret top fits ( and it is a perfect fit) - but as previously noted, the new hatch covers can easily be fitted upside-down......no need to ask me how I know

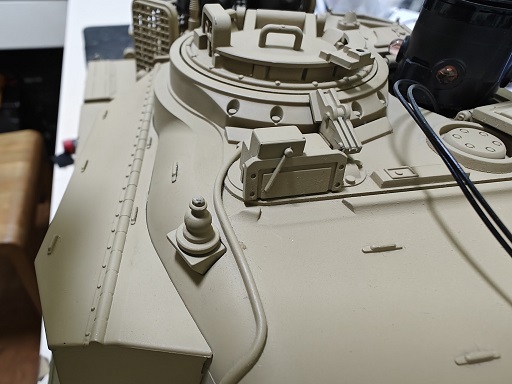
The armoured box shape fits on the glacis plate in place of the left hand spare track link holder. This has an almost plain surface - unlike the more detailed surface on the Tongde - and the 1/35 scale AFV kit shows a third variant or surface detail. Maybe there were several variants of this armoured box?
Does anyone know what this "armoured box" actually does on the real Mk5 Centurion?
Does it have a hinged lid (as suggested on the AFV kit box art) or is it a just a slab or armour plate?
Re: HAYA Centurion KIT. Mk 5 Conversion - No Fitting Instructions
Posted: Mon Oct 07, 2024 4:50 pm
by ongbenghui
zooma wrote: ↑Mon Oct 07, 2024 12:05 pm
This is just a plain shape - unlike the detailed surface on the Tongde - which one is the most correct?
Can anyone advise where the small additional moulding fits please?
Will this helps ?
- IMG20241007235501.jpg (62.74 KiB) Viewed 693 times
HAYA Centurion KIT. Lamp covers now removed
Posted: Tue Oct 08, 2024 12:31 am
by zooma
The Bob Smith "UN-CURE" superglue remover worked well enough and enabled me to remove the lamp covers that I had glued into place before threading the two legs of the light bulbs into the holes that would be hidden underneath them.
Removing these headlamp covers was my first experience of working with a de-bonder and I was not expecting to be quite so thin (like water). The fluid does eventually penetrate the hardened cyno adhesive and it becomes quite a "gooey" stooge that does not leave the surrounding surface areas untouched! I did notice that the plastic kit moulding was also left a bit "stodgy" in the immediate area surrounding where the cyno had been removed, but this has hardened overnight and can be easily restored so I will "clean-up" the fitting slots and the holes for the "legs" on the light bulbs.
The original fitting slots and holes have been revealed (and can now be cleaned-up) so I think I need to paint the glacis plate before threading the light bulbs into place after I have glued-on the Mk 5 armoured box .
At this stage, I am not sure if I should leave the Mk5 glacis plate "armoured box" as it is, or if I should add some panel details? The rival Centurion from Tongde shows various details that are not moulded into the HAYA armoured box and the 1/35 AFV kit shows yet another variation of surface detail.
Maybe there was more than one version of this armoured box? I am not looking for any extra work, but simply glueing on some strips to replicate this detail would not take long and it would be better done now than later, so I will start looking at pictures of Mk5 Centurion glacis plates to see if I can see any without this extra surface detail.
I have ordered a pair of new lamp brackets from Andrew at HAYA as removing the ones that I had wrongly glued into place has not left them looking quite as pristine as they were (I damaged the fitting legs when removing them) and so they do need replacing - especially as they need to be able to be "clicked" into position (and not glued!) so that they can be removed and replaced to access the two headlamp bulbs.
Waiting for the two new headlamp covers to come back into stock at HAYA will not slow down the build as they will be a simple "press-fit" when they arrive.
HAYA Centurion KIT. Lamp Covers
Posted: Tue Oct 08, 2024 12:10 pm
by zooma
I managed to save and “clean-up” one of the glacis plate mounted lamp covers but it has lost its rear mounting tag.
The other lamp cover was not recoverable, but I need two new replacements with all three “legs” (mounting tags) if they are to be made removable.
