Hi Everyone,
Well, it's been quite a while since I updated this thread so here goes. I have been very busy this past year, so not always able to catch up with tanking and developments here but, hopefully, this year I will have more time. Anyway I have not been entirely idle since last I posted. Indeed, I have been working extensively, on and off, for some time on the Mato M36B1 turret, and the question what to do with it exactly? I wanted to do something different, it being an unusual 'open-top' but wasn't quite sure what to do, what could be done, and how to go about it.
In the end I set myself a rather ambitious task of completely upgrading the cannon and breech. The plan was to make it not only visually like the original as much as possible, both to scale and detail, but also fully working - not just the recoil and elevation, which it already has, but also a working breech, breech block, and mechanism, able to load and ejection of shell casing, as well as redesigning the stock Mato turret internal layout to provide space for a new scratch built breech and mechanism. I also wanted to make provision for some semblance of the turret basket and hull floor, etc. Given the twin decks I built into the hull earlier I wasn't sure all this would be possible. I had it in my mind this might be achievable but not the clearest of ideas how I would work it all out for sure.

Anyway, here is a record, much abridged, of what I have done so far and where I am with it:
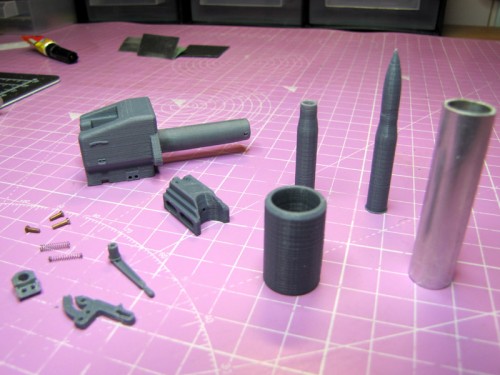
I recently acquired a small 3d printer more or less exclusively for the purpose of scratch building small components, parts, and accessories for my projects. This proved to be a good investment and after some time designing and prototyping some of the parts I would need things started to come together. In this pic is an early prototype of the breech, breech block and mechanism, barrel sleeves, and shell casing can be seen.

Here are many of those parts partially assembled into the final version of the breech. This I model on the original as closely as I could given the constraints of the Mato components it was to be matched with. In the inset picture can be seen a few of the many previous versions I worked through getting this breech as scale as I could and (hopefully) functional. The main picture shows the spring breech block ejector mechanism which I designed. This is not as the original of course but it is on the underside out of sight and so the emphasis is on function here. Also visable is the ejector spring adjuster knob at the end of barrel inner sleeve.
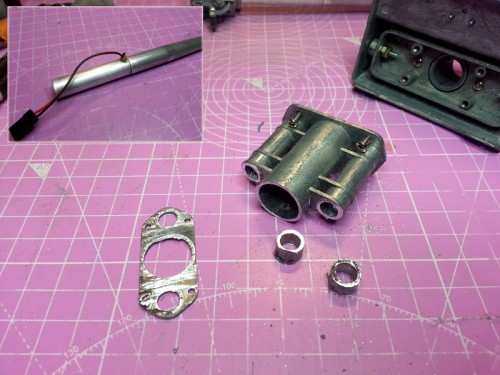
Here the barrel extension sleeve (aluminium) and the spacer sleeve are test fitted - the spacer takes up all the slack on the stock Mato parts and the extension is necessary to the design (this will all make sense, I think, soon

)
Next the Mato cannon carriage needed modifying for both the working mechanisms and to achieve the look of the original gun. The inset picture shows the barrel now fitted with the extension and a brass fitting that will act as a guide to fix the barrel position and to route the led cannon flash wiring (which is in place).

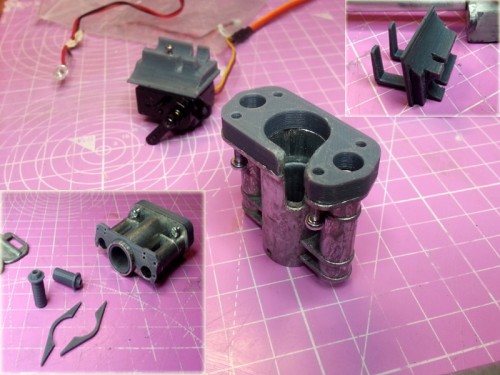
In this picture several things can be seen - The Mato gun carriage now has the slot for the brass guide tube and led writing. Also can be seen is a new base spacer to get the corrected length of the carriage once in the turret. In the bottom left inset is the face plate that the breech end of the carriage which carries the fixings for the recoil guards, the recoil cylinder sleeves (for the recoil plungers to be fitted on the breech casing), and the carriage braces missing from the Mato part. In the top, right, inset is the part I designed and printed for securing the recoil servo beneath the carriage which would then be out of sight (it can be seen assembled in the background of the main picture).

This picture shows the some of the parts further assembled. The recoil guards have now been modified to scale and the counter-weights are solid copper which actually does make the whole, when assembled, very well balanced. The recoil plungers are now fitted to the breech and the recoil cylinders fitted with sleeves and braces. The inset shows the fixing fabricated for the left side under carriage. This will provide both a pivot point for the elevation servo and a fixing for the faux ejector mechanism below the breech.
A rear view of the breech now assembled with the breech block in place for testing.
This picture shows the placement of the IR led. It sits in a 5mm tube that ports to the telescope opening on the right of the mantlet. The tube passes through the inner mantlet and the led is then built into the telescope itself (Next pic)
Here is the telescope itself in construction, made from a carbon rod, brass fitting and 3d printed eyepiece.
More parts fabricated here. In this picture the M76 sighting scope is now mounted to the gun carriage in it's own bracket. Also visible is the head rest and bracket mounted to the right of carriage above the telescope
To be continued


............

 very rich looking paint job. The exhausts look fantastic as do the welds and detail items!