Mato M36B1 Tank Destroyer (full metal)
- PainlessWolf
- Colonel
- Posts: 7816
- Joined: Sun Feb 26, 2012 9:09 pm
- Location: Southern Colorado Rocky Mountains
Re: Mato M36B1 Tank Destroyer (full metal)
Good afternoon, Doctor!
You have really worked the kinks out of a vehicle that shouldn't have had any to begin with. If you had been employed with MATO, a much better series of Shermans and Variants would have resulted. I am looking forward to your excellent detailing skills next!
regards,
Painless
You have really worked the kinks out of a vehicle that shouldn't have had any to begin with. If you had been employed with MATO, a much better series of Shermans and Variants would have resulted. I am looking forward to your excellent detailing skills next!
regards,
Painless
...Money!? What's that!?...
- c.rainford73
- Major
- Posts: 6104
- Joined: Thu Aug 25, 2016 7:34 pm
- Location: Connecticut USA
Re: Mato M36B1 Tank Destroyer (full metal)
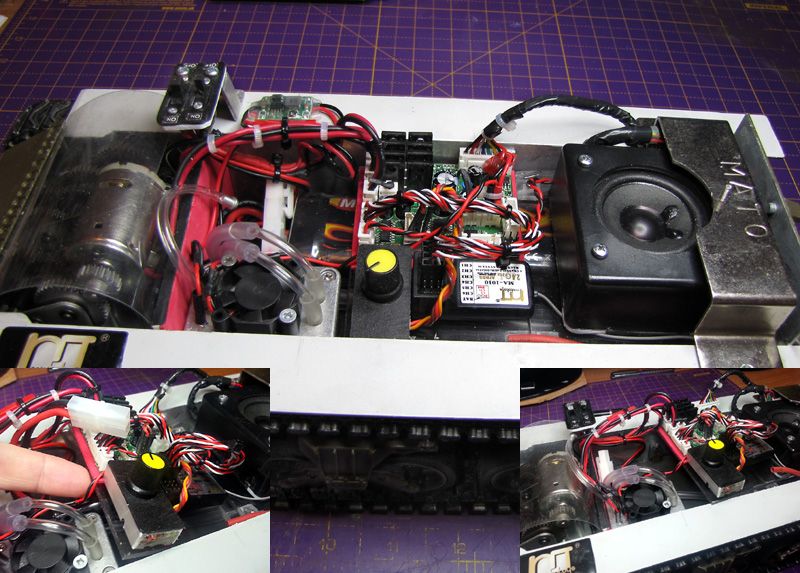
I think you are both raising the bar with these refined armor masterpieces! Hard to find better examples of these tank destroyers anywhereDr Phibes wrote:Just a little update: The lower hull now has the TK24 conversion installed (a super audio upgrade over the TK22 btw) and I have been able fit everything in as intended. Apart from the Clark board a better 10k pot for audio volume control has been added and, next to the main/smoker switch mount, can be seem a small step-down voltage regulator. This was needed because, frankly, running the Tarr smoker straight off the battery was producing too much smoke for realism.
The two insert pictures show how easy the upper deck can be moved to access and remove the battery below:
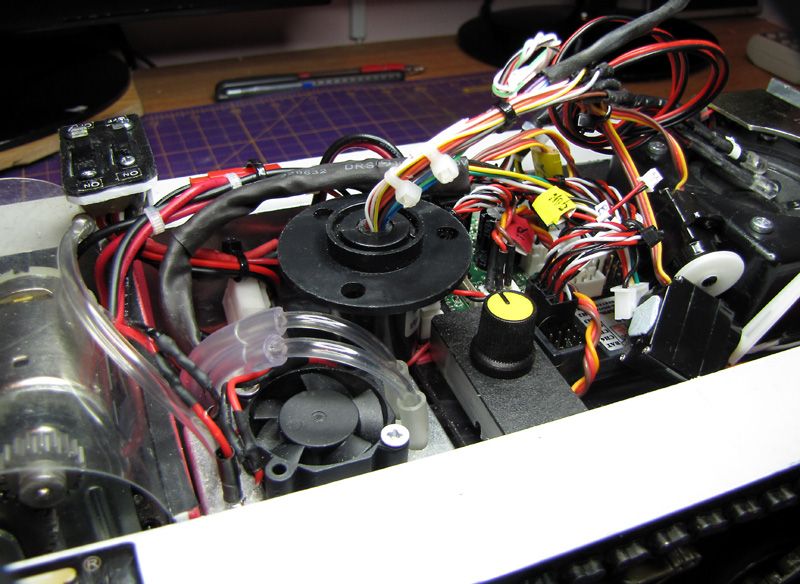
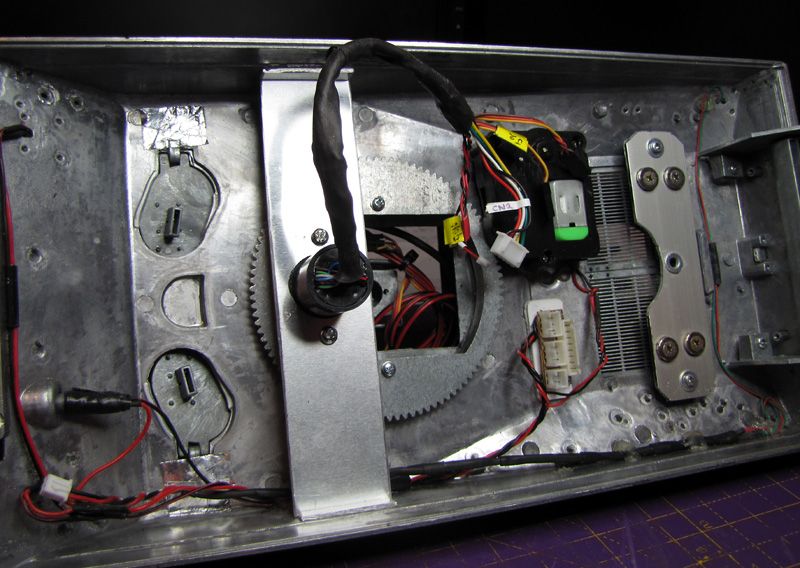
The next thing I needed to do was ascertain just where the 360 swivel joint would fit between the new upper deck and the gearbox compartment - as can be seen a snug but feasible place (as I hoped) would be just above next to the Tarr smoker. This places the large 18 wire 360 swivel quite a bit forward from centre of the turret, but it's workable:
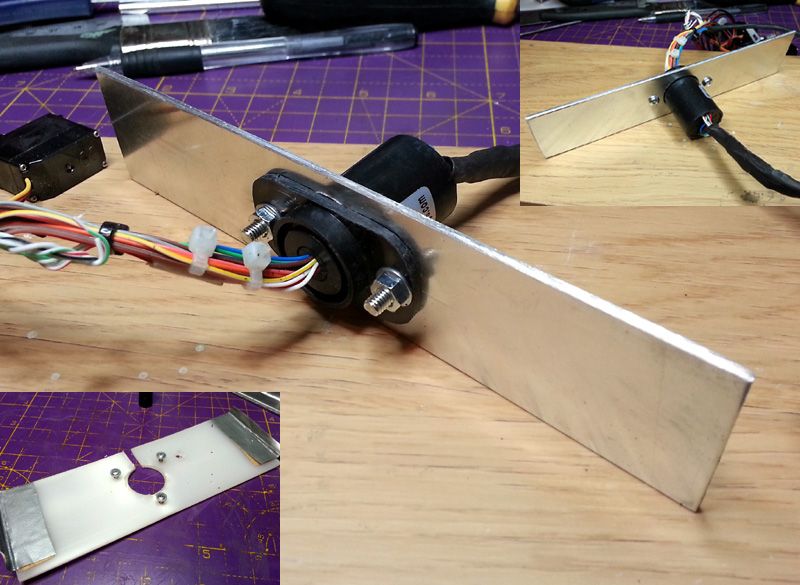
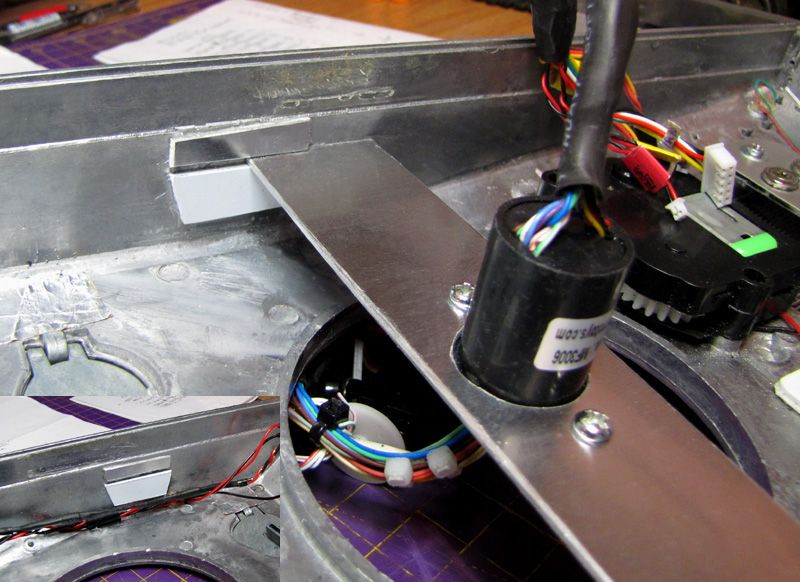
Moving on to the upper hull, I made a bridge to hold the 360 swivel in place. For this I used 2.0mm aluminum plate (the original is poorly cut plastic on mine - set inset pic) which allowed me to reduce the width of the bridge and produce much stronger fixing with the added bonus that is metal like the rest of the Mato. As can be seen, I also modified the 360 itself to a 2 instead of 3 bolt fixing:
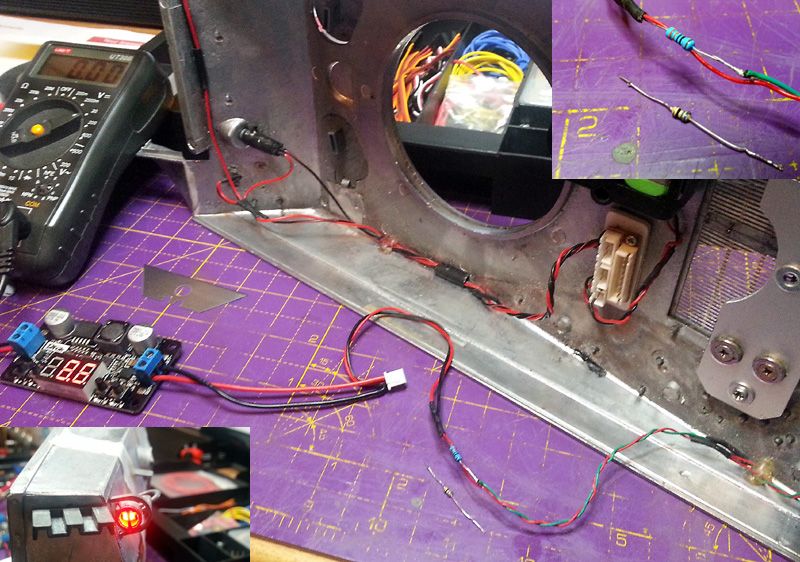
Before fitting the 360 swivel, however, I tested all the Mato upper hull wiring (oh me of little faith). What I found was that the load resistor on the tail lights was woefully inadequate. Doing the math (sort of) I'd reckoned around a 150ohm resistor was needed but what I found was a very sorry looking 60ohm component. These lights are connected direct to the smoker output by Mato. That means on a fully charged NiMh battery up to around 8.6v are pumped to these leds. This is less for the TK24 because it's proportional but with the TK22 it's full voltage all the time. When I put even 6v to the leds through this resistor it became very very hot indeed. In the end I used a readily available 330ohm resistor that allowed a fairly bright tail lights even at the lower proportional output of around 3.0v but run very cool even at the full 8.6 volts.
I thought I would add this for other owners, or potential owners, just to keep an eye on because I really don't think Mato did their homework when hooking up the tail light leds to the smoker output on the Clark board, especially considering they were/are supplying these tanks with the older TK22 (full voltage on the smoker output). The headlight output is controlled by a dedicated output on the Clark board and so doesn't present a problem like this:
Returning to the modified 360 swivel bridge, I next fixed blocks to the sides of the upper hull to allow the bridge to slide in place. This is a firm fixing but easily removable if needed:
I then fitted the metal replacement turret gear ring with bearings from DKLM so as to complete the metal transformation;
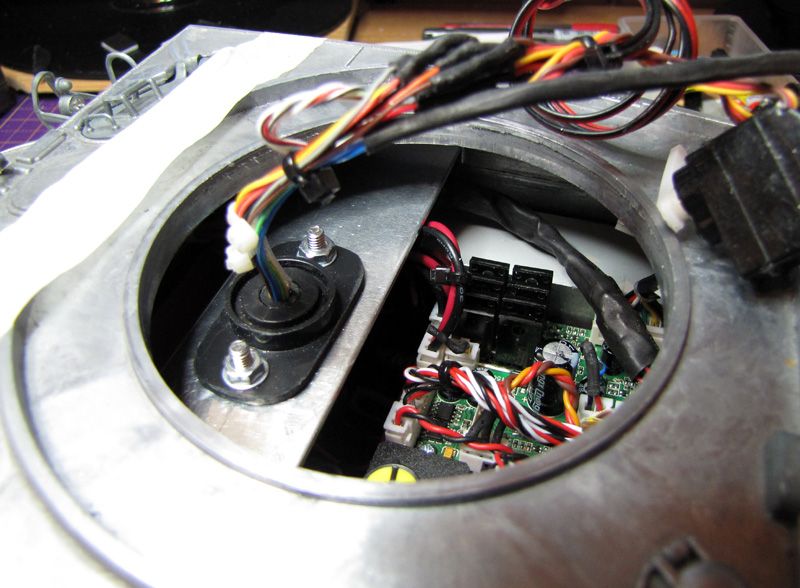
Finally, here is a picture of the finished result from the turret side; the 360 swivel drops neatly in place although, as I pointed out, it sits quite a bit forward. This means I may still have limited '360' ability depending on how inventive I can be with the turret wiring, though I'm confident it will work out fine (the tricky stuff is done);
That's all for now folks, as I say a pretty small update. Now though I am looking forward to moving from the internals and on to the scale modelling bit that Painless keeps raising the bar on!
 Beyond impressed!
Tanks alot.... 
Re: Mato M36B1 Tank Destroyer (full metal)
Well at last I have found some time to sort out the Photobucket problem and get some new pics up of progress to date. It's been a fairly slow process, not least because of working with an all metal construction and my wishing to stick to this as much as possible. Having more or less completed the lower hull time to go back to the upper hull and, in particular, the detailing work prior to priming.
To begin with I of course strip the hull down to component parts thus;
download/file.php?id=62808
I begin by installing a number of Schumo upgrade parts;
Next, I added the Aber antenna mount, the bow machine gun cover fixing ring, and the bow MG inset weld ring, which wasn't very visible.
Moving up, I fitted the Schumo blower vent cover. To do this I ground out the molded imitation on the Mato hull to provide a flusher surface (see inset pic). I then drilled through and fitted two 1.2mm bolts to the rear to secure the cover.
Next up was a re-vamp of the driver and mate's hatch doors. The original are a bit skinny (thin so I beefed them up a bit to provide a more substantial look. For the periscopes I go real lucky and found these excellent highly detailed 3D printed ones on the Shapeways website when I was searching out the gun sight Painless put me on to;
I also added a couple of smaller details, the headlight plug and holder;
And the weld seam for the glacis plate which Mato seems to have missed;
This concludes the front of the hull progress for now.
To be continued soon...............................
- c.rainford73
- Major
- Posts: 6104
- Joined: Thu Aug 25, 2016 7:34 pm
- Location: Connecticut USA
Re: Mato M36B1 Tank Destroyer (full metal)
Beautiful work with all the intricate details. A true work of art

Tanks alot.... 
- PainlessWolf
- Colonel
- Posts: 7816
- Joined: Sun Feb 26, 2012 9:09 pm
- Location: Southern Colorado Rocky Mountains
Re: Mato M36B1 Tank Destroyer (full metal)
Doc Phibes!
Now this is what I was waiting to see! I really like those periscopes! They offer more functionality than the Tamiya pieces I regularly use. Beautiful job on the cap holders and on everything else as well! I'm really enjoying the 'sit back and relax' portion of doing one of these and watching how other Builders do theirs. Following along,
regards,
Painless
...Money!? What's that!?...
Re: Mato M36B1 Tank Destroyer (full metal)
Thank you gentlemen, coming from inspiring and accomplished builders such as yourselves it is praise indeed. So, as promised, here are some further pics of the rear end of the upper hull.
Taking a sort of walk-around the rear, and starting on the left, the mods are as follows; 1) the drain holes in the bullet shields missed by Mato. Actually earlier M4 hulls had two small cut-aways in the upper of these in the pic which was later changed for the single, larger, hole seen depicted here. 2) the Mato engine door stops are too thin so, as seen, I replaced these with two I fashioned from 2mm aluminum plate which are screwed and glued in place (much more solid too). 3) next can be seen the HD Schumo lifting lugs again and, in the right corner, can be seen the Schumo rear light bush guard which again replaces the original Mato. 4) above this is the re-worked retaining post and pin for the 'little joe' (i.e. idler adjusting spanner). I ground off the original molded effort and replaced with a brass fitting;
Moving around is the re-worked travel lock. I did plan on replacing the Mato effort with the working Schumo upgrade but they turned out to be rarer than dragons poo. In the event I reconstructed the claws out of plastic sheet and pinned into slots to give a working travel lock. The tricky bit was fabricating the aluminium locking catch (see inset pic) on the engine deck that holds the travel lock in the down position;
Next is the addition of the excellent stowage rack made by EddyK from this forum. Fixinr this securely was the trick here as, like the original, it is load bearing and exposed to knocks. I drilled and pinned each hinge as well as applying CA glue for a secure fix. The other addition here is the four small bolts (fake) per hinge as on the original. I did think this was a bit over-kill at first but given how much these racks were sometimes loaded up I guess they needed a real good fixing down;
The next addition was the spare track holder locking straps. For these I made working bottom hinges and used Aber wingnuts and threaded shafts which allows for removal of the wingnut when required (unlike the Schumo wingnuts);
And then there were tools! As can be seen here a number of fittings for the various tools. The sledgehammer holder was particularly tricky (see inset) but I was very happy with the end result. I also reworked the tools themselves and added the fuel cap pins and chains as well as the tie-down 'handles' for strapping down the tools;
And a further pic of the overall progress at this stage. Clearly seen here is the addition of the bullet guard extension around the external fire extinguisher pull handle box (top left of pic). I am unclear at present whether or not this was in fact only a post war upgrade but included it anyway;
Finally, I added the barrel cleaning rods which are stored under the stowage rack. Made from barbecue sticks which are about the right diameter (as suggested by someone on this forum!);
And here, for the under side of the engine doors, I found some 'acoustic foam' which is apparently (?) audibly transparent, etc, etc. Anyway, it does the job, as they say ;
;
Well, that's it for now. There's more to follow as soon as I can get a few more pictures taken to bring the build progress up to date.
Taking a sort of walk-around the rear, and starting on the left, the mods are as follows; 1) the drain holes in the bullet shields missed by Mato. Actually earlier M4 hulls had two small cut-aways in the upper of these in the pic which was later changed for the single, larger, hole seen depicted here. 2) the Mato engine door stops are too thin so, as seen, I replaced these with two I fashioned from 2mm aluminum plate which are screwed and glued in place (much more solid too). 3) next can be seen the HD Schumo lifting lugs again and, in the right corner, can be seen the Schumo rear light bush guard which again replaces the original Mato. 4) above this is the re-worked retaining post and pin for the 'little joe' (i.e. idler adjusting spanner). I ground off the original molded effort and replaced with a brass fitting;
Moving around is the re-worked travel lock. I did plan on replacing the Mato effort with the working Schumo upgrade but they turned out to be rarer than dragons poo. In the event I reconstructed the claws out of plastic sheet and pinned into slots to give a working travel lock. The tricky bit was fabricating the aluminium locking catch (see inset pic) on the engine deck that holds the travel lock in the down position;
Next is the addition of the excellent stowage rack made by EddyK from this forum. Fixinr this securely was the trick here as, like the original, it is load bearing and exposed to knocks. I drilled and pinned each hinge as well as applying CA glue for a secure fix. The other addition here is the four small bolts (fake) per hinge as on the original. I did think this was a bit over-kill at first but given how much these racks were sometimes loaded up I guess they needed a real good fixing down;
The next addition was the spare track holder locking straps. For these I made working bottom hinges and used Aber wingnuts and threaded shafts which allows for removal of the wingnut when required (unlike the Schumo wingnuts);
And then there were tools! As can be seen here a number of fittings for the various tools. The sledgehammer holder was particularly tricky (see inset) but I was very happy with the end result. I also reworked the tools themselves and added the fuel cap pins and chains as well as the tie-down 'handles' for strapping down the tools;
And a further pic of the overall progress at this stage. Clearly seen here is the addition of the bullet guard extension around the external fire extinguisher pull handle box (top left of pic). I am unclear at present whether or not this was in fact only a post war upgrade but included it anyway;
Finally, I added the barrel cleaning rods which are stored under the stowage rack. Made from barbecue sticks which are about the right diameter (as suggested by someone on this forum!);
And here, for the under side of the engine doors, I found some 'acoustic foam' which is apparently (?) audibly transparent, etc, etc. Anyway, it does the job, as they say
Well, that's it for now. There's more to follow as soon as I can get a few more pictures taken to bring the build progress up to date.
- HERMAN BIX
- Major-General
- Posts: 11779
- Joined: Sun Jan 12, 2014 12:15 am
- Location: Gold Coast,Australia
Re: Mato M36B1 Tank Destroyer (full metal)
Busy days Dr !
Must be a heartbreaker to take all that off to do your final paint coat
Must be a heartbreaker to take all that off to do your final paint coat
HL JAGDPANTHER,HL TIGER 1,HL PzIII MUNITIONSCHLEPPER, HL KT OCTOPUS,HL PANTHER ZU-FUSS,HL STuG III,HL T34/85 BEDSPRING,
HL PZIV MALTA,MATORRO JAGDTIGER,HL F05 TIGER,TAMIYA KT,HL PANTHERDOZER,HL EARLY PANTHER G,TAIGEN/RAMINATOR T34/76,
HL AN-BRI-RAM SU-85
HL PZIV MALTA,MATORRO JAGDTIGER,HL F05 TIGER,TAMIYA KT,HL PANTHERDOZER,HL EARLY PANTHER G,TAIGEN/RAMINATOR T34/76,
HL AN-BRI-RAM SU-85
- PainlessWolf
- Colonel
- Posts: 7816
- Joined: Sun Feb 26, 2012 9:09 pm
- Location: Southern Colorado Rocky Mountains
Re: Mato M36B1 Tank Destroyer (full metal)
Good morning, Doc!
With enough of us 'mentioning' the "cheese metal", maybe MATO will start to listen. Everything is turning out beautifully. I applaud especially how you are adding heft to the areas of likely failure, i.e. the door braces and lifting hooks. Your spare track holders are especially well done! Following along, I agree about some of the Schumo bits. I waited for weeks to get the final pieces for my version of this tank killer. You did a wonderful job of making the MATO piece usable, Doc.
regards,
Painless
...Money!? What's that!?...
- 43rdRecceReg
- Major
- Posts: 6295
- Joined: Fri Jul 31, 2015 11:38 am
- Location: North West Highlands, Scotland
Re: Mato M36B1 Tank Destroyer (full metal)
Very, very neat surgery there, Doc
"Get your facts first, and then you can distort them as much as you please"- Mark Twain.
Re: Mato M36B1 Tank Destroyer (full metal)
Busy days indeed Herman! Though bit might look otherwise it's not a problem removing and replacing the the tools. Since my rebuild includes, where possible, installing and securing tools and accessories as the original tank they are all simply held in place by the hull fittings (I will make and fit the securing straps in final detailing stage).
Painless, yes, agreed on Mato's need to address the cheese metal problem on some of these components. i maintain this is a great tank, it really is, but the kind of re-building some like ourselves undertake should not be necessary to have a reliable tank out the box at these prices. In a way I hope the work we do acts as a 'suggestion box' for Mato, and perhaps a shortcut guide for new owners wanting to do a quick check over before running.
43rd, thank you for the generous and much appreciated praise coming, as it does, from someone with your all too obvious talents - I remain entirely seduced by your scratch built Cromwell, such that I need for my wallet's sake to stay away from Ludwig's site!
Ok, some small upgrades but, while I'm here........
I had a spare periscope from the Shapeways' set I got for the hatches so had the idea that I would use the spare parts to add a 'periscope up' position on the drivers side (since, if running with the hatches closed this would be necessary - I get hung up on these details, don't we all?.. dohh)....................
I then attached to the drivers hatch and fabricated a hinged periscope cover as follows;
It might be noticed in the above pics that I have also added two little hooks either side of the drivers hatch - these were there for attaching the drivers side periscope rain cover - complete with windscreen wiper!
A further mod I mentioned earlier, and just for information, here is a pic of the hatch hinges properly screwed in place. Gluing is fine in many respects but does not allow for easy removal, adjustment, and replacement as is the case using a screw fastener;
And lastly, an upgraded metal turret gearbox and motor by DKLM (supplied by Forgebear). This is a fully metal unit, including all metal drive gears so is consistent with the all metal Mato theme so to speak. However, if you are considering this upgrade some points to note; 1) it is about four time heavier that the original, and a little larger, 2) it is much, much stronger and more precise, especially when mated to a metal turret gear (as I have done here) and 3) if set up like this (all metal) then nothing will give if the barrel jams against something and, consequently, the motor will overload (burn) very quickly. This may be a problem for certain MFUs (e.g. Clark) so a load resistor should ideally be fitted (this is in fact recommended on Clark's website anyway);
More to follow soon..................
