shaun
1st large scale tank: Tamiya 1/16 Tiger I
-
jarndice

- Colonel
- Posts: 8497
- Joined: Mon Sep 03, 2012 11:27 am
- Location: the mountains of hertfordshire
Re: 1st large scale tank: Tamiya 1/16 Tiger I
PZ, It's called experience, and we have all been there which takes some believing when you see some of the builds on the Forum!!! 
shaun
shaun
I think I am about to upset someone 
-
panzer man
- Lance Corporal
- Posts: 107
- Joined: Sun Sep 13, 2015 9:10 pm
- Location: San Diego, California USA
Re: 1st large scale tank: Tamiya 1/16 Tiger I
I removed one of the PE intake screens & did in fact see the scribed line for bending. Too hot & humid here today for modeling.  I do not have air conditioning where I live so I will take break for now & retry the PE screens when the temperature is more comfortable inside. I have a question for prepping PE for paint. Is a light sanding needed? I though I heard somewhere that acetone was needed for cleaning. Any thoughts on preparation?

Re: 1st large scale tank: Tamiya 1/16 Tiger I
Tbh all parts are normally washed in a soapy mixture and left to dry.
I just put metal primer on PE or metal parts. Having said that though on some bits I don't prime as you can reveal metal underneath and it makes scratches look more realistic
I just put metal primer on PE or metal parts. Having said that though on some bits I don't prime as you can reveal metal underneath and it makes scratches look more realistic
-
jarndice
- Colonel
- Posts: 8497
- Joined: Mon Sep 03, 2012 11:27 am
- Location: the mountains of hertfordshire
Re: 1st large scale tank: Tamiya 1/16 Tiger I
PZ, Hi, The first thing I do before painting is to wipe the whole Tank over with a lint free cloth dipped in Acrylic Thinners to remove any thing that stops the paint taking.
I always use "MR METAL" primer from Mr Hobby (A Japanese Company) it comes in a small glass jar and lasts forever. Try Hobby stores or E-BAY.
I paint it on all the metal fittings on my armour before painting a regular primer on top.
I learnt the hard way, after making up the front and rear fenders on a Tiger 1 out of PE, I then painted the whole Tank in a regular red primer (Red being the colour of primer German Armour was painted between 1937 and 1945) and watched in horror as the paint dried in lumps on all the untreated metal surfaces,
Since then I always use metal primer first. I hope that helps.
shaun
I think I am about to upset someone
-
jarndice
- Colonel
- Posts: 8497
- Joined: Mon Sep 03, 2012 11:27 am
- Location: the mountains of hertfordshire
Re: 1st large scale tank: Tamiya 1/16 Tiger I
I notice that you intend keeping the Feifel air cleaners and the associated pipes, which means you will inherit the pain in the a** when trying to open the quick release Body from the Hull.
Commander on RCU gave me the answer,
First those shiny black plastic pipes are wrong, the fix is to sheaf them in the cloth that you see on electrical cable. this is readily available for a few pennies/cents,
It comes in different colours but acrylic paint will take well to it. a drop of glue on the pipe and slide the cloth outer along the pipe leaving a slight overhang.
Next you will need dress makers pins, those things that stick in you when put on a new shirt!!!
And you will need "NEO-DYNMIUM Magnets, you can get these quite easily in the USA as well as the UK, they come in all shapes and sizes, the size you need are 5mm by 5mm and you need 8.
This is what you do, fit the cloth covered plastic pipes in place, push a magnet into the pipe, about 5 mm, then push a dressmakers pin in behind the magnet,This will stop the magnet going any further down the pipe, push another dressmakers pin in front to stop the magnet from coming out of the pipe, clip the pins flush with the pipe,
Next cut 5mm off the end of the articulated pipe coming out of the Air cleaner and Superglue a 5mm magnet in place of the cut off section, MAKE SURE THAT THE MAGNET IS THE RIGHT WAY ROUND ( ATTRACTED TO THE MAGNET IN THE PIPE NOT REPELLING IT!!!) paint the side of the magnet matte black, and when everything is dry swing the articulated pipes into place and trim the excess cloth on the pipe.
Now to open your Tank you swing the articulated pipes up and flick the quick release, Job done.
If you are having problems with PEDDINGHAUS Decals, Try ARCHERS or ELITE, Both are American companies and are first class
Good luck, shaun
I think I am about to upset someone
-
panzer man
- Lance Corporal
- Posts: 107
- Joined: Sun Sep 13, 2015 9:10 pm
- Location: San Diego, California USA
Re: 1st large scale tank: Tamiya 1/16 Tiger I
Thanks. If this kit was all plastic, I would normally just use soap & water. Because of the metal parts involved, I will use a automotive primer from a spray can. I have a friend who used to build professionally & he had a inexpensive brand from Auto Zone (auto parts store) that he always used for his models. I was just wondering if the PE screens needed any additional cleaning before soap & water & priming. I see your point about revealing metal. The drive sprocket teeth would look great if the paint was removed leaving just bare metal.Ad Lav wrote:Tbh all parts are normally washed in a soapy mixture and left to dry.
I just put metal primer on PE or metal parts. Having said that though on some bits I don't prime as you can reveal metal underneath and it makes scratches look more realistic
-
panzer man
- Lance Corporal
- Posts: 107
- Joined: Sun Sep 13, 2015 9:10 pm
- Location: San Diego, California USA
Re: 1st large scale tank: Tamiya 1/16 Tiger I
So you just brush this product on by hand or use a airbrush? I may consider getting some.jarndice wrote:PZ, Hi, The first thing I do before painting is to wipe the whole Tank over with a lint free cloth dipped in Acrylic Thinners to remove any thing that stops the paint taking.
I always use "MR METAL" primer from Mr Hobby (A Japanese Company) it comes in a small glass jar and lasts forever. Try Hobby stores or E-BAY.
I paint it on all the metal fittings on my armour before painting a regular primer on top.
I learnt the hard way, after making up the front and rear fenders on a Tiger 1 out of PE, I then painted the whole Tank in a regular red primer (Red being the colour of primer German Armour was painted between 1937 and 1945) and watched in horror as the paint dried in lumps on all the untreated metal surfaces,
Since then I always use metal primer first. I hope that helps.
shaun
-
panzer man
- Lance Corporal
- Posts: 107
- Joined: Sun Sep 13, 2015 9:10 pm
- Location: San Diego, California USA
Re: 1st large scale tank: Tamiya 1/16 Tiger I
I agree with you concerning the air duct hoses in the kit. I already saw on the forum how to make new hoses with the methods & materials you describe here. I must admit that it does look quite impressive! I know the Heng Long pipes are wrong & have no detail but one person said, I believe somewhere on this forum, that the Tamiya hoses are correct. Maybe David could provide more information. So, to be clear I install the kit hoses as usual & then slide the sheathing over that? I will also check out ARCHERS & ELITE decals. I did find a stencil that has the letters S & the numbers 25 to model S25 from Das Reich circa 1943. Tamiya provides the rest of the markings I will need.jarndice wrote:I notice that you intend keeping the Feifel air cleaners and the associated pipes, which means you will inherit the pain in the a** when trying to open the quick release Body from the Hull.
Commander on RCU gave me the answer,
First those shiny black plastic pipes are wrong, the fix is to sheaf them in the cloth that you see on electrical cable. this is readily available for a few pennies/cents,
It comes in different colours but acrylic paint will take well to it. a drop of glue on the pipe and slide the cloth outer along the pipe leaving a slight overhang.
Next you will need dress makers pins, those things that stick in you when put on a new shirt!!!
And you will need "NEO-DYNMIUM Magnets, you can get these quite easily in the USA as well as the UK, they come in all shapes and sizes, the size you need are 5mm by 5mm and you need 8.
This is what you do, fit the cloth covered plastic pipes in place, push a magnet into the pipe, about 5 mm, then push a dressmakers pin in behind the magnet,This will stop the magnet going any further down the pipe, push another dressmakers pin in front to stop the magnet from coming out of the pipe, clip the pins flush with the pipe,
Next cut 5mm off the end of the articulated pipe coming out of the Air cleaner and Superglue a 5mm magnet in place of the cut off section, MAKE SURE THAT THE MAGNET IS THE RIGHT WAY ROUND ( ATTRACTED TO THE MAGNET IN THE PIPE NOT REPELLING IT!!!) paint the side of the magnet matte black, and when everything is dry swing the articulated pipes into place and trim the excess cloth on the pipe.
Now to open your Tank you swing the articulated pipes up and flick the quick release, Job done.
If you are having problems with PEDDINGHAUS Decals, Try ARCHERS or ELITE, Both are American companies and are first class
Good luck, shaun
-
jarndice
- Colonel
- Posts: 8497
- Joined: Mon Sep 03, 2012 11:27 am
- Location: the mountains of hertfordshire
Re: 1st large scale tank: Tamiya 1/16 Tiger I
HI,PZ, You brush the metal primer, your not trying to lay down a heavy layer, all you are doing is providing the primer a surface to bind to.
Yes after putting a few drops of glue on the pipes slide the sheathing over the pipe.
ABER make a PE set of pipes but I reckon they come under the title "HARD WORK" and I don't think I have ever seen any actually built up.
shaun
Yes after putting a few drops of glue on the pipes slide the sheathing over the pipe.
ABER make a PE set of pipes but I reckon they come under the title "HARD WORK" and I don't think I have ever seen any actually built up.
shaun
I think I am about to upset someone
-
panzer man
- Lance Corporal
- Posts: 107
- Joined: Sun Sep 13, 2015 9:10 pm
- Location: San Diego, California USA
Re: 1st large scale tank: Tamiya 1/16 Tiger I
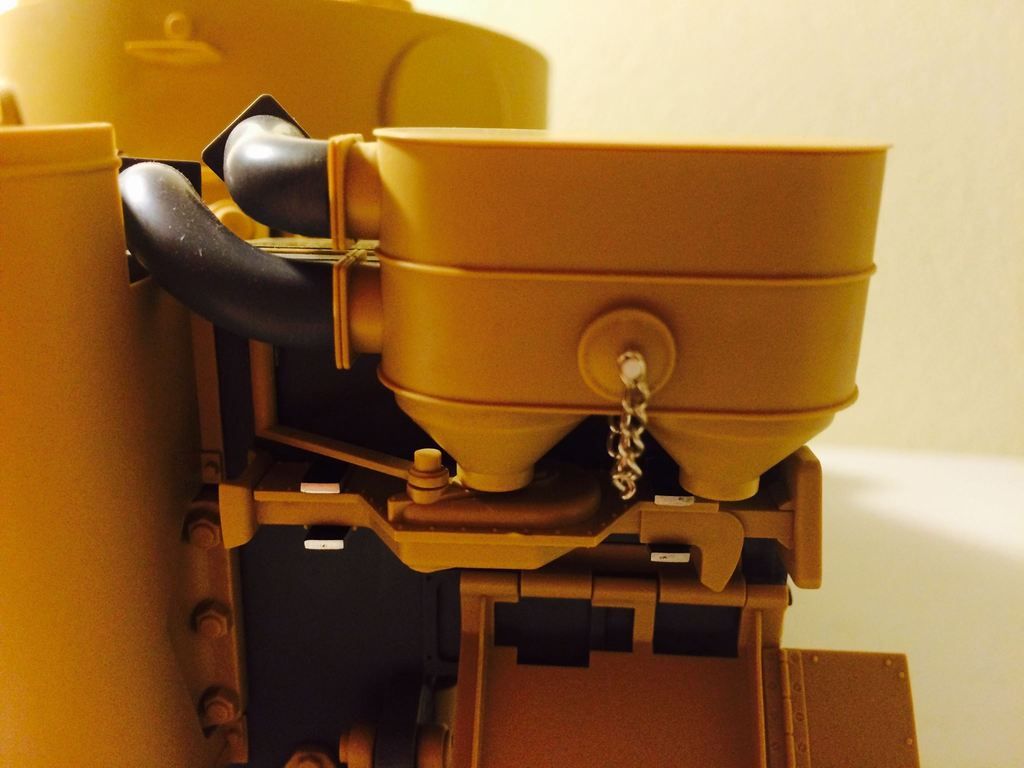
I tried to detail one of the Feifel air cleaners drain cover by adding a retainer chain. I used a cheap chain from the craft store & small plastic rod. The chain is out of scale & I may change it. Anyone knows where I can purchase a more realistic chain for this piece?