Good Morning, Alpha,
I will make the top half of the clamp removeable like the the one on the M4A1. I'll try an inverted 'U' instead of the single peg that Mato uses.
regards,
Painless
1944 M4A3 105mm
-
PainlessWolf

- Colonel
- Posts: 7863
- Joined: Sun Feb 26, 2012 9:09 pm
- Location: Southern Colorado Rocky Mountains
Re: 1944 M4A3 105mm
...Money!? What's that!?...
Re: 1944 M4A3 105mm
Great... I actually wondered about it yesterday.... glad you planned for itPainlessWolf wrote:Good Morning, Alpha,
I will make the top half of the clamp removeable like the the one on the M4A1. I'll try an inverted 'U' instead of the single peg that Mato uses.
regards,
Painless
ALPHA
-
cannedheat
Re: 1944 M4A3 105mm
hi painless
it cool its neat, its, well what can we say super smashing as jim bowen would say .......wot wot
alphas crew ? the two squat can we get them to stand up ?
it cool its neat, its, well what can we say super smashing as jim bowen would say .......wot wot
alphas crew ? the two squat can we get them to stand up ?
Re: 1944 M4A3 105mm
cannedheat wrote:hi painless
it cool its neat, its, well what can we say super smashing as jim bowen would say .......wot wot
alphas crew ? the two squat can we get them to stand up ?
ALPHA
-
PainlessWolf
- Colonel
- Posts: 7863
- Joined: Sun Feb 26, 2012 9:09 pm
- Location: Southern Colorado Rocky Mountains
Re: 1944 M4A3 105mm
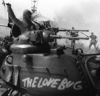
76th Day: CH, Super Smashing! After a special Dinner, I put a couple of hours into head scratching and building a tow cable clamp. I was going to groove out a rectangle of plasticstruct and drill two holes and shape a staple into a 'U' and do it that way but 1/16 scale is large enough to get a little more realistic. I wound up going with a single hole\single peg mount like the Mato M4A1 but instead of doing a plastic piece, I did the grooved plastistruct block with a rotating fastener in brass. It has been painted and is drying over night before I put it into use. If the tension of the semi rigid tow cable is enough to work the small nail I used as a pivot out of it's socket over time, I allowed enough room and material to use a small screw instead. Pics:
- Attachments
-
- Rotating clamp
- Rotating clamp.JPG (86.27 KiB) Viewed 3605 times
-
- Plastistruct block base
- Plastistruct block base.JPG (75.21 KiB) Viewed 3605 times
...Money!? What's that!?...
-
PainlessWolf
- Colonel
- Posts: 7863
- Joined: Sun Feb 26, 2012 9:09 pm
- Location: Southern Colorado Rocky Mountains
Re: 1944 M4A3 105mm
77th Day: Was out for the evening but came in soon enough to spend an hour on the Sherman I pulled the tow clamp slide and reshaped it to give a little room over the shackle and to grip the block edge better. A little O.D. and I'm satisfied with it. I painted the commander's hatch periscope per illustrations from Zaloga's 'Sherman at War' and called it a night. I have Sun. and Mon. to finish the tank. No need to rush. ;o) Pics:
- Attachments
-
- Commander's periscope back
-
- Commander's periscope front
- Commander's periscope front.JPG (96.96 KiB) Viewed 3581 times
-
- Reshaped slide
- Reshaped slide.JPG (88.4 KiB) Viewed 3581 times
-
- Original work
- Original work.JPG (87.99 KiB) Viewed 3581 times
...Money!? What's that!?...
Re: 1944 M4A3 105mm
An unsurpassable level of excellence Painless
ALPHA
-
PainlessWolf
- Colonel
- Posts: 7863
- Joined: Sun Feb 26, 2012 9:09 pm
- Location: Southern Colorado Rocky Mountains
Re: 1944 M4A3 105mm
78th Day: Thanks Alpha. I'm glad that you like the work. It is painstaking at times but worth the effort in satisfaction. I spent the day detail painting the Sherman. Found a working tow shackle since mine went missing. The Pershing one, with a little mod, worked fine. Added a chain to use on the stowage tomorrow. Pics:
- Attachments
-
- Almost done
-
- Electric blue periscopes
-
- Stowage chain
-
- Yellow head lights and spot light
-
- Yellow tinted headlights
- Yellow tinted headlights.JPG (90.92 KiB) Viewed 3550 times
-
- Tri-tone tow shackle, olive drab, steel and rust
-
- Clean red tail lights
-
- Reflecting mirror blue on the commander's hatch periscope lens
- Reflecting mirror blue on the commander's hatch periscope lens.JPG (94.95 KiB) Viewed 3550 times
-
- Sherman at dawn
- Sherman at dawn.JPG (96.12 KiB) Viewed 3550 times
...Money!? What's that!?...
-
palepainter
- Sergeant
- Posts: 564
- Joined: Sun Nov 03, 2013 4:04 am
- Location: Lafayette, CO
Re: 1944 M4A3 105mm
Fantastic Painless!!! I have to do the glass on my scopes as well. Did you custom mix the color or buy it that way. They look great. I have been deliberating over what specific shade of blue to use.
-
TKcommander

- Corporal
- Posts: 293
- Joined: Wed Oct 16, 2013 6:16 pm
- Location: Temple of Doom, Somerset, UK
Re: 1944 M4A3 105mm
Done some catching up today on some builds I had neglected to follow. Amazing detail going into this, I now cant wait to see this finished, it's going to be stunning. 
TKcommander ~ Andy
"I'm a BAD LAD!"
"I'm a BAD LAD!"
