Do you add hinges to the two tool storage cabinets on either side of the box? I was thinking about that, too.
Herr Doc's Famo
-
Herr Dr. Professor

- Major
- Posts: 5990
- Joined: Mon Apr 22, 2019 10:48 pm
- Location: Southern Wisconsin USA
Re: Herr Doc's Famo
I may even find ways to be slower. For example, I like the way the speaker you chose fits behind the grill, so I may have to locate that speaker (you gave the name and number above), even if I already have six or more speakers I considered. 
Do you add hinges to the two tool storage cabinets on either side of the box? I was thinking about that, too.
Do you add hinges to the two tool storage cabinets on either side of the box? I was thinking about that, too.
-
jhamm
- Warrant Officer 2nd Class
- Posts: 1101
- Joined: Fri May 19, 2017 7:21 am
- Location: Germany
- Contact:
Re: Herr Doc's Famo
Yes, the two tool cabinets on both sides of the box are hinged.
The power switch is behind them on the left side.
The power switch is behind them on the left side.
-
Herr Dr. Professor
- Major
- Posts: 5990
- Joined: Mon Apr 22, 2019 10:48 pm
- Location: Southern Wisconsin USA
Re: Herr Doc's Famo: Snail still crawling
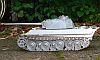
I do continue at a snail's pace. With the wheels painted and coated in flat clear lacquer, last night I assembled the chassis. Stretching those 28 skinny Continental tires back onto the road wheels and idlers left me with sore fingers.  Then I got the interlaced wheels together and fiddled to get them to clear one-another.
  Finally, as I was trying to reassemble both front wheels, I found that while one axle fit either wheel quite well, the other axle just would not fit either wheel. I realized that the 4.00 mm axle was too great a diameter for the 3.97mm hole. Simple fix--just drill it out, right?
OOPS! That 3.97 mm "hole" was actually a ball bearing,
  so perfectly installed* that I could not see the fitting for the outer race. With my tabletop drill press and a new 4.09mm bit, I did a great job of practically welding the inner bearing race onto the drill bit.
  Despite desperate, heroic efforts, I could not remedy my stupid mistake.
  So now I am on the search here in the U.S. for the right-sized bearing to reinstall in one of the front wheels (and a new 4 mm. drill bit, too ). I'm learning, and despite frustration, it is interesting.
Meanwhile, I am ready to re-install the electronics and speaker (I did get a Visaton to fit behind the grill, thanks to Herr Hamm's kind and always-useful advice.) Then I can fiddle with the cosmetic stuff (dashboard, fender markings, horizontal driver's side windshield divider, windshield wipers, load of interesting stuff, etc.). And there remain the figures to paint (fun for me).
In the following photo you can see the dramatic difference between Vallejo Dunkelgrau primer (all over) and Tamiya's version (on the winch only). I painted the winch a long time ago just to see the color. I will likely leave it, as if someone installed an old faded winch on a newer FAMO. I am just amused by the paint differences, and I like the idea of the winch being easier to see after the body is on.
*See my next post.
OOPS!
Meanwhile, I am ready to re-install the electronics and speaker (I did get a Visaton to fit behind the grill, thanks to Herr Hamm's kind and always-useful advice.) Then I can fiddle with the cosmetic stuff (dashboard, fender markings, horizontal driver's side windshield divider, windshield wipers, load of interesting stuff, etc.). And there remain the figures to paint (fun for me).
In the following photo you can see the dramatic difference between Vallejo Dunkelgrau primer (all over) and Tamiya's version (on the winch only). I painted the winch a long time ago just to see the color. I will likely leave it, as if someone installed an old faded winch on a newer FAMO. I am just amused by the paint differences, and I like the idea of the winch being easier to see after the body is on.
- Chassis Assembled.jpg (317.93 KiB) Viewed 16731 times
Last edited by Herr Dr. Professor on Thu Aug 10, 2023 9:04 pm, edited 1 time in total.
-
Herr Dr. Professor
- Major
- Posts: 5990
- Joined: Mon Apr 22, 2019 10:48 pm
- Location: Southern Wisconsin USA
Re: Herr Doc's Famo
Some Observations on my Experience with this FAMO Kit.
This Asiatam kit is a challenge. I believe that the kit itself is rather well-designed, but the manufacturing, and the communication and packaging care seem to cause problems.
Manufacturing: the castings can be a bit rough, needing clean-up. Some parts break readily, as if made of a cheap metal (a zinc alloy?). Some of the parts (e.g. the axles) are of surprisingly different diameters and/or lengths. The steering tires are great! The road wheels and idler tires have dandy markings for the Continental brand, but some have the markings on both sides, some on only one side. Why? Hmm... All seem to be the same size.
I did not use the electronics supplied with the kit. After trying futilely to get the supplied electronics to work, I packed them carefully for storage and, at Herr Hamm's suggestion, turned to an SGS kit specifically for half-tracks. As I have noted above, I have the SGS MFU and other electronics working, tested at every step of the way.
Communication and packaging care: I received the FAMO partly assembled with no instructions. I got the instructions after an explicit request for them. They are a far cry from the kind of instructions one gets in a Takom, Tamiya, or Andy's Hobby kit. By scratching my head, I figured out what parts were already installed, what were shipped loose, and what were just missing. One part was included but was not in the instructions: a fine mount for a standard-sized servo. I discovered this after I installed a handmade servo mount. The motors and gearboxes appear to be completely different from those represented in the line drawing instructions. I think the motors and gearboxes might just be an improvement over some originals, but no one bothered to update the instructions.
I think that if Asiatam were to get someone who can communicate clearly and thoroughly, re-work the instructions some, and someone who can watch over the quality of manufacturing and parts machining, the firm would have an improved reputation and better sales. There is great potential for this kit to have renewed life as a winner.
I also have the Asiatam Kübelwagen. I am hoping it is simpler, but just as well designed. Now that I know of some of the pitfalls of Asiatam kits, I am eager to put my learning to use once the FAMO is rolling.
Last edited by Herr Dr. Professor on Sat Aug 26, 2023 1:54 am, edited 1 time in total.
-
Herr Dr. Professor
- Major
- Posts: 5990
- Joined: Mon Apr 22, 2019 10:48 pm
- Location: Southern Wisconsin USA
Re: Herr Doc's Famo
"So now I am on the search here in the U.S. for the right-sized bearing to reinstall in one of the front wheels." Through Amazon, I bought a nifty bearing tool and enough of the right sized bearings to repair the FAMO and use on some future project, all quite inexpensively. How do I know the bearing is the right size? Oh---it fit perfectly, and the FAMO chassis is ready to roll.
-
ColemanCollector
- Warrant Officer 2nd Class
- Posts: 1254
- Joined: Sat Jan 14, 2023 8:50 pm
- Location: Ontario, Canada
Re: Herr Doc's Famo
Crikey, that's going to look tasty when assembled! Just the thing to pull Pantigers out of the mud, and then push them over the edge into the nearest dumpster.
Mike.
Mike.
Elbows up
-
PainlessWolf

- Colonel
- Posts: 7858
- Joined: Sun Feb 26, 2012 9:09 pm
- Location: Southern Colorado Rocky Mountains
Re: Herr Doc's Famo
Good Evening,
You're doing a Great Job here. It is looking like it should and any mistakes, you do not leave on the back burner but rectify right away. Following along.
regards,
Painless
You're doing a Great Job here. It is looking like it should and any mistakes, you do not leave on the back burner but rectify right away. Following along.
regards,
Painless
...Money!? What's that!?...

Re: Herr Doc's Famo
Well this is good news Herr Dr. I look forward to more progress.
"Charlie don't surf"- Lt. Col. Bill Kilgore
-
Herr Dr. Professor
- Major
- Posts: 5990
- Joined: Mon Apr 22, 2019 10:48 pm
- Location: Southern Wisconsin USA
Re: Herr Doc's Famo
Thanks for all the cheering! I got in nine straight hours of work yesterday. I have started putting the electronics in their final places, re-soldering some wiring, and trying four different speakers to see which gives the best combination of volume, sound, and fit. This may change yet again as I put on the cab and body. At the cost of space for the (non-working, but moveable) winch, I fit a smoke machine in, wired in a switch for it, and set up the tubing to the exhaust. (Here's a nice thing about the SGS MFU: the smoke unit runs when the track sprockets are turning, but stops after about ten seconds with the track stopped. That's nifty!) However, although the smoke machine worked fine, it just did not produce enough smoke for me, so this morning the smoke machine came out, and the winch went back in. Smoke machine in; smoke machine out. Four speakers in and out and in and out for testing... Whew! I also put in some new metric hardware here and there for better quality. Now if need to come up with a final speaker and battery location (under the hood, I hope) and test the tracks. (Oh, yes, and glue in all the track pads: idiot's delight.)
-
jhamm
- Warrant Officer 2nd Class
- Posts: 1101
- Joined: Fri May 19, 2017 7:21 am
- Location: Germany
- Contact:
Re: Herr Doc's Famo
Good morning Mr. Doc,
glue in all track pads... oh jes...
I have had to do this three times so far - for three sets of tracks....
The first set of tracks was too old and broke like glass...
Best Asiatam quality - zinc parts disassemble themselves after 5-10 years.
glue in all track pads... oh jes...
I have had to do this three times so far - for three sets of tracks....
The first set of tracks was too old and broke like glass...
Best Asiatam quality - zinc parts disassemble themselves after 5-10 years.
