Page 6 of 10

Re: 1/16 RC US 155mm Gun Motor Carriage M12 - Build

Posted: Wed Mar 02, 2022 8:17 pm
by lmcq11
Herr Dr. Professor wrote:Everything you are doing here amazes me, so this is an exciting build to watch. I have watched the YouTube video five or six times already. I don't mean to suggest any inadequacy--on the contrary--rather I wonder, will there be smoke from the barrel? Is that even possible with the substantial recoil you have replicated?
Hello Dr. I thought about it. It would be very difficult for smoke or even a simple LED to be installed in the barrel. As you can see below, the howitzer is quite independent from the chassis. The only chassis connections to the cradle are the two pins on the side of the thin mount, and the added push rod at the front. But it is the six centimeters of end to end sliding breech recoil that would tear apart any wiring in the way. Unless someone knows about a wireless device that would fit inside the barrel, its unlikely the howitzer will get smoke or light.

Re: 1/16 RC US 155mm Gun Motor Carriage M12 - Build

Posted: Fri Mar 04, 2022 3:18 am
by Herr Dr. Professor
"...six centimeters of end to end sliding breech recoil...would tear apart any wiring." Yes, I understand. I have re-soldered and rewired a few barrel recoil micro-switches even when the recoil is much less dramatic. Regardless, your 155 just blows me away!

Re: 1/16 RC US 155mm Gun Motor Carriage M12 - Build

Posted: Fri Mar 04, 2022 10:27 am
by HERMAN BIX
As the breach is an opening device, could a barrel light be powered by a button battery, triggered by the breach opening movement to make a contact in a circuit , and accessed by the opening breach for battery changes ?
Of course, its easy for me to say, no hope of being able to do it myself !

Re: 1/16 RC US 155mm Gun Motor Carriage M12 - Build

Posted: Fri Mar 04, 2022 3:27 pm
by Snowwolflair
It could be done with an inductive coupling (think electric toothbrush charging), but probably beyond the capabilities of most modellers.

Re: 1/16 RC US 155mm Gun Motor Carriage M12 - Build

Posted: Mon Mar 07, 2022 2:35 am
by EAO
Snowwolflair wrote:It could be done with an inductive coupling (think electric toothbrush charging), but probably beyond the capabilities of most modellers.
:D

If anyone could do it, Louis could! Once again totally blown away by your workmanship!

Cheers,
Eric.

Re: 1/16 RC US 155mm Gun Motor Carriage M12 - Build

Posted: Mon Mar 07, 2022 7:14 pm
by lmcq11
Snowwolflair wrote:It could be done with an inductive coupling (think electric toothbrush charging), but probably beyond the capabilities of most modellers.
HERMAN BIX wrote:As the breach is an opening device, could a barrel light be powered by a button battery, triggered by the breach opening movement to make a contact in a circuit , and accessed by the opening breach for battery changes ?
Of course, its easy for me to say, no hope of being able to do it myself !
Thank you gentlemen. These are good ideas. I'll put this dilemma aside for now pending investigations and decision.

Continuing with the build, the sighting apparatus.

I found no wartime pictures with close ups on the sighting instruments. This is a capture from a video found on Youtube. Not much help.
1/16 RC US 155mm Gun Motor Carriage M12 - Build
Capture.JPG (96.08 KiB) Viewed 1547 times
Academy did not really do a good job in this area. The whole shield and sighting instruments are simplified and full of ejection pin marks. The round hub for the gears does not have the right shape. As i am not sure i will finish the 1/35 kit, i have just assembled the parts to get some clarity on this area.
1/16 RC US 155mm Gun Motor Carriage M12 - Build
At least, it provided some ideas for the sights to reproduce instead of leaving the area empty on the 1/16 model. Notice the triangular shape behind the shield, with thickness grossly exaggerated and lack of back rivets for the ones on the other face. Still, dimension and positions for what is there was most welcome.
1/16 RC US 155mm Gun Motor Carriage M12 - Build
Capture3.JPG (97.98 KiB) Viewed 1547 times
This is the same area on the surviving M12, showing the complexity and where improvements can be made. We can see the structure of the main arm and everything that is there. Sadly, the scopes were not installed.
1/16 RC US 155mm Gun Motor Carriage M12 - Build
Of the whole area behind the shield, these are the only parts that Vandra provides. A 3D printed hub for the gun elevation/rotation with the crank wheels, and a simplified arm devoid of any sighting apparatus or details. It is annoying when you pay for a kit, and when the area is complicated, the vendor just ignores it...
1/16 RC US 155mm Gun Motor Carriage M12 - Build
The Vandra hub is a bit too small but was reused. It needs a thicker base for attachment to the gun mount.
1/16 RC US 155mm Gun Motor Carriage M12 - Build
Capture6.JPG (86.62 KiB) Viewed 1547 times
The arm needed to be redone with proper dimension and shape.
1/16 RC US 155mm Gun Motor Carriage M12 - Build
The shape of the arm need to be aligned so that when the scope is mounted at the tip, the view needs to go through the small hole in the shield.
1/16 RC US 155mm Gun Motor Carriage M12 - Build
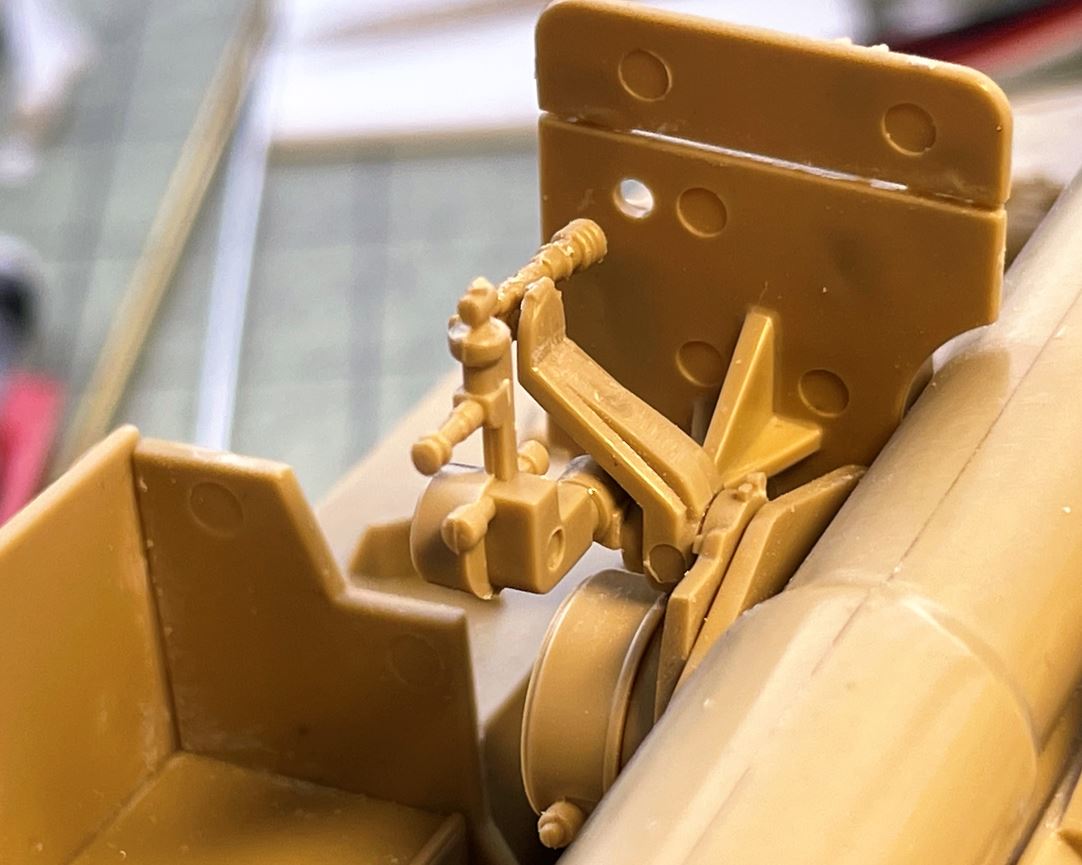
After one day of plasticard and tube cutting, this is my best effort at reproducing the sighting apparatus from the few pictures and angles on the M12 book. My goal was not to spend a month doing a perfect scale rendition, i do not have enough photographic reference material for that. But it certainly fills the hole with a fair representation.
1/16 RC US 155mm Gun Motor Carriage M12 - Build
Sighting apparatus is installed but removable as it is part of the pin that allows the gun barrel to be dismounted. Rivets were also added to the back of the shield, aligned with the items in the front of it.
1/16 RC US 155mm Gun Motor Carriage M12 - Build
continuing on following post.

Re: 1/16 RC US 155mm Gun Motor Carriage M12 - Build

Posted: Mon Mar 07, 2022 7:18 pm
by Maccrage
So how much of the Vandra kit is actually left?

Re: 1/16 RC US 155mm Gun Motor Carriage M12 - Build

Posted: Mon Mar 07, 2022 7:19 pm
by lmcq11
More views of the completed shield and sighting apparatus.
1/16 RC US 155mm Gun Motor Carriage M12 - Build
Moving to the seats, the 3D printed Vandra seats do not have the right shape. The back of the seat is way too short.
1/16 RC US 155mm Gun Motor Carriage M12 - Build
Capture14.JPG (89.93 KiB) Viewed 1544 times
I did new seats using the 1/35 kit dimensions and what i saw in reference.
1/16 RC US 155mm Gun Motor Carriage M12 - Build
Seats are installed.
1/16 RC US 155mm Gun Motor Carriage M12 - Build
The interior of the model as it stands today.
1/16 RC US 155mm Gun Motor Carriage M12 - Build
Next step, the back blade.

Regards, Louis

Re: 1/16 RC US 155mm Gun Motor Carriage M12 - Build

Posted: Mon Mar 07, 2022 7:20 pm
by lmcq11
Maccrage wrote:So how much of the Vandra kit is actually left?
Not a lot, i am checking the back blade and questioning whether to reuse some of it or rebuild.

Re: 1/16 RC US 155mm Gun Motor Carriage M12 - Build

Posted: Mon Mar 07, 2022 7:22 pm
by BarryC
WOW, Louis!

That sight looks fantastic. :clap: :clap:

Barry