Page 6 of 13
Re: Panzer kaput! Tamiya Tiger 1 restoration.
Posted: Sat Oct 02, 2021 10:59 pm
by AGKPeiper
Thats some sexy fabrication Jofaur.
Paint. Ignoring the microwave dishes how do my paint choices work for you folk?
Re: Panzer kaput! Tamiya Tiger 1 restoration.
Posted: Sun Oct 03, 2021 8:39 am
by jarndice
I use Humbrol simply because Tamiya Paint is too expensive BUT I use acrylics because they are washable so no worries about clogged brushes and if I overpaint an area by mistake it is a simple fix with an application of water,
If at a later date I decide to apply a new paint scheme it is a doddle removing the acrylic paint in comparison to enamel,
Re: Panzer kaput! Tamiya Tiger 1 restoration.
Posted: Sun Oct 03, 2021 9:36 am
by AGKPeiper
That all makes sense, thank you. How about the colours themselves?
Re: Panzer kaput! Tamiya Tiger 1 restoration.
Posted: Sun Oct 03, 2021 1:20 pm
by jarndice
If you are using Humbrol Acrylics to paint German Armour I would suggest you avoid Humbrols ides of the German Army's Grey and use number 27 Sea Grey it is far more accurate and for German Armour in North Africa I would use number 93 Desert Yellow,
Apart from that avoid Olive drab and use number 30 dark green and number 29 dark earth for brown and a very good substitute for the real thing is number 113 matt rust, great on exhausts.
I hope that helps.
Re: Panzer kaput! Tamiya Tiger 1 restoration.
Posted: Sun Oct 03, 2021 2:57 pm
by AGKPeiper
That is indeed helpful. Thank you.
Re: Panzer kaput! Tamiya Tiger 1 restoration.
Posted: Tue Oct 05, 2021 12:55 pm
by AGKPeiper
Laid my platform in the chassis yesterday and started attached the brain box. I think a velcro strap for the battery. More shopping!
Tidying up the turret swap as well.
1mm ABS to be attached using epoxy.
I suspect at this point that the driver and funk hatches will be fitted the same way.
Re: Panzer kaput! Tamiya Tiger 1 restoration.
Posted: Tue Oct 05, 2021 1:40 pm
by jarndice
If you glue a sheet of velcro to the floor and sides of the Tank hull you will not have to drill into the Tank to attach the control board,Smoker and battery,
Just glue a velcro patch to the back of anything you are fitting into the hull including the battery which can be attached to the Hull side instead of on the floor thereby making more space available,
Everything will stay in place until YOU want to move it.
Re: Panzer kaput! Tamiya Tiger 1 restoration.
Posted: Tue Oct 05, 2021 2:56 pm
by AGKPeiper
Now thats a great idea.
Unfortunately the suspension will get in the way when attaching it to the floor. I can however use it on top of my floorboard.
Fitting the board used one of the existing holes and a spacer from one of the OE gearboxes.
The smoke unit did require a couple of holes drilling but I'm not sure it would line up with the exhaust otherwise.
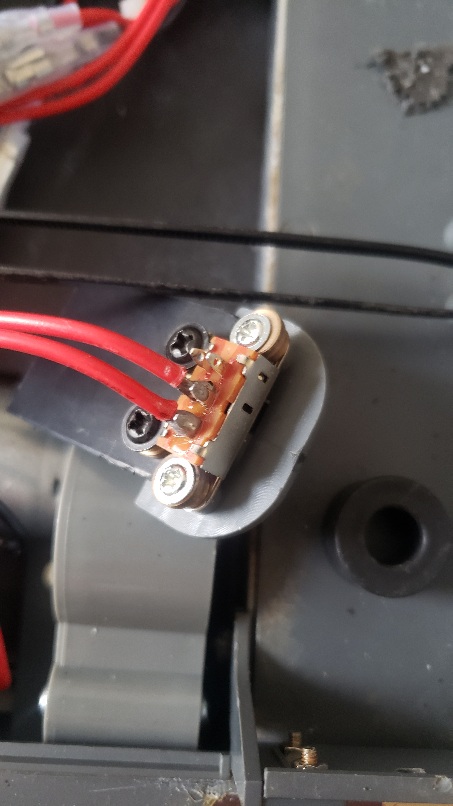
The following relocation of the on/off switch was not going to be solid enough without a hole drilling to enable bolting it in place.
Even without a turret I've been crashing this thing over obstacles and I want nothing electrical floating around.
Re: Panzer kaput! Tamiya Tiger 1 restoration.
Posted: Tue Oct 05, 2021 3:05 pm
by AGKPeiper
That switch relocation.
Firstly, glasses discarded for close work and obligatory foot.
Codged together mounting bracket. Really glad I've so many oddments of gearbox as these HL screws do not like to go back where removed from and stay. Please ignore the cable tie it isn't permanent.

- 20211005_144528.jpg (84.15 KiB) Viewed 1574 times
Yes. Even I mark things out occasionally and this is to make sure I mount the switch in the right spot.
Yep. Another hole.
With yet more gearbox parts it works though.
Re: Panzer kaput! Tamiya Tiger 1 restoration.
Posted: Tue Oct 05, 2021 3:09 pm
by jarndice
AGKPeiper wrote:Now thats a great idea.
Unfortunately the suspension will get in the way when attaching it to the floor. I can however use it on top of my floorboard.
Fitting the board used one of the existing holes and a spacer from one of the OE gearboxes.
The smoke unit did require a couple of holes drilling but I'm not sure it would line up with the exhaust otherwise.
The following relocation of the on/off switch was not going to be solid enough without a hole drilling to enable bolting it in place.
Even without a turret I've been crashing this thing over obstacles and I want nothing electrical floating around.
I actually meant the floorboard certainly not the floor of the hull.