Page 6 of 9
Re: My Panther G Build
Posted: Thu Dec 08, 2016 12:52 am
by HERMAN BIX
With Schurzen, on the ones I have done I always fit each plate and mount to suit. That is, place the front mount then hang the plate, secure the next mount once its in the hanger slot, then repeat.
This way you can manually centralise the mounts to give yourself a tiny bit of give for clearance on every plate.
I agree on the glue issue. Gel is the way to go, and with attention to clean-paints free contact area the Gel really hold on.
Re: My Panther G Build
Posted: Thu Dec 08, 2016 1:13 am
by c.rainford73
I too have assembled and attached plates in the same fashion as Mr. Herman. In addition to this on one build I used very small flat magnets on the backside of the schurzen plates and thin strips of steel on the brackets to hold them to the plates. It worked nice and was very strong. It also allowed for removal and adjustments of the plates didn't line up. It took me some work to get the plastic plates to be partially recessed enough to accommodate part of the magnet.
On a Panzer III I built I had brass schurzen hangers with the magnets recessed and thin metal schurzen plates. Worked nicely. I think having the brackets setup as Herman recommends works best!
Re: My Panther G Build
Posted: Thu Dec 08, 2016 1:17 pm
by silversurfer1947
Success!

I managed to get the 2 front panels on the left off AND all 3 panels fitted without anything falling off.

- 20161208_100320.jpg (30.9 KiB) Viewed 4547 times
It just remains to do the same on the other side.
UPDATE: Got the other side on as well.
. Time will tell as to how secure everything is. I had a few bits fall of my Tiger when it got onto the battlefield - and that was without me bumping into anything.
Re: My Panther G Build
Posted: Fri Dec 09, 2016 2:30 pm
by silversurfer1947
The schurzen have now had a coat or two of paint. This tank has been my first experience with an airbrush, and I still have a lot to earn before I can get a really quality job. However, my excuse for the time-being is that camouflage was put on in the field by the crew with a bucket and a mop
.
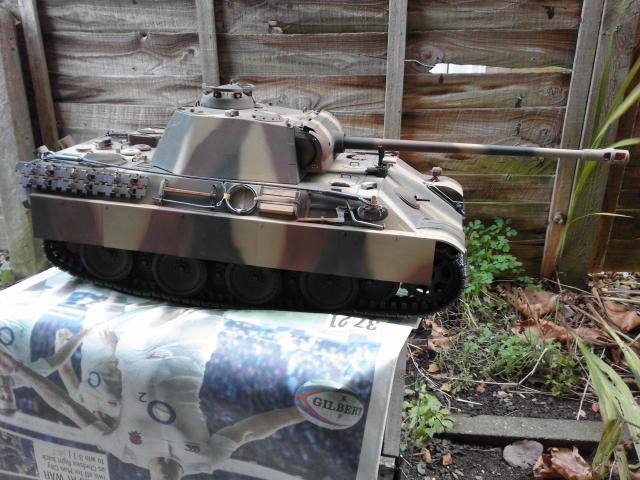
- 20161209_142046.jpg (60.43 KiB) Viewed 4525 times
Re: My Panther G Build
Posted: Fri Dec 09, 2016 3:23 pm
by doc larsson
helluva good job with the airbrush ! you have no fears now mate ! nice job.are you gonna weather it ?
Re: My Panther G Build
Posted: Fri Dec 09, 2016 3:47 pm
by silversurfer1947
I've downloaded some "How To" guides from the AK web-site and have a selection of paints. Once I have read them thoroughly, I shall have a go. I think a practice on some scrap plastic might be a good idea. If I had an old cheap tank, I would practice on that. I don't want to ruin all the hard work that I've put into the Panther.
Re: My Panther G Build
Posted: Fri Dec 09, 2016 4:03 pm
by Bogeyman
Richard, well done mate, you have done an amazing job, it's not an easy proposition to take on a job like this for your second build, you have done yourself proud

John
Re: My Panther G Build
Posted: Sat Dec 10, 2016 9:55 am
by silversurfer1947
I'm now thinking about putting on the decals. When I did them on my Tiger, they finished up looking like stuck on decals -not very impressive. If I recall correctly, I have read on here somewhere about some solutions which effectively melt the decals into the paintwork. I can't find it, so if anyone can either point me in the right direction, or supply a brief masterclass on fixing decals, I shall be exceedingly grateful.
Re: My Panther G Build
Posted: Sat Dec 10, 2016 11:30 am
by Estnische
Micro sol and Micro set, although Humbrol make, I think, Decalfix which does the same thing.
There are some pretty handy tutorials on Youtube from the modelling channels which run you through the processes, in particular on when to stop interfering with the processes.
Re: My Panther G Build
Posted: Sat Dec 10, 2016 1:04 pm
by Bogeyman
Richard, the same can also be bought from Vallejo, they work very well.
John