Page 6 of 9
Re: My Tiger Tank 1 (Early model, full option) Build.
Posted: Thu Jan 21, 2016 12:48 pm
by silversurfer1947
I have a small problem for which I would like advice. I imagine the answer will be second nature to the experienced talented modellers, but despite my advancing years, I most definitely do not fall into this category. When I assembled and painted my Tiger, I was intending to fit the tools as supplied by Tamiya. However, I now wish to use brass PE clamps and fittings to secure them. As I see it, this will leave me a number of location holes in the top deck which will not be covered. I don't really want to have to do a major repaint, so is there a easy way to deal with them? I have body putty.
Edit. I have realised this is a pretty stupid question. What I was proposing was just to push some body putty in to the holes and paint over them. However, I am worried about how to blend them so they don't just look like holes that have been filled. Hope that makes sense, and apologies for being a bit of an idiot.
Re: My Tiger Tank 1 (Early model, full option) Build.
Posted: Thu Jan 21, 2016 1:36 pm
by jarndice
Richard, If I understand you correctly you want to use filler to fill the holes in the Tank body but you are afraid you will remove large areas of paint when trying to flatten the filler residue.
I assume the lady in your life uses "ABRASIVE FINGER BOARDS" to trim her nails.?
"BORROW" a couple of them and cut them to size and you can then flatten only that part of the Tank body that needs it and then touch up the abraded area with your airbrush or a paintbrush.
shaun.
I owe this tip to the Major General and it has become an essential part of finishing my builds.
Re: My Tiger Tank 1 (Early model, full option) Build.
Posted: Thu Jan 21, 2016 1:50 pm
by silversurfer1947
Doh! I already use finger boards, but it never occurred to me to cut them down. Thanks for that. I really must try and put my brain into gear every now and then.
Re: My Tiger Tank 1 (Early model, full option) Build.
Posted: Sun Jan 24, 2016 2:58 pm
by silversurfer1947
A couple more photos, hopefully showing what I have tried to do with the deck mounted tools. The photos give no indication of the amount of time it has taken, how much blue air they have generated and the number of times I have nearly super-glued my fingers together. I have no doubt, a lot of the tank builders here would be able to have all the clamps fully working, but my level of ability means they are all glued, hopefully permanently.

- 20160124_144217.jpg (42.09 KiB) Viewed 5289 times
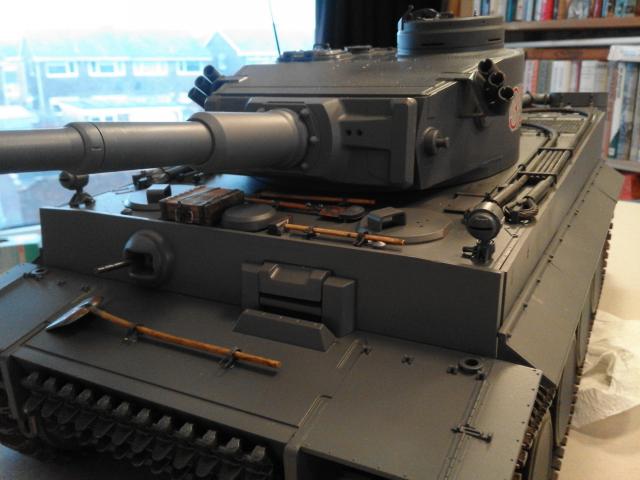
- 20160124_144237.jpg (38.16 KiB) Viewed 5289 times
Next task is to represent the wiring conduits for the headlamps, which are not working ones.
Re: My Tiger Tank 1 (Early model, full option) Build.
Posted: Sun Jan 24, 2016 3:01 pm
by Ad Lav
Looking great!
The Jack block is awesome.
Think it might have put you off another Aber set.
Re: My Tiger Tank 1 (Early model, full option) Build.
Posted: Sun Jan 24, 2016 4:53 pm
by jarndice
Richard, The best way to emulate the headlight wiring is to use ordinary raw "SOLDER" off the spool,
The dimensions are right and it bends exactly along any given line you wish and of course a drop of superglue will retain its position on the Tank.
shaun.
Re: My Tiger Tank 1 (Early model, full option) Build.
Posted: Sun Jan 24, 2016 5:46 pm
by silversurfer1947
And I've just come down from making the first one out of some brass rod

I'll give this a try for the other side. I would do both of them, but I am using Aber etch parts and have firmly superglued the nuts and washers to the one I have done. Thanks for the info - I really ought to try a bit more lateral thinking when it comes to improvising.
Re: My Tiger Tank 1 (Early model, full option) Build.
Posted: Tue Jan 26, 2016 12:46 pm
by silversurfer1947
Come on here to let off steam! It has just taken me 45 minutes to assemble one clamp for the rear tool box,despite using helping hands and a large work light and magnifier. None of these is any use when trying to thread a 0.3mm rod through 4 0.3mm holes. The harder I try to keep them still, the more my fingers shake! Still it's done now. I still have more to do but need a break.
Re: My Tiger Tank 1 (Early model, full option) Build.
Posted: Tue Jan 26, 2016 3:17 pm
by PainlessWolf
SilverSurfer,
I just wanted to say that I had just looked over your earlier photos in your build thread here again and seriously, your Tiger is looking brilliant! I'm currently working on a 1/6 scale tank and even then somethings are like 'ARRRGGGH!' I've done a few 1/16th and smaller and know the masochistic pleasures of 'Tiny' and 'Fiddly' so hang in there, sir. The results of your hard work are showing.
regards,
Painless
Re: My Tiger Tank 1 (Early model, full option) Build.
Posted: Tue Jan 26, 2016 3:24 pm
by silversurfer1947
Thank you for the kind words. It does help. Fortunately, I live on my own, so I can let rip when things go awry without anyone to complain about the language!
I reckon, by the time i have finished, all the little bits and pieces will have taken me longer than the rest of the tank put together. Still, they do say that the devil is in the detail. More photos will appear as the back end comes together.