Page 5 of 8
Re: IDF Sherman M50
Posted: Sat Feb 01, 2014 12:26 pm
by tomhugill
That's pretty cool!
Re: IDF Sherman M50
Posted: Sat Feb 01, 2014 5:46 pm
by forgebear
looks good frank what mix did you use for the colour
dave
Re: IDF Sherman M50
Posted: Sat Feb 01, 2014 6:01 pm
by forgebear
still looks good like that mate i have some where the mix code for the idf

Re: IDF Sherman M50
Posted: Sat Feb 01, 2014 6:04 pm
by forgebear
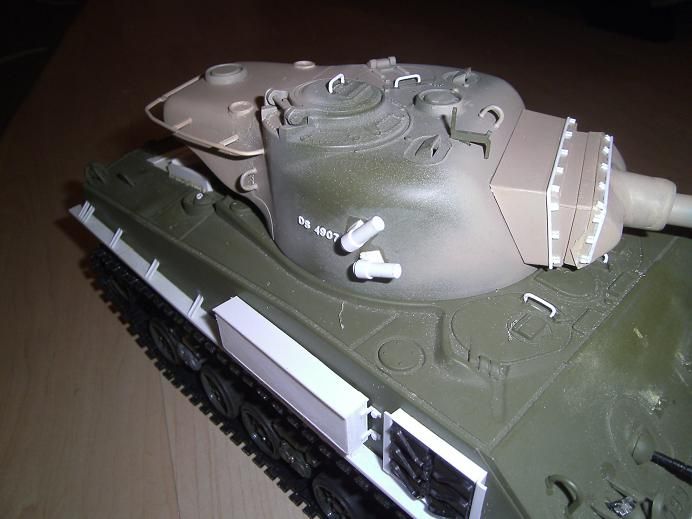
According to what I've read and seen in pictures, there were M51 painted
in a kind of Olive Drab and a Desert Yellow typical of the IDF which is
very close to the Buff. One of our collaborators, suggested me to use a
mix of Tamiya Desert Yellow XF-59 + Buff XF-57. Actually, I believe that
these tanks once painted had a semi gloss finish, but as result of the
desert, they quickly became matt, so it’s correct to paint them matt color.
Once the mix was prepared, it looked very yellow, more similar to the
paint needed for a vehicle of the WWII burnt by sun exposure than for an
Israeli one, so, I added very small amounts of grey, yellow, buff... etc
until the result satisfied me. I think this is the best method since the
IDF didn’t followed the FS standard but the resources they had to hand,
and two equal vehicles in different periods would look different.
dave
Re: IDF Sherman M50
Posted: Sat Feb 01, 2014 6:07 pm
by forgebear
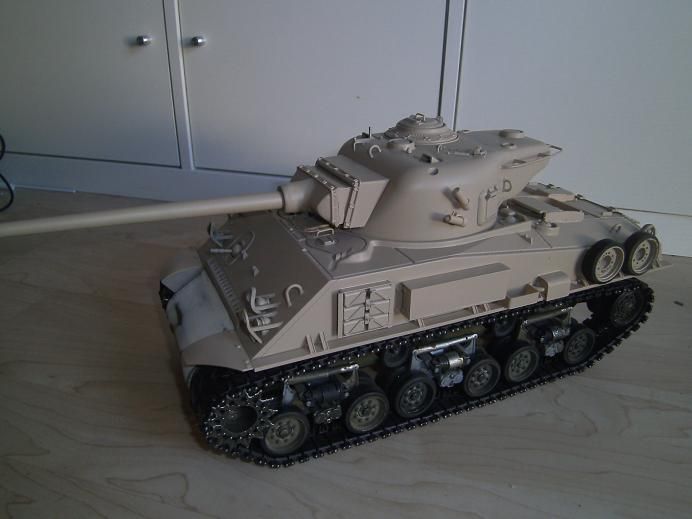
I lightened the centre of the panels with very diluted Buff
For the weathering, I used acrylics starting from a couple of filters
with burnt umber as well as punctual washes with the same acrylic
darkened with black and /or lightened with burnt sienna, and grey,
white, rust pigments...etc.
The traces of water were made by applying a point of acrylic white,
giving downward strokes with a clean brush wet in alcohol. In this way I
accomplished different vertical marks, mixing yellow and white points.
I didn’t consider it necessary to give any drybrushing, but black lead
taken from a 6B pencil scraped with a #180 sand, applied with my finger
tips on the hatches’ edges, tools...etc.
I painted the tracks with XF 64 and gave black and buff washes. Then,
white and sand pigments were applied and finally I used abundant
graphite for the area where the tracks touch the ground.
The ID plates were drawn and printed in paper to be later glued on the
hull. The size should be around 25mm.
dave
Re: IDF Sherman M50
Posted: Sun Feb 02, 2014 3:30 am
by cannedheat
looks better all the time nice one .........wot wot
Re: IDF Sherman M50
Posted: Sun Feb 02, 2014 6:29 pm
by ALPHA
YOU DEMON!

...........

Torturing poor me ... here stranded on a Rock in the Pacific

One day fynsdad,,,, One day

...

ALPHA
Re: IDF Sherman M50
Posted: Sun Feb 02, 2014 6:31 pm
by ALPHA
fynsdad wrote:Still got a bit of work to do, but took advantage of a break in the weather to blow a quick coat of paint on

WOW!... JUST WOW!

ALPHA
Re: IDF Sherman M50
Posted: Mon Feb 03, 2014 10:47 am
by ALPHA
cannedheat wrote:looks better all the time nice one .........wot wot
If ye treasure box allows ... get it canned
ALPHA
Re: IDF Sherman M50
Posted: Mon Feb 03, 2014 1:22 pm
by teddyt
forgebear wrote:I lightened the centre of the panels with very diluted Buff
For the weathering, I used acrylics starting from a couple of filters
with burnt umber as well as punctual washes with the same acrylic
darkened with black and /or lightened with burnt sienna, and grey,
white, rust pigments...etc.
The traces of water were made by applying a point of acrylic white,
giving downward strokes with a clean brush wet in alcohol. In this way I
accomplished different vertical marks, mixing yellow and white points.
I didn’t consider it necessary to give any drybrushing, but black lead
taken from a 6B pencil scraped with a #180 sand, applied with my finger
tips on the hatches’ edges, tools...etc.
I painted the tracks with XF 64 and gave black and buff washes. Then,
white and sand pigments were applied and finally I used abundant
graphite for the area where the tracks touch the ground.
The ID plates were drawn and printed in paper to be later glued on the
hull. The size should be around 25mm.
dave
sounds Interesting Dave. can you put your build log of your IDF shermans up as I would very much like to see them Cheers