HL Panther G customization diary
Re: HL Panther G customization diary
Beautiful Panther,nice job 
Re: HL Panther G customization diary
Thanks Koubiak. I also enjoyed reading your E100 build and continue to follow your updates on it.
Re: HL Panther G customization diary
Thanks for posting the tutorial on creating rain streaks - very informative.
Re: HL Panther G customization diary
Updates 1/19/2014 - Mud Effects Finished
Finally had some time to complete the weathering of the tank. Decided to complete the Dirt/Mud effects. In my previous post, I mentioned I bought some Art pastel colors.

Chose the following colors for my mud.


I grounded up the pastels by rubbing it on a sieve.

I placed a container underneath to catch the powder.


And here are all the colors collected.

To make my mud, I dissolved white glue in water. You can vary the consistency of the liquid by adding more glue.


In a separate container, I mixed the different pastel powders to approximate the color of mud. This first mix, looked a bit too brown. When I applied it on the tank it almost disappears in the red brown camo of the tank. I fixed it later by adding more yellow pastel to the mix.

Pour this mix into the white glue and water mix.

I then applied the "mud" on the tracks.


To vary the color of the mud, I poured a little of the different colored powders onto the tracks.


No matter how much mud a track accumulates, the guide horns will still be clean since this gets worn down to bare metal as the tank moves. To replicate this, I brushed some Hobby color silver to the track guides.

As you can see below, I didn't bother to silver the track cleats as this should get worn to the bare metal as I run the tank on rough ground.

Added some mud on the fenders as well. (Sorry for the underexposed shot)

Next added some mud on the sprockets and idlers. Here I tried not to cover with mud the paint chipping I did before.


Sprockets and idlers finished.

Next I did the road wheels. Here I ran my finger on the mud to spread it out and make it look like mud smear.

Road wheels finished.

I then muddied the schurzen plates.

I even tried adding mud splatter. At first I read somewhere that you can dip the mud in a toothbrush and as you run your fingers on the brush, It should splatter. However I tried this but could not get the mud to splatter. So I tried a different approach. I dipped a brush in mud making sure it is saturated, then I quickly whipped the brush to make the splatter effect.


Not completely satisfied but it should do. I limited the splatter on the leading and trailing side skirts.


Also added mud splatter on the tank rear and lower sides.


Here I laid the tank on some rubber hoses to cushion it and then covered the underside to prevent stray splatters.

And here is the tank rear after adding mud and mud splatters.

Next I muddied the lower hull under the sponsons. I covered the drive shaft and idler holes to prevent the mud from getting inside and clogging up the works.


Then it was just a matter of applying the mud with a brush.


Finally had some time to complete the weathering of the tank. Decided to complete the Dirt/Mud effects. In my previous post, I mentioned I bought some Art pastel colors.
Chose the following colors for my mud.
I grounded up the pastels by rubbing it on a sieve.
I placed a container underneath to catch the powder.
And here are all the colors collected.
To make my mud, I dissolved white glue in water. You can vary the consistency of the liquid by adding more glue.
In a separate container, I mixed the different pastel powders to approximate the color of mud. This first mix, looked a bit too brown. When I applied it on the tank it almost disappears in the red brown camo of the tank. I fixed it later by adding more yellow pastel to the mix.
Pour this mix into the white glue and water mix.
I then applied the "mud" on the tracks.
To vary the color of the mud, I poured a little of the different colored powders onto the tracks.
No matter how much mud a track accumulates, the guide horns will still be clean since this gets worn down to bare metal as the tank moves. To replicate this, I brushed some Hobby color silver to the track guides.
As you can see below, I didn't bother to silver the track cleats as this should get worn to the bare metal as I run the tank on rough ground.
Added some mud on the fenders as well. (Sorry for the underexposed shot)
Next added some mud on the sprockets and idlers. Here I tried not to cover with mud the paint chipping I did before.
Sprockets and idlers finished.
Next I did the road wheels. Here I ran my finger on the mud to spread it out and make it look like mud smear.
Road wheels finished.
I then muddied the schurzen plates.
I even tried adding mud splatter. At first I read somewhere that you can dip the mud in a toothbrush and as you run your fingers on the brush, It should splatter. However I tried this but could not get the mud to splatter. So I tried a different approach. I dipped a brush in mud making sure it is saturated, then I quickly whipped the brush to make the splatter effect.
Not completely satisfied but it should do. I limited the splatter on the leading and trailing side skirts.
Also added mud splatter on the tank rear and lower sides.
Here I laid the tank on some rubber hoses to cushion it and then covered the underside to prevent stray splatters.
And here is the tank rear after adding mud and mud splatters.
Next I muddied the lower hull under the sponsons. I covered the drive shaft and idler holes to prevent the mud from getting inside and clogging up the works.
Then it was just a matter of applying the mud with a brush.
Last edited by jeff1101 on Sun Jan 19, 2014 1:19 pm, edited 2 times in total.
Re: HL Panther G customization diary
Updates cont'd. Adding Oil stains and rust effects
I also decided to add some oil stains on the engine coolant filler cover. To do this, mixed some white and balck oil paint in 50/50 mix diluted with mineral spirit.


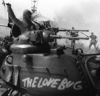
Also while doing some research on my panther, I found this picture. You can see what seems to be engine oil coming out of the open hand crank access hole.

Decided to copy this on my tank as well.

Finally added rust on the inner exhaust pipe just before the flame dampeners. Rust has a complex color and quite difficult to replicate. Decided to use these oil paint colors.

Squeezed a little of each color on a card. I then dipped a brush on each color and applied it on the exhaust. I started with the darkest first and then lightest color last. The reds I used in between. I applied the paint just on the tip of the brush and applied the paint as small dots.


Here are the results. Not bad I think.


Whew. Weathering effects are finished. Except for the tow ropes I can say the tank itself is now finished. All I need to do is let it dry for a week, spray a final coat of matte clear, do final assembly and that should be it.
Thanks for reading.
I also decided to add some oil stains on the engine coolant filler cover. To do this, mixed some white and balck oil paint in 50/50 mix diluted with mineral spirit.
Also while doing some research on my panther, I found this picture. You can see what seems to be engine oil coming out of the open hand crank access hole.
Decided to copy this on my tank as well.
Finally added rust on the inner exhaust pipe just before the flame dampeners. Rust has a complex color and quite difficult to replicate. Decided to use these oil paint colors.
Squeezed a little of each color on a card. I then dipped a brush on each color and applied it on the exhaust. I started with the darkest first and then lightest color last. The reds I used in between. I applied the paint just on the tip of the brush and applied the paint as small dots.
Here are the results. Not bad I think.
Whew.
Thanks for reading.
-
doc larsson
- Staff Sergeant
- Posts: 829
- Joined: Sat Sep 29, 2012 5:05 pm
Re: HL Panther G customization diary
gorgeous job jeff. when i get my self a panther i will return to this for reference.shouldn't this be in the masterclass section ? i'd nominate if that's all it takes ! now get some troops on/in it !
-
PainlessWolf

- Colonel
- Posts: 7970
- Joined: Sun Feb 26, 2012 9:09 pm
- Location: Southern Colorado Rocky Mountains
Re: HL Panther G customization diary
Good Morning,
Jeff, the paint on your Panther is as detailed and as amazing as all of the work you have done to date on this tank. I'll gladly give my vote to add your Panther G to the Masterclass section. It certainly belongs there.
Regards,
Painless
Jeff, the paint on your Panther is as detailed and as amazing as all of the work you have done to date on this tank. I'll gladly give my vote to add your Panther G to the Masterclass section. It certainly belongs there.
Regards,
Painless
...Money!? What's that!?...
Re: HL Panther G customization diary
I agree with Painless Jeff and would be happy to vote for this to go into the masterclass.
-
palepainter
- Sergeant
- Posts: 564
- Joined: Sun Nov 03, 2013 4:04 am
- Location: Lafayette, CO
Re: HL Panther G customization diary
Ditto. Not only for the quality of build, but the documentation as well. 
-
doc larsson
- Staff Sergeant
- Posts: 829
- Joined: Sat Sep 29, 2012 5:05 pm
Re: HL Panther G customization diary
so that's 4 votes then ?
