Good Evening, Jeff,
Mums the word. ;o)
warm regards,
painless
HL Panther G customization diary
-
PainlessWolf

- Colonel
- Posts: 7970
- Joined: Sun Feb 26, 2012 9:09 pm
- Location: Southern Colorado Rocky Mountains
Re: HL Panther G customization diary
...Money!? What's that!?...
Re: HL Panther G customization diary
This is so awesome!!!
I just recently purchased the same kit and this diary will be invaluable in my attempt to refine the Heng Long Panther Ausf G, as well. Thank you so much. This was an exciting journey and very interesting to see you grow in your skills and confidence as you took on more challenges and achieved even the minute, yet complex details.
Hats off to you!!!
Re: HL Panther G customization diary
Updates 07/12/2013 - Washes cont'd
Thanks Warchild. I know you will have as much fun customizing your Panther as I have.
In my last post I added a wash to outline the bolts, panel lines and what not on the tank.
Here is the particular area once the wash has dried. Sorry for the color issues as I took these photos under flourescent lights and my camera had a heck of a time trying to get the correct white balance.

To remove the excess wash I dipped a cotton bud in mineral spirit/turpentine thinner and wiped away (gently) the excess oil paint. The oil paint can really stick in there so you have to repeatedly wipe using the cotton bud but be gentle as you don't want to scrape away any of the acrylic paint. The cotton bud should just be moist (not dripping wet) so you can control the amount of excess wash you want to remove. Also it is not a good idea to slather the entire tank in wash (unless you intend it to be a filter) as removing the excess can be a pain. Just put some directly in areas you want the effect.

And here is this area finished.

I am not quite finished applying the wash, but I have done specific areas so you can see the effect.
Before

After

Notice how the wash adds contrast to the bolts, panels lines and fuel/cooler covers and make them stand out.
Here are the other areas that were finished.


The wash is especially effective in emphasizing areas of the tank that has a coarse texture.


I'll paint the tow ropes next.

Thanks Warchild. I know you will have as much fun customizing your Panther as I have.
In my last post I added a wash to outline the bolts, panel lines and what not on the tank.
Here is the particular area once the wash has dried. Sorry for the color issues as I took these photos under flourescent lights and my camera had a heck of a time trying to get the correct white balance.
To remove the excess wash I dipped a cotton bud in mineral spirit/turpentine thinner and wiped away (gently) the excess oil paint. The oil paint can really stick in there so you have to repeatedly wipe using the cotton bud but be gentle as you don't want to scrape away any of the acrylic paint. The cotton bud should just be moist (not dripping wet) so you can control the amount of excess wash you want to remove. Also it is not a good idea to slather the entire tank in wash (unless you intend it to be a filter) as removing the excess can be a pain. Just put some directly in areas you want the effect.
And here is this area finished.
I am not quite finished applying the wash, but I have done specific areas so you can see the effect.
Before
After
Notice how the wash adds contrast to the bolts, panels lines and fuel/cooler covers and make them stand out.
Here are the other areas that were finished.
The wash is especially effective in emphasizing areas of the tank that has a coarse texture.
I'll paint the tow ropes next.
-
palepainter
- Sergeant
- Posts: 564
- Joined: Sun Nov 03, 2013 4:04 am
- Location: Lafayette, CO
Re: HL Panther G customization diary
Beautiful paint work!! Thanks for all the tips and pointers.
-
PainlessWolf
- Colonel
- Posts: 7970
- Joined: Sun Feb 26, 2012 9:09 pm
- Location: Southern Colorado Rocky Mountains
Re: HL Panther G customization diary
Good Morning,
Thanks for the step by step on the wash process. This will prove incredibly useful going forward with all of my builds. Excellent work!
regards,
Painless
Thanks for the step by step on the wash process. This will prove incredibly useful going forward with all of my builds. Excellent work!
regards,
Painless
...Money!? What's that!?...
Re: HL Panther G customization diary
Updates 15/12/2013 - Weathering cont'd
Not much done today as I was doing some work around the house but managed to start weathering the lower hull and finished weathering the wheels.
For the lower hull, decided to mix Titanium white and charcoal black oil paint at about 75% and 25 % respectively to emphasize the lines of the drive housing and bump stops. I used this mix to simulate dirty grease and oil stains that builds up around this area.
Paints

Mixed very thin with mineral spirit and applied as a wash

Also applied in top corner of lower hull and bump stops.

When dried, cleaned the excess wash with mineral spirit using cotton swab dipped in mineral spirit.
Before

After


I also finished up weathering the wheels. After I added a wash of Raw Amber oil paint to the wheels, I added a minor detail that was left out by Heng Long. As you can see in the picture below of the inner road wheel from the Littlefield panther (from http://www.svsm.org) , Heng Long has made a mistake in that they left out the metal flange just after the rim bolts. This flange partially covers and protects the rubber rims from the guide horns. Also since this flange contact the guide horns, it will (as the tank moves) get worn to bare metal.
In this picture you can see the flange already getting worn with the paint chipping exposing bare metal. Obviously the Littflefield panther has only a few miles on it (maybe not even then!), but you can imagine the amount of wear on this flange for panthers that traveled a considerable distance.

I decided to simulate this using just paint. First I painted the outer rim in thinned Tamiya XF- 9 Hull Red. Then I dry brushed some hobby color silver

to simulate wear on the flange.


And here are the road wheels weathered and finished.

Not much done today as I was doing some work around the house but managed to start weathering the lower hull and finished weathering the wheels.
For the lower hull, decided to mix Titanium white and charcoal black oil paint at about 75% and 25 % respectively to emphasize the lines of the drive housing and bump stops. I used this mix to simulate dirty grease and oil stains that builds up around this area.
Paints
Mixed very thin with mineral spirit and applied as a wash
Also applied in top corner of lower hull and bump stops.
When dried, cleaned the excess wash with mineral spirit using cotton swab dipped in mineral spirit.
Before
After
I also finished up weathering the wheels. After I added a wash of Raw Amber oil paint to the wheels, I added a minor detail that was left out by Heng Long. As you can see in the picture below of the inner road wheel from the Littlefield panther (from http://www.svsm.org) , Heng Long has made a mistake in that they left out the metal flange just after the rim bolts. This flange partially covers and protects the rubber rims from the guide horns. Also since this flange contact the guide horns, it will (as the tank moves) get worn to bare metal.
In this picture you can see the flange already getting worn with the paint chipping exposing bare metal. Obviously the Littflefield panther has only a few miles on it (maybe not even then!), but you can imagine the amount of wear on this flange for panthers that traveled a considerable distance.
I decided to simulate this using just paint. First I painted the outer rim in thinned Tamiya XF- 9 Hull Red. Then I dry brushed some hobby color silver
to simulate wear on the flange.
And here are the road wheels weathered and finished.

Re: HL Panther G customization diary
Updates Dec 31, 2030 - Painting the Side Skirts
Happy Holidays everyone! I guess this would be my last post for 2013 and I hope to finish the Panther next year.
But before my main post, I would like to ask a question, regarding my attempt to paint the tow ropes. The HL tow rope is made of a rubbery plastic material. It does wonders in making the rope flexible, however this same property makes it impossible for paint to stick to it. I tried priming the rope but the primer started flaking off at the slightest touch.

Any opinions? How did you paint the tow ropes?
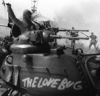
For the side skirts, I again used this photo of panther 242 as my reference. I plan to make the skirts a bit more weathered using the salt technique. I experimented masking with salt twice, first for the red oxide primer to show the bare metal and second for the camo colors on top of the primer.
I also tried to replicate this very long paint scratch that extends to 3 side plates.

Although I was hesitant using masking liquids before, I bought this new brand of masking liquid which I tried for this step. I plan to use this masking liquid for the paint scratch as it is impossible to replicate the scratch using salt.

First I primed the side skirts using Tamiya grey primer. I then sprayed Tamiya Dark Iron in patches. It doesn't have to be thick so that some grey primer would still be visible underneath.

Then I started with the weathering. To allow this color to show through, I masked the scratch using the masking liquid.


I "pulled" the masking liquid using a toothpick to simulate the long scratches.

scratches masked...


For paint chipping, I used the salt method.

I then sprayed my red oxide primer color mix.

When the red oxide color dried, I brushed the salt off using a brush.

The masking liquid dissolves using water so I just soaked the side skirts in a bowl of water and then used a cotton swab remove the masking liquid. The paint is then removed with it.

Results:


I then proceeded with the 2nd level masking. I repeated the salt technique and liquid mask for the scratches. Unfortunately I forgot to photograph this step, but it should be the same as the previous step. What the salt and liquid mask does is to reveal the red oxide color underneath the camouflage. Re-apply the salt and masking liquid in the same areas you masked earlier. After this is done, I then spayed on top of this my dark yellow color mix.
Here you can see traces of the salt and the masking liquid I added (again) just underneath the dark yellow.

I then masked the dark yellow using blu-tac. I did not even attempted to follow the pattern I used for the hull on the side skirt. What I was trying to aim for was that these side skirts belonged to another tank (Hence the excessive weathering) or was painted independently and not attached to this tank when camo was applied.

Then sprayed my red brown color mix.

And finally the olive green color mix.

After the paint dried, I removed the salt and masking liquid using the same process I mentioned previously.


And here are the side skirts attached to the tank. These have not been sprayed with Klear yet.


Finally I sprayed on Klear to protect the paint and also stop the paint from "peeling" further. Here is a comparison shot of the original reference panther and my "interpretation" of it in my panther. I tried to match the camera angle and perspective as much as possible with the original period photo.


Thanks for reading and have a Happy New Year.
Happy Holidays everyone! I guess this would be my last post for 2013 and I hope to finish the Panther next year.
But before my main post, I would like to ask a question, regarding my attempt to paint the tow ropes. The HL tow rope is made of a rubbery plastic material. It does wonders in making the rope flexible, however this same property makes it impossible for paint to stick to it. I tried priming the rope but the primer started flaking off at the slightest touch.
Any opinions? How did you paint the tow ropes?
For the side skirts, I again used this photo of panther 242 as my reference. I plan to make the skirts a bit more weathered using the salt technique. I experimented masking with salt twice, first for the red oxide primer to show the bare metal and second for the camo colors on top of the primer.
I also tried to replicate this very long paint scratch that extends to 3 side plates.
Although I was hesitant using masking liquids before, I bought this new brand of masking liquid which I tried for this step. I plan to use this masking liquid for the paint scratch as it is impossible to replicate the scratch using salt.
First I primed the side skirts using Tamiya grey primer. I then sprayed Tamiya Dark Iron in patches. It doesn't have to be thick so that some grey primer would still be visible underneath.
Then I started with the weathering. To allow this color to show through, I masked the scratch using the masking liquid.
I "pulled" the masking liquid using a toothpick to simulate the long scratches.
scratches masked...
For paint chipping, I used the salt method.
I then sprayed my red oxide primer color mix.
When the red oxide color dried, I brushed the salt off using a brush.
The masking liquid dissolves using water so I just soaked the side skirts in a bowl of water and then used a cotton swab remove the masking liquid. The paint is then removed with it.
Results:
I then proceeded with the 2nd level masking. I repeated the salt technique and liquid mask for the scratches. Unfortunately I forgot to photograph this step, but it should be the same as the previous step. What the salt and liquid mask does is to reveal the red oxide color underneath the camouflage. Re-apply the salt and masking liquid in the same areas you masked earlier. After this is done, I then spayed on top of this my dark yellow color mix.
Here you can see traces of the salt and the masking liquid I added (again) just underneath the dark yellow.
I then masked the dark yellow using blu-tac. I did not even attempted to follow the pattern I used for the hull on the side skirt. What I was trying to aim for was that these side skirts belonged to another tank (Hence the excessive weathering) or was painted independently and not attached to this tank when camo was applied.
Then sprayed my red brown color mix.
And finally the olive green color mix.
After the paint dried, I removed the salt and masking liquid using the same process I mentioned previously.
And here are the side skirts attached to the tank. These have not been sprayed with Klear yet.
Finally I sprayed on Klear to protect the paint and also stop the paint from "peeling" further. Here is a comparison shot of the original reference panther and my "interpretation" of it in my panther. I tried to match the camera angle and perspective as much as possible with the original period photo.
Thanks for reading and have a Happy New Year.
-
PainlessWolf
- Colonel
- Posts: 7970
- Joined: Sun Feb 26, 2012 9:09 pm
- Location: Southern Colorado Rocky Mountains
Re: HL Panther G customization diary
Happy New Years, Jeff!
Thank you for the tips on the weathering. Beautiful job of replication. Here's hoping that 2014 will see the completion of this solid Panther and you on to the beginning of your next project. Have you given any thought to Russian or American armor types?
warm regards,
Painless
Thank you for the tips on the weathering. Beautiful job of replication. Here's hoping that 2014 will see the completion of this solid Panther and you on to the beginning of your next project. Have you given any thought to Russian or American armor types?
warm regards,
Painless
...Money!? What's that!?...
Re: HL Panther G customization diary
Your masking fluid and water method for replicating scratches is darn clever Sir.
