Sov,
All the Kudos remaining in the day, Sir ;o)
warm regards,
Painless
Sov's Tiger Build
-
PainlessWolf

- Colonel
- Posts: 7970
- Joined: Sun Feb 26, 2012 9:09 pm
- Location: Southern Colorado Rocky Mountains
Re: Sov's Tiger Build
...Money!? What's that!?...
-
SovereignZuul

- Corporal
- Posts: 456
- Joined: Sat Aug 25, 2012 11:50 pm
- Location: Connecticut, USA
Re: Sov's Tiger Build
TFTM....

Ready for the next one.
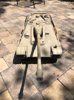
One of the brass sprues was missing with the tool box kit with the tiny latch pieces of course. I wasn't thrilled with that but it's w/e. I made due with spare clasp pieces from Voyager.
Here's another package of goodies that arrived recently. Should be everything I need to get this beast fully operational!

Challenge Complete.
Ready for the next one.
One of the brass sprues was missing with the tool box kit with the tiny latch pieces of course. I wasn't thrilled with that but it's w/e. I made due with spare clasp pieces from Voyager.
Here's another package of goodies that arrived recently. Should be everything I need to get this beast fully operational!
My Build Thread: http://www.rctankwarfare.co.uk/forums/v ... 22&t=10204
-
SovereignZuul
- Corporal
- Posts: 456
- Joined: Sat Aug 25, 2012 11:50 pm
- Location: Connecticut, USA
Re: Sov's Tiger Build
Doing some texturing of the tank. Way too plain with smooth as glass plastic.
Maxsollie of our forums inspired me to do this.
https://www.youtube.com/watch?v=_P5Ru1U ... X23eQZeq9g
You can see in pictures of the real rolled steel armor it's not very smooth at all. Lots of pits.
http://harveyblackauthor.files.wordpres ... nk-018.jpg
http://harveyblackauthor.files.wordpres ... nk-027.jpg
It's certainly a far leap from cast texture, so I had to be careful to find the correct method to style the texture as to not make it cast looking.
Anyone have tips on this let me know. Just winging it right now.
Got the whole lower hull pitted. Washed it thoroughly to get any dust off and it's drying, awaiting Mr. Surfacer 1200.

Here was a test portion I did. The under side of the turret. Looks pretty good and better yet, feels good. Once painted this should bring some more life to the armor.

Also "finished" my fenders.

Maxsollie of our forums inspired me to do this.
https://www.youtube.com/watch?v=_P5Ru1U ... X23eQZeq9g
You can see in pictures of the real rolled steel armor it's not very smooth at all. Lots of pits.
http://harveyblackauthor.files.wordpres ... nk-018.jpg
http://harveyblackauthor.files.wordpres ... nk-027.jpg
It's certainly a far leap from cast texture, so I had to be careful to find the correct method to style the texture as to not make it cast looking.
Anyone have tips on this let me know. Just winging it right now.
Got the whole lower hull pitted. Washed it thoroughly to get any dust off and it's drying, awaiting Mr. Surfacer 1200.
Here was a test portion I did. The under side of the turret. Looks pretty good and better yet, feels good. Once painted this should bring some more life to the armor.
Also "finished" my fenders.
My Build Thread: http://www.rctankwarfare.co.uk/forums/v ... 22&t=10204
-
Markocaster
- Staff Sergeant
- Posts: 997
- Joined: Mon Mar 31, 2014 11:16 pm
- Location: Bay Area , California
Re: Sov's Tiger Build
WOW the fenders are brilliant 
HL /Mato tiger 1 early, Tamiya Tiger 1 early, Taigen tiger 1 mid
Taigen T34/85, HL SU-100
Jagdpanzer Lang
Taiga Jagdpanther
Heng Long Sherman DGS Firefly kit
Tamiya King Tiger (unbuilt)
Mato all metal Panzer III
1/10 Jagdpanther
Taigen T34/85, HL SU-100
Jagdpanzer Lang
Taiga Jagdpanther
Heng Long Sherman DGS Firefly kit
Tamiya King Tiger (unbuilt)
Mato all metal Panzer III
1/10 Jagdpanther
-
Steelhammer
- Corporal
- Posts: 251
- Joined: Sun Feb 12, 2012 8:04 pm
- Location: Birchington, Kent, UK
Re: Sov's Tiger Build
Absolutely stunning and a fine testiment to your ingenuity and attention to detail.
Quite remarkable
Quite remarkable
Tamiya King Tiger (no options)
Taigen Full Metal T34 (winter)
Heng Long Challenger II (European camo')
Tamiya Tiger I full options (still in the box)
Taigen Full Metal T34 (winter)
Heng Long Challenger II (European camo')
Tamiya Tiger I full options (still in the box)
-
SovereignZuul
- Corporal
- Posts: 456
- Joined: Sat Aug 25, 2012 11:50 pm
- Location: Connecticut, USA
Re: Sov's Tiger Build
Didn't get to my tank electronics before the new year like I wanted, but Soon™.
Everyone enjoy New Years!
Those times when you want to work on a fun project but get stuck doing an "unfun" one.
Back to car stuff. Daily Driver has a loud grinding (mostly in turns). Sounds like a wheel bearing to me.
The tragedy is learning how rust penetrator will turn a brand new asphalt driveway to loose stone.
Gotta find someway to fix that & fast.... The GF won't appreciate that.
You learn something new erry'day, rite?
Now if only I could lift my arms. Nothing like swinging steel to steel about 1000 times... On that note I love my new 4lb blacksmith hammer.
My Build Thread: http://www.rctankwarfare.co.uk/forums/v ... 22&t=10204
-
PainlessWolf
- Colonel
- Posts: 7970
- Joined: Sun Feb 26, 2012 9:09 pm
- Location: Southern Colorado Rocky Mountains
Re: Sov's Tiger Build
Sov,
I love your Tools! Good job on the Bearing! To fix your driveway: Run down to your local Home Despot and buy Kitty Litter, a bucket of Asphalt Sealant and a cheap Window Washer Squeegee. Pour Kitty litter and let it sit for a couple of hours to soak up the rest of the rust remover. Sweep up the litter carefully but thoroughly. Pour the Liquid Asphalt Sealant on in a puddle to size with the crumbling spot in your driveway. Squeegee it flat. Heat it with a heat gun or blow dryer til you see it setting up. Repeat the pour as needed, mixing in a handful of sand for consistency to match if required.
regards and Happy New Years!
Painless
...Money!? What's that!?...
-
SovereignZuul
- Corporal
- Posts: 456
- Joined: Sat Aug 25, 2012 11:50 pm
- Location: Connecticut, USA
Re: Sov's Tiger Build
I did soak up the mess with litter after the tip, thanks Painless. I'll get to the rest of the repair as soon as I can. 
Did my texturing with Mr. Surfacer 1200 on the lower hull today.
Hard to see in the pic, sorry.
Started out rough with lots of raised areas after applying the treatment and sponging it. A very brief light sanding brought it somewhat flat and smooth with only a light rough feel. It feels better than the smooth slippery plastic feel before. I really won't know how it looks until some paint. Might try to get some paint on it this weekend? I've got all I need, but painting with an airbrush is one more thing I haven't done so another learning process. I've been meaning to paint the exhausts asap as is, so I can get the shrouds on, and then the rest of the rear plate parts. Would be good to get the majority of the lower hull together.
My Build Thread: http://www.rctankwarfare.co.uk/forums/v ... 22&t=10204
-
tanks_for_the_memory

- Sergeant
- Posts: 501
- Joined: Tue Jan 04, 2011 4:50 pm
- Location: London
Re: Sov's Tiger Build
Dear Sov,
I'm afraid I was too slow to pick that gauntlet back up and smack myself around the face with it at the appropriate moment - excellent work with that rear tool box!
The texture of a tank is an interesting extra dimension - and one easily overlooked in pursuit of scale perfection. The 1/35th boys (and girls) cottoned on to it ages ago, but I feel we in 1/16th land have been a little too slow. Everyone worries about the paint job (and I sense you are worrying - relax if your photo-etch skills are that good you will have a natural hand with an airbrush) but what is paint without the proper surface to attach it to?
Since your Tiger is remaining nude of zimmerit this texture is essential. Having said all that it certainly shouldn't be overdone.
And then again, there is more than one texture on a Tiger...
The surviving tank at Vimoutiers has been out in the rain for a long time (70 years and counting), much abused, repainted and climbed over for most of that time - plus it used to have zimmerit - but I believe it still shows us the tell-tale signs of how a German heavy panzer should look in 1/1 scale. Here are some photos I took on my French trip in 2013:
- The pitted texture on the rear plate of the Vimoutiers Tiger can be clearly seen here despite the over-painting.jpg (30.97 KiB) Viewed 4708 times
- Here you can see the milling marks where the front of the turret side plates were ground away.jpg (47.48 KiB) Viewed 4708 times
- The turret roof has a finely grained texture while the hull roof looks smoother (but this may just be the rain!).jpg (47.68 KiB) Viewed 4708 times
- The angled front plate seems to have the same texture as the roof.jpg (42.25 KiB) Viewed 4708 times
- While the glacis plate has the same pitted texture as the rear; typical of rolled, thick steel plate - note the gap behind the headlamp mount showing that it overlapped the original zimmerit.jpg (40.88 KiB) Viewed 4708 times
My Mid-Production Normandy Tiger 1 build thread: http://www.rctankwarfare.co.uk/forums/v ... =22&t=8350
-
tanks_for_the_memory
- Sergeant
- Posts: 501
- Joined: Tue Jan 04, 2011 4:50 pm
- Location: London
Re: Sov's Tiger Build
A few more shots...
- More grinding or 'milling' marks on the side of the shot deflector for the driver's visor.jpg (43.63 KiB) Viewed 4708 times
- A close up.jpg (41.05 KiB) Viewed 4708 times
- The texture of the hull side probably owes more to rust and paint deterioration than the original armour plate....jpg (47.82 KiB) Viewed 4708 times
- Here you can see that the cast metal area behind the engine hatch is rough - but has none of the random pitting or scarring of the thick armoured plate.jpg (35.22 KiB) Viewed 4708 times
- On the better preserved Saumur Tiger 1 the hull roof is relatively smooth by comparison....jpg (69.87 KiB) Viewed 4708 times
My Mid-Production Normandy Tiger 1 build thread: http://www.rctankwarfare.co.uk/forums/v ... =22&t=8350
