Alwyn
Nashorn kit - Another kit In Progress
-
AlwynTurner

- 2nd Lieutenant
- Posts: 2656
- Joined: Thu Oct 23, 2014 10:47 am
- Location: Chapel-en-le-Frith, Derbyshire
Re: Nashorn kit - Almost ready
Forgot to mention, the gun barrel is wired for muzzle flash, you just have to pull the wires at the muzzle brake, solder the flash neon or whatever you want to use, and connect the blue and brown wires to the muzzle flash socket on your MFU.
Alwyn

Alwyn
YOU'RE NEVER TOO OLD TO HAVE A HAPPY CHILDHOOD!
Saladin scratchbuild, Matilda scratchbuild, Churchill scratchbuild, Crusader scratchbuild, M10 Achiĺles scratchbuild, Universal Carrier scratchbuild
Saladin scratchbuild, Matilda scratchbuild, Churchill scratchbuild, Crusader scratchbuild, M10 Achiĺles scratchbuild, Universal Carrier scratchbuild
-
c.rainford73

- Major
- Posts: 6104
- Joined: Thu Aug 25, 2016 7:34 pm
- Location: Connecticut USA
Re: Nashorn kit - Almost ready
Yes I discovered that neat feature last night in the workshop
I will continue to dry fit parts this evening after work and then disassembly will begin with paint and such.
I have to admit. The locking mechanism on the rear fighting compartment doors is one of the best parts of this kit. It just speaks to the level of detail that you invested in this models design.
Tanks alot....
-
c.rainford73
- Major
- Posts: 6104
- Joined: Thu Aug 25, 2016 7:34 pm
- Location: Connecticut USA
Re: Nashorn kit - Almost ready
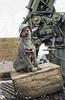
Today after work I spent the afternoon in my workshop and was able to take the gun apart following Mr Alwyn's instructions. It actually was quite simple just had to be extremely careful and take a lot of pictures.
I sanded and put the upper hull superstructure in primer. The gun was sanded and primed. I will wet sand the primer on the gun tomorrow. The wiring to the lower hull has been snaked and now I am working on the stowage boxes and shell racks.
I will also get some plastic card tomorrow and design a radio rack and spare track hangers.
Please don't worry it won't be left in red oxide...
I've yet to work the details on the lower hull and accessories.
I need to make room for a speaker system a small lipo battery to save space and my Clark board. I am 99% sure a tk60 will fit. Better measure one more time
I added a Bosch headlamp and wiring
For the first time in along time my wife (yes my dear wife) actually admired and liked one of my pieces of armour!
Maybe the key is to blow the lady away with crazy details....
So here we are as on this evening...


Tanks alot....
-
c.rainford73
- Major
- Posts: 6104
- Joined: Thu Aug 25, 2016 7:34 pm
- Location: Connecticut USA
Re: Nashorn kit - Almost ready
Thank youEastern Front wrote:Wow, not sure how I managed to miss this...I am gonna watch this to the end!
Awesome!
Cheers!

Tanks alot....
-
HERMAN BIX

- Lieutenant-General
- Posts: 12013
- Joined: Sun Jan 12, 2014 12:15 am
- Location: Gold Coast,Australia
Re: Nashorn kit - Almost ready
And the crowd goes silent......................
superb looking kit Mr Rainford, and a credit to Mr Turner for taking the time to make it.
superb looking kit Mr Rainford, and a credit to Mr Turner for taking the time to make it.
HL JAGDPANTHER,HL TIGER 1,HL PzIII MUNITIONSCHLEPPER, HL KT OCTOPUS,HL PANTHER ZU-FUSS,HL STuG III,HL T34/85 BEDSPRING,
HL PZIV MALTA,MATORRO JAGDTIGER,HL F05 TIGER,TAMIYA KT,HL PANTHERDOZER,HL EARLY PANTHER G,TAIGEN/RAMINATOR T34/76,
HL AN-BRI-RAM SU-85
HL PZIV MALTA,MATORRO JAGDTIGER,HL F05 TIGER,TAMIYA KT,HL PANTHERDOZER,HL EARLY PANTHER G,TAIGEN/RAMINATOR T34/76,
HL AN-BRI-RAM SU-85
-
c.rainford73
- Major
- Posts: 6104
- Joined: Thu Aug 25, 2016 7:34 pm
- Location: Connecticut USA
Re: Nashorn kit - Almost ready
Thank you Mr Herman! Alwyn really did a superb job designing this beast. I just ordered some bits from Forgebear to add some accessories, brackets and spare road wheels. Have to assemble the slew motor connection tomorrow and make some homemade metal parts. Some final measurements to confirm the tk60 board placement then I'll order it from Mr Maxmekker.HERMAN BIX wrote:And the crowd goes silent......................
superb looking kit Mr Rainford, and a credit to Mr Turner for taking the time to make it.

Tanks alot....
-
AlwynTurner
- 2nd Lieutenant
- Posts: 2656
- Joined: Thu Oct 23, 2014 10:47 am
- Location: Chapel-en-le-Frith, Derbyshire
Re: Nashorn kit - Almost ready
That's great work Carl, and so Quick! There's just one small problem to watch out for. When you glue in the ammo cupboards you will need to scrape off some paint so you get styrene to styrene contact as otherwise if you try and stick to paint then the cupboards will simply come loose. The alternative is to drill a couple of small holes from underneath to attach the ammo cupboards with small screws. The same thing applies to the tool box in the back of the tank and also when you fit the styrene card shelves for the radio.
Looking really good. Have you picked out a cammo scheme Yet?
Alwyn
Looking really good.
Alwyn
YOU'RE NEVER TOO OLD TO HAVE A HAPPY CHILDHOOD!
Saladin scratchbuild, Matilda scratchbuild, Churchill scratchbuild, Crusader scratchbuild, M10 Achiĺles scratchbuild, Universal Carrier scratchbuild
Saladin scratchbuild, Matilda scratchbuild, Churchill scratchbuild, Crusader scratchbuild, M10 Achiĺles scratchbuild, Universal Carrier scratchbuild
-
Jake79
- Warrant Officer 2nd Class
- Posts: 1062
- Joined: Mon Aug 11, 2014 9:10 pm
- Location: Essex,Colchester, UK
Re: Nashorn kit - Almost ready
such a nice kit Carl your a lucky guy to have one of these in your collection, great work so far..I'll deff be keeping an eye on this thread keen to know the camo you've chosen. Glad you got hold of the spare road wheels too I think they really add that bit extra to the look of the rear.
Tamiya: 2 King Tigers
H/L,Taigen :Initial Tiger 1, Panzer III, Kv 2, Panther G, Bulldog, Leo 2A6
H/L,Taigen :Initial Tiger 1, Panzer III, Kv 2, Panther G, Bulldog, Leo 2A6
-
AlwynTurner
- 2nd Lieutenant
- Posts: 2656
- Joined: Thu Oct 23, 2014 10:47 am
- Location: Chapel-en-le-Frith, Derbyshire
Re: Nashorn kit - Almost ready
Hi Carl, here is a pic of german tank radio consoles.

If you are getting some styrene card, these can be made by making flat card about the size of the radio front, cut holes in the card where the dials go, glue on round bits of styrene of the appropriate size for the knobs, square bits for the switches or drill small holes and use thin copper wire and insert it in the holes and superglue in, paint the front, then stick on white styrene behind where the dials are and use a fineliner pen to make markings on them.
Then just make boxes with the styrene card, inset the fronts into the boxes, and there you have the radios for your tank. With some very thin wire for the box connections and headphone cable it should look the business! Simples!
Alwyn
YOU'RE NEVER TOO OLD TO HAVE A HAPPY CHILDHOOD!
Saladin scratchbuild, Matilda scratchbuild, Churchill scratchbuild, Crusader scratchbuild, M10 Achiĺles scratchbuild, Universal Carrier scratchbuild
Saladin scratchbuild, Matilda scratchbuild, Churchill scratchbuild, Crusader scratchbuild, M10 Achiĺles scratchbuild, Universal Carrier scratchbuild
-
c.rainford73
- Major
- Posts: 6104
- Joined: Thu Aug 25, 2016 7:34 pm
- Location: Connecticut USA
Re: Nashorn kit - Almost ready
Thank you Alwyn for the information. I plan on using the screw in method for the ammo cupboardsAlwynTurner wrote:Hi Carl, here is a pic of german tank radio consoles.
If you are getting some styrene card, these can be made by making flat card about the size of the radio front, cut holes in the card where the dials go, glue on round bits of styrene of the appropriate size for the knobs, square bits for the switches or drill small holes and use thin copper wire and insert it in the holes and superglue in, paint the front, then stick on white styrene behind where the dials are and use a fineliner pen to make markings on them.
Then just make boxes with the styrene card, inset the fronts into the boxes, and there you have the radios for your tank. With some very thin wire for the box connections and headphone cable it should look the business! Simples!
Alwyn
no camo design yet. Today I do some research...Tanks alot....
