Managed to make some progress this week I'm pleased to say, although it's been a slow process. So, the task I set myself was to correct some of the details on the rear of the hull. As this is somewhat hidden below the upper hull rear armour it wasn't altogether necessary but the issues were just one of those things that kept bugging me (as these little things do sometimes

) so here's where the fun starts (as follows)!
 Viewed 3202 times")
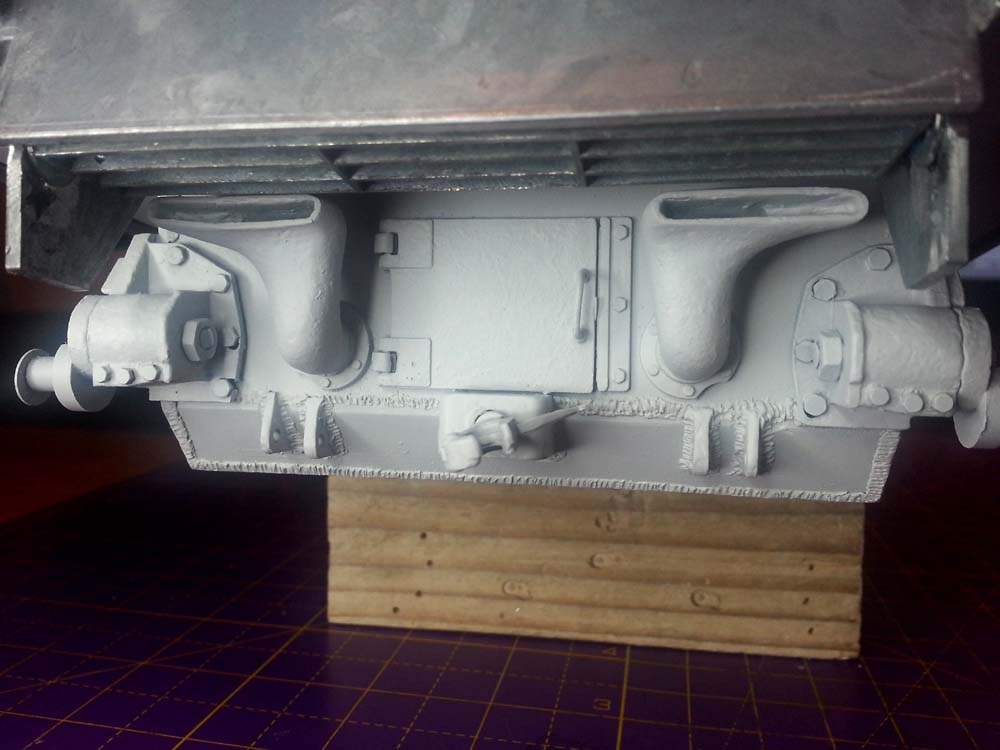
The image on the left (above) is of a welded hull construction (as opposed to cast/riveted) like the Mato so I took this as my template (the detailing is also very clear in this M4A3 example). Mato (right, of course) have done a fair job of approximating the details but there are shortfalls: 1) the exhaust shape is all wrong - too tall, too narrow, 2) the engine access door is too high on hull, notice the gap between the first weld (where the tow lugs are) and the bottom of the door, 3) the clamping bolts in the idler mounts (the three at the bottom of the mount) are barely visible and screws securing the idler assembly to the hull should be bolts too. Also the problem with the door and exhaust height mean the exhaust deflector didn't really work as it should by clearing away from the top of the exhausts and the engine door when in the up position (note that this example of the M4 hull has the deflector removed altogether). Oh dear, this thing this is becoming excessive!
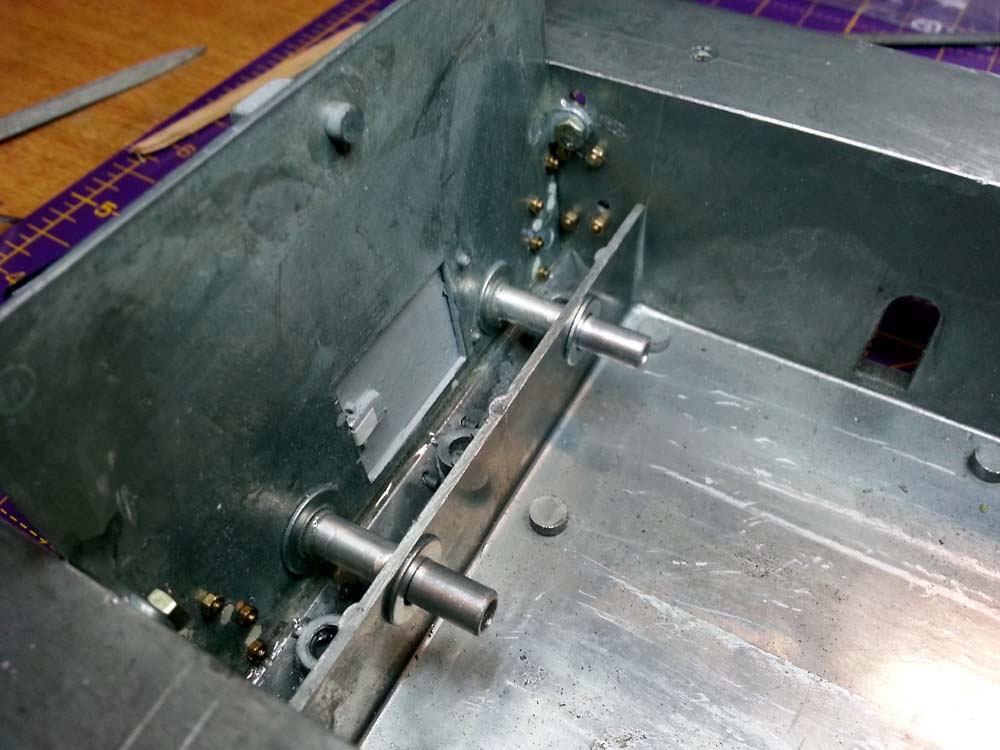
I had to drill out most of the idler mount screws (due to everything being super-glued together) and here I immediately come up against the 'crumbly metal' syndrome that Mato has with many of its detail parts. Barely any pressure was applied but it was enough for the exhaust part to break in into about 5-6 pieces each

;
I had to pretty much super heat the exhaust parts to get them out but end the end I managed and went on to start reconstructing them to match the ones in the example above. I also removed the excess material on the bottom of the plate to bring the engine door down to where it should be (notice the indents in the exhaust flanges that are there to clear the tow lugs below). I should add, for others with this Mato, that the rear hull plate and hull itself are made of much better/stronger alloy:
After doing my best modelling sculpting effort on the exhaust a combination of crumbly metal bits and Milliput silver resulted in this (the Milliput is stronger that the metal bits

);
I then refit the rear hull plate to the hull and set about chaging all the screws for brass nuts and bolts (M2.0 on sides which is oversize you will see but these are load-bearing so I thought it better to use stronger fixings here. The rear are M1.6 and M1.4 for the lower clamping bolts). I also added the tow hitch at this stage;
On the interior of the hull I now added two 6mm tubes running from the exhaust inlets to provide easy connection for Tarr smoker later;
- Rear Hull10.jpg (98.08 KiB) Viewed 3202 times
Next I had to modify the exhaust deflector and its mounting, which is part of the upper hull (to be tackled fully later) but needed to be done now to ensure a correct fit before moving on. I had grind the original fixing lugs off to re-position the pivot pins as, on the original, the placement meant the deflector drops down too far, obscuring the exhausts and stopping the door from opening properly. I also ground cutaways into the back upper edge of the deflector itself to ensure that, when it is down, the gases flow through efficiently - this is the only non-standard modification I have done but I have at present no schematic for the deflector design itself (but I'm guessing it will use some kind of baffle arrangement);
And here is the baffle in place (down) with everything in its place. I needs to take around a 1-1.5mm off the lower edge of the rear armour as it is a little ower than it should be but this I will do when I take on the upper hull itself;
This is the rear hull view with the exhaust deflector up. As can be seen it now clears the exhausts and the engine door, and I think looks a little more correct now;
- Rear Hull16.jpg (77.43 KiB) Viewed 3202 times
Lastly, returning to the comparison picture with the M4 template, as I call it, that we started with...just got to get some of that lovely olive drab on it now

So that's it for now. Next I will hopefully continue with completing the lower hull. I am still waiting of a TK24 upgrade from Clark so the electronics may have wait but there's plenty to do besides!

 Nothing but trouble until I reworked everything after tearing it down and drilling out the road wheels etc...
