Page 4 of 39
Re: PANTHER G ZU-FUSS
Posted: Fri Jan 16, 2015 12:10 pm
by jeff1101
Hi Herman,
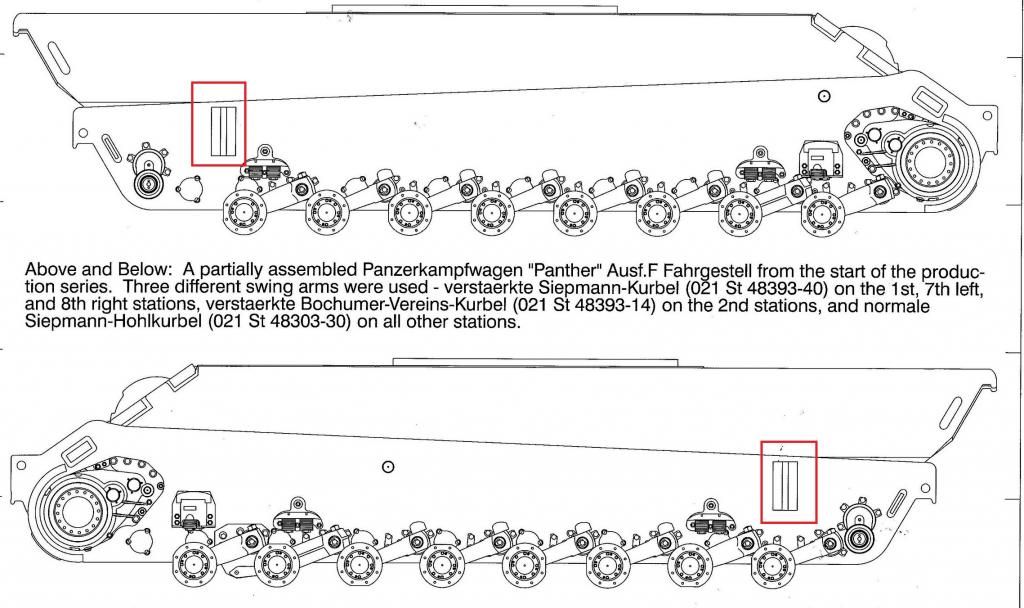
The track pin return plate is actually further back near the idler arms. See the diagram I highlighted in red from Panzer Tracts. Any track pin that would inadvertently slip out gets pushed back in by this raised plate when the track is fed coming from the idler wheels as the tank moves.
Heng Long did not include this little detail in their panther tank. Actually its also absent in the Tamiya Panther. You can also see here that the two forward bump stops (for the 1st and 2nd swing arms) are level with each other. As they should be.
You get to know these things when you research the panther for as long as I have.

regards
Jeffrey
Re: PANTHER G ZU-FUSS
Posted: Sat Jan 17, 2015 5:05 am
by HERMAN BIX
Ahh, so the pin striker was at the rear. The raised plate on the bump stop must just be a basic guide.
Righto, poped the bump stops off the hull, smoothed the area out & remounted even with the second axle bump stop.
Was better straight away

Dug out some un needed plastic PzIII return rollers, stuck them in the dril & used my drem-obi ! to take the excess diameter off down to the rim basically.I used the inner roller as the outer though it has a hub as such, would have looked odd with the screw in the middle of it.
Then dressed the OD with a file while rotating in the drill.
Pilot drilled a small hole (2mm) for a self tapping screw (a hull screw)in the corner of the final drive case as instructed.
Used a bigger drill to counhter bore the boss in the centre of the roller to sink the screw head in flush, added a drop of super glue to the hole in the final drive & made home the roller.
Was easy and seems very effective, although I have not run it in anger of course.
If the plastic reverse slack roller needs to be changed to metal at any point, I will get a couple of metal return rollers, leave the tyres off, & grind the tyre ridge off to get the same effect.
But for now, these will do the trick.
Re: PANTHER G ZU-FUSS
Posted: Sat Jan 17, 2015 1:11 pm
by HERMAN BIX
The other side !
Re: PANTHER G ZU-FUSS
Posted: Mon Jan 19, 2015 12:16 pm
by HERMAN BIX
A little more progress tonight.
Used a couple of brass nails from a picture hanging kit to make the mantlet lifting trunnions.
Pilot drilled 1.5mm hole into the side of the mantlet - inline with the [profile on the inner mantlet, just above the top line of the thicknessing ring that goes around the barrel when viewed from the side.
The picture hanging kits are 6 bucks a set !! so I will not have any issue with plenty of these if/when I need them, and they have perfect Tiger 1 track pulling cables in them as well
Re: PANTHER G ZU-FUSS
Posted: Mon Jan 19, 2015 12:36 pm
by HERMAN BIX
I must put in a big thanks to Mr Dietrich for painstakingly sending me info on the 'G' .
Took many an email & the info is pin point accurate.
If/when I use any of it in here I will ensure credit where its due and I will reference authors where necessary.
Again, big shout out Mr D,
much appreciated.
Re: PANTHER G ZU-FUSS
Posted: Wed Jan 21, 2015 10:17 am
by HERMAN BIX
Got my weld on !
Used my brulee burner to heat the screwdriver in the wine cork & got on with the turret welds.
The anti aircraft armour will cover much roof detail, but I can now hit it with red primer & then do the double armour plates when I want to.
I will make a cardboard template of the armour so I can get them the same on the rough out. Will dress them clamped together to ensure uniformity. The trusty dress making pins will no doubt be the 'bolts' again.
Hopefully my wheels & suspension arms will arrive tomorrow so I can get things back in order.
Re: PANTHER G ZU-FUSS
Posted: Wed Jan 21, 2015 12:18 pm
by HERMAN BIX
Coated the turret armour & cupola with superglue & rubbed it in using an old credit card & my finger to get that textured effect.
Because I like the smell of primer, I gave it a light coat & hit it with a hair dryer.
Having it primed also highlights any imperfections in the plastic & just feels like progress !
Re: PANTHER G ZU-FUSS
Posted: Thu Jan 22, 2015 5:39 am
by hotte8487
You've made fine weld lines Herman and also the flame cuts at the armor plates are super detailed.

But what I don't like is the big fat LED in the front plate of the turret - with the rain cover she looks like an dolls eye.

Re: PANTHER G ZU-FUSS
Posted: Thu Jan 22, 2015 7:18 am
by jeff1101
The welds are great. Should have thought about your technique when I did my Panther. Yours look way easier to do and better looking.
However, I know its too late but a minor detail. The Commandder cupola on all Panthers were bolted to the turret roof, not welded in place, same as in the Tiger II. Although I have seen some period photos of King Tigers that have cupolas that were welded to the turret roof so you never know.
Photo from http://worldwartwozone.com

Re: PANTHER G ZU-FUSS
Posted: Thu Jan 22, 2015 10:25 am
by HERMAN BIX
The drawings I have do show the cupola as bolted, but to be honest it just looked out of place not welded !
Ive seen the welded cupolas on the KT's too.(assume knocked off by a strike & welded on once safe to do so ?)
I know the belly plate penetrations on the late G were capped over the the hole rather than recessed flush & the bolt holes for the fasteners were to be flame cut(which is pretty rough) so with this being a late G and entering the november '45 production with the rockets etc, welded it is...........................or I will fester on my decision overnight & change my mind

My Tiger 1 late steel wheels arrived today along with the KT suspension arms I need to mount them, so I can get back to the normal routine I follow-ground up.