Hi Painless Wolf,
the price is always a matter how you calculate it. My clients have mostly want to improve their tanks in many, many technical bits and then eventually have noticed that it never is what they want and my work if the cost is even cheaper then most likely together.
Then there are my most loyal customers.
regards Edwin
Three Tigers
-
Edwin
- Corporal
- Posts: 394
- Joined: Tue Jun 11, 2013 8:34 pm
- Location: Rheinland Pfalz Germany
- Contact:
Re: Three Tigers
APAMOTEC Model technology in detail
-
PainlessWolf

- Colonel
- Posts: 7969
- Joined: Sun Feb 26, 2012 9:09 pm
- Location: Southern Colorado Rocky Mountains
Re: Three Tigers
Good Afternoon Edwin.
Then perhaps one day, we will do business. *bows*
regards,
Painless Wolf
Then perhaps one day, we will do business. *bows*
regards,
Painless Wolf
...Money!? What's that!?...
-
Edwin
- Corporal
- Posts: 394
- Joined: Tue Jun 11, 2013 8:34 pm
- Location: Rheinland Pfalz Germany
- Contact:
Re: Three Tigers
And here it goes a little further, one thing I have going on here but back then it really about ....
Nevertheless, I have done with the tower on.
First, the servos tested and placed in the center position. I'm using since only servos with metal gears. Since then, I no longer broke.

On the aluminum bracket I have glued a 2mm poly-edition.

The connecting rod between the gun barrel and the servo do I make a 1.5 mm aluminum rest.

And so I can stick the servo on the connecting rod bearing and mount.

So like I'm doing it with the servo for pipe Elivation.
Now you just need the button for the flash shot, but another time
Nevertheless, I have done with the tower on.
First, the servos tested and placed in the center position. I'm using since only servos with metal gears. Since then, I no longer broke.
On the aluminum bracket I have glued a 2mm poly-edition.
The connecting rod between the gun barrel and the servo do I make a 1.5 mm aluminum rest.
And so I can stick the servo on the connecting rod bearing and mount.
So like I'm doing it with the servo for pipe Elivation.
Now you just need the button for the flash shot, but another time
APAMOTEC Model technology in detail
Re: Three Tigers
Incredible work so far 
Are you concerned about losing any hardness from the gears by heating them to solder them ?
Adrian.
Are you concerned about losing any hardness from the gears by heating them to solder them ?
Adrian.
-
Edwin
- Corporal
- Posts: 394
- Joined: Tue Jun 11, 2013 8:34 pm
- Location: Rheinland Pfalz Germany
- Contact:
Re: Three Tigers
Hi Adrian,
Cool I, the gears immediately after brazing fast they are harder than before.
As yet, none of my homemade gear broke down due to wear. The only damage the gear I had until now was caused by a defective ball bearings. This has burst and the small balls have forced between the teeth, destroying the gears. It drive gear this design already more than two years without fail and are used very often. The drives and chains are usually already replaced because of wear, but the gears are the first.
regards Edwin
APAMOTEC Model technology in detail
-
Dietrich

- Staff Sergeant
- Posts: 973
- Joined: Thu Aug 13, 2009 10:29 am
- Location: England and Aquitaine,France
Re: Three Tigers
Stunning Work there Edwin...
An absolute pleasure to see the skill that you display in making these Panzer hulls and the running gear. Please keep up the good work
Alb.
An absolute pleasure to see the skill that you display in making these Panzer hulls and the running gear. Please keep up the good work
Alb.
Never Forget......
The Propaganda of the Victors....... becomes the History of the Vanquished
The Propaganda of the Victors....... becomes the History of the Vanquished
Re: Three Tigers
Awesome work. Excellent engineering skills. Wunderbar!
-
Edwin
- Corporal
- Posts: 394
- Joined: Tue Jun 11, 2013 8:34 pm
- Location: Rheinland Pfalz Germany
- Contact:
Re: Three Tigers
And here it goes again after further between times I had to do something else.
The switch, which is the cause of the excess flash I have the arm still extended by I glued a thin strip of brass.

And so the button is released and remains pressed in the final position of the servo. Only then the flash fires only once.


And so it now looks in the tower now.

Thus wer was now first again screwed and set aside.
Now I do first and the second well done.
The first step was again the gear align exactly in the trough and screw with the housings of the countershaft.

And when I had perfect everything .... ... I could build it all back and disassemble the transmission. In an engine is a very small metal chip had smuggled and since I risked no damage to the winding by I ignore him ......
So the whole thing up again.
When everything was back where I was able to install the PTO to the back gears and always sure it runs smoothly.

And next time it goes with the back gears on again....
The switch, which is the cause of the excess flash I have the arm still extended by I glued a thin strip of brass.
And so the button is released and remains pressed in the final position of the servo. Only then the flash fires only once.
And so it now looks in the tower now.
Thus wer was now first again screwed and set aside.
Now I do first and the second well done.
The first step was again the gear align exactly in the trough and screw with the housings of the countershaft.
And when I had perfect everything ....
So the whole thing up again.
When everything was back where I was able to install the PTO to the back gears and always sure it runs smoothly.
And next time it goes with the back gears on again....
APAMOTEC Model technology in detail
-
Edwin
- Corporal
- Posts: 394
- Joined: Tue Jun 11, 2013 8:34 pm
- Location: Rheinland Pfalz Germany
- Contact:
Re: Three Tigers
Today I have to solder the large gears with the hard drive axles first.
For this I draw to the first position of the gears on the axles and imagine a Caliper firmly so that I can later adjust the exact position during soldering.

Between these two lines I sharpen the axes in such a way that the grooves run along the axis and thus also results in a set of teeth to the rotation direction. That's what I do with my favorite tool, a small belt sander.


So that the brazing area also connects the gears to the axles I file into the bore of multiple channels into which the solder can be spread by capillary action with a file.

Then brush the parts at the contact points with flux, solder and stuck together.


After quenching in water I edit the workpieces to the lathe and plasters them. The teeth I work with a stainless steel brush with the buildup I remove the coverings and fluxes.


The last step is again a small heat treatment, notably, the axes are not sensitive to shock. So I give the parts again for one hour at 230 ° C in the oven.


The axes are then ready for installation. But before I fit more to the drive wheels.
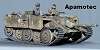
But still not right with the chain.

With late drive to set the track is easiest. One only has an aluminum bar stuck in the middle of the rollers.
Since the drive wheels must still 3.8 mm closer to the tub I edit it again on my big lathe.


And it must look like then.


Tomorrow I'm doing the countershaft to then.
For this I draw to the first position of the gears on the axles and imagine a Caliper firmly so that I can later adjust the exact position during soldering.
Between these two lines I sharpen the axes in such a way that the grooves run along the axis and thus also results in a set of teeth to the rotation direction. That's what I do with my favorite tool, a small belt sander.
So that the brazing area also connects the gears to the axles I file into the bore of multiple channels into which the solder can be spread by capillary action with a file.
Then brush the parts at the contact points with flux, solder and stuck together.
After quenching in water I edit the workpieces to the lathe and plasters them. The teeth I work with a stainless steel brush with the buildup I remove the coverings and fluxes.
The last step is again a small heat treatment, notably, the axes are not sensitive to shock. So I give the parts again for one hour at 230 ° C in the oven.
The axes are then ready for installation. But before I fit more to the drive wheels.
But still not right with the chain.
With late drive to set the track is easiest. One only has an aluminum bar stuck in the middle of the rollers.
Since the drive wheels must still 3.8 mm closer to the tub I edit it again on my big lathe.
And it must look like then.
Tomorrow I'm doing the countershaft to then.
APAMOTEC Model technology in detail
-
Edwin
- Corporal
- Posts: 394
- Joined: Tue Jun 11, 2013 8:34 pm
- Location: Rheinland Pfalz Germany
- Contact:
Re: Three Tigers
And on it goes.
Today was the assembly of the countershaft to the series.
For this purpose, I first filled the housing with graphite grease, the drive axle is pushed to the gear, which then leveled supernatant fat to the middle and cleaned the edge.


The next step was to cut the 13 pieces M1, 2 screws with whom I have the lid screwed. Of course, the sealant was not to forget.


After the countershaft is now closed I had to adjust the drive. Here's a little editing using a file or belt sander was necessary.


So then the drive has less than 1mm clearance to the countershaft.

The assembly of the chains was then just a formality.

After the drive is now so far advanced I had to for a test drive or the controller soldering and programming.

And then came the big eye look again. If everything goes the way I imagine it, or I have to optimize something, or even change.

Today was the assembly of the countershaft to the series.
For this purpose, I first filled the housing with graphite grease, the drive axle is pushed to the gear, which then leveled supernatant fat to the middle and cleaned the edge.
The next step was to cut the 13 pieces M1, 2 screws with whom I have the lid screwed. Of course, the sealant was not to forget.
After the countershaft is now closed I had to adjust the drive. Here's a little editing using a file or belt sander was necessary.
So then the drive has less than 1mm clearance to the countershaft.
The assembly of the chains was then just a formality.
After the drive is now so far advanced I had to for a test drive or the controller soldering and programming.
And then came the big eye look again. If everything goes the way I imagine it, or I have to optimize something, or even change.
APAMOTEC Model technology in detail
